
Plumbing After a Bathroom or Kitchen Renovation: What to Check Before and After the Tiles Go On
Once new tiles are down, the pipes, waterproofing and floor slopes underneath are hidden for years. This guide shows which checks to insist on at each stage of a bathroom or kitchen renovation, and what to collect before the final payment.
The checks that matter most happen before anything is covered: a pressure test on the new supply pipes, dated photos and measurements of every concealed pipe, and a flood test of the waterproofing membrane once it has cured.[1][5]
After tiling, check that water runs to the floor trap without leaving puddles, that every trap holds water, that valves can still be reached, and that sealant is left to cure before the first shower.[7][8]
Keep the records (test results, photos, product names and warranties) with your flat's papers, and do not pay the final instalment until the list of defects has been cleared.[9]
Some steps carry risk — follow the warnings, and call a tradesperson if in doubt.
A renovation is the one moment when the plumbing inside your walls and floor is open to view. In an apartment block it also affects others: your bathroom floor sits above a neighbour's ceiling, and your floor trap drains into a pipe the whole building shares. This guide follows the job in order and says what to ask for at each stage. It is written for the owner or committee member who hires the contractor.
Why the order of the checks matters
Each layer of a wet room hides the one below it. Pipes sit in chases (grooves cut into the wall) and in the screed (the sand-cement bed on the slab); the screed is covered by a waterproofing membrane, and the membrane by adhesive and tiles. BRANZ, New Zealand's building research body, reports many wet-area failures in which water escaped into other parts of the building, and lists missing membranes, too little curing time and poor application among the causes.[4]
So the rule is simple: test and record each layer before the next one goes on. The diagram shows the usual sequence; the steps inside the dashed outline cannot be checked properly once the tiles are laid.
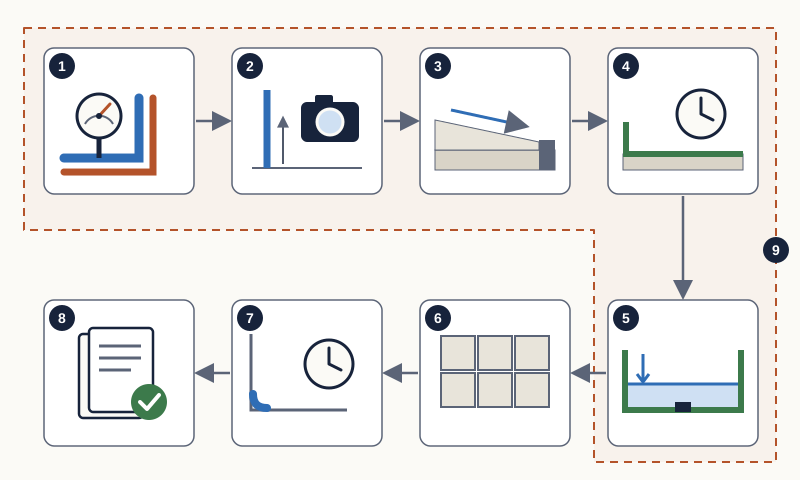
- New supply pipes installed and pressure tested
- Pipes photographed with measurements before the chases are filled
- Screed laid with a fall towards the floor trap
- Waterproofing membrane applied and left to cure fully
- Flood test of the membrane with the drain plugged
- Tiles laid and grouted
- Sealant in the joints, with its cure time before use
- Final walk-through and handover documents
- Stages that must be checked and recorded before the next layer covers them
Tools and paperwork you will need
You do not need plumbing tools to supervise a renovation, but a few things make the checks easier:
- A phone camera, and a tape measure to hold in the photos.
- A notebook or a shared folder for each stage's photos, test results and receipts.
- A bucket or jug for water tests on the finished floor, and a torch.
- Masking tape and a marker to label hot and cold pipes before the walls are closed.
Pressure test the new pipes before they are covered
A pressure test fills the new supply pipes with water, raises the pressure above what they normally carry, and checks whether it holds, finding weak joints while they can still be reached. UK water rules, used here because they are well documented, require all new water systems to be tested hydraulically before use, at no less than 1.5 times the highest pressure the system is designed for.[1][2] We found no published Bangladeshi procedure for flat renovations, so ask your plumber which method and pressure they will use, and whether it follows the pipe maker's instructions.
The method depends on the pipe. For all-metal systems, Northumbrian Water's guidance is to pump to the test pressure, isolate the system and leave it for an hour with no fall in pressure.[1] Plastic pipes swell slightly under pressure, so systems containing plastic need longer, staged procedures, and United Utilities warns that a one-hour hold at fixed pressure is not an acceptable test for polyethylene pipe.[1][2] See repairing or replacing a water pipe for testing basics and choosing pipe materials for pipe types.
Ask to be present, or at least to get the result in writing. UK test certificates record the tester, the pipe material, size and length, the test pressure, start and end times and the procedure, and are signed and witnessed.[2] A handwritten record of the same facts beats any verbal assurance.
Photograph and measure every concealed pipe
After the pipes pass their test and before the chases are filled, photograph every run. A photo with a tape measure in the frame tells a future plumber, buyer or tenant where it is safe to drill, and saves breaking good tiles to find a leak. Water Regs UK, which advises on the UK water fittings rules, notes that joints on concealed pipework are likely to lose their integrity over time, so hidden joints should be kept to the unavoidable minimum.[3] Your photos should show where they are.
- Label the pipes with tape: hot, cold and, where useful, the fixture each one feeds.
- Take a wide photo of each wall and floor showing the whole route, then close-ups of every bend, tee and joint.
- Hold the tape measure against the pipe and take readings from fixed points: the finished floor level and the nearest corner or door frame.
- Note the pipe material, size and brand, and photograph any printed marking on the pipe.
- Draw a simple sketch of each wall with the measurements: your as-built drawing, a record of what was actually installed rather than what was planned. Keep copies in two places.
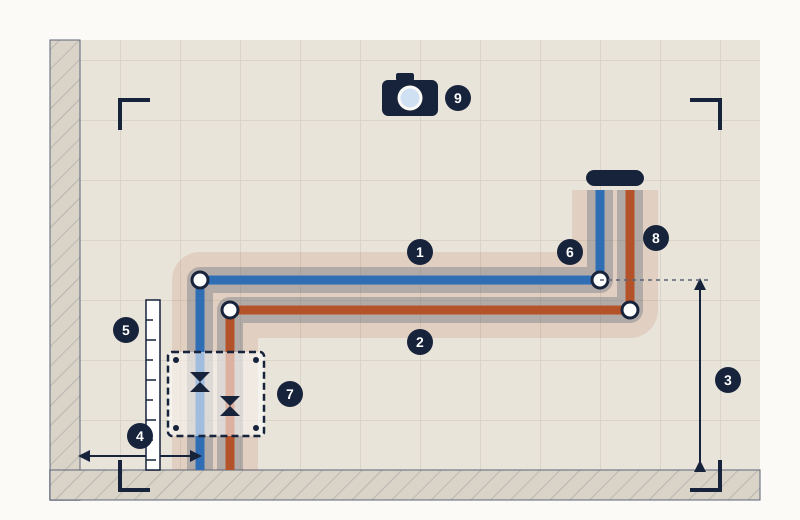
- Cold water pipe route
- Hot water pipe route
- Height of the horizontal run above the finished floor
- Distance of the vertical run from the corner
- Tape measure held beside the pipe in the photo
- Joints at the bends: the fewer hidden joints, the better
- Isolation valves behind a removable access panel
- Zone around the pipes where drills and nails must be avoided
- Wide photo framing the whole wall
Floor falls and traps
Falls to the floor trap
A wet floor needs a fall (a gentle slope) so every drop runs to the floor trap. BRANZ advises forming the falls in the screed under the membrane, not in the tile bed, so that water soaking through the grout also drains away.[4] One membrane maker's installation sheet likewise requires tiles laid with an adequate fall to the floor waste.[6] We found no published gradient for Bangladesh, so judge the result by testing it.
After tiling, pour a bucket of water slowly from the far corners and the shower area. It should run steadily to the trap and leave no puddles. Check along the walls, at the doorway and round the trap grating, which should sit slightly below the surrounding tiles, not proud of them.
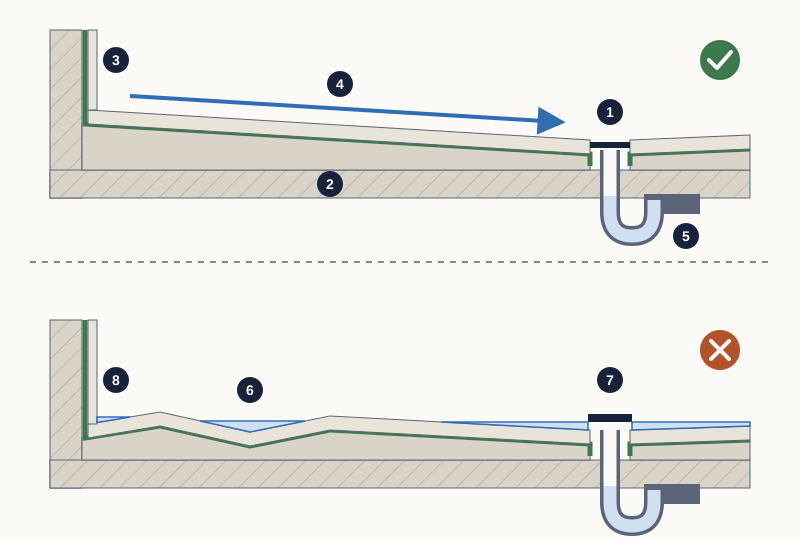
- Trap grating set slightly below the surrounding tiles
- Continuous fall formed in the screed beneath the membrane
- Membrane turned up the wall and dressed down into the trap
- Water from a bucket runs straight to the trap
- Water seal held in the U-bend of the trap
- A dip in the floor holds a puddle
- Trap set too high: water stands around it
- Back-fall towards the wall: water collects at its base
Traps and their water seal
Every basin, sink, shower floor and WC outlet needs a trap that holds water to keep drain air out. England's drainage guidance, Approved Document H, gives minimum seal depths, for example 75 mm for a washbasin and 50 mm for a shower, says traps should be removable or have a cleaning eye, and expects pipes to be reasonably accessible for repair.[7] Check that each new trap is fitted, full of water and sealed where it meets the floor or wall, and that basin and sink traps can be undone for cleaning. If a smell appears in the first weeks, see how to find and fix drain odours.
Waterproofing and the flood test
The membrane is the layer that keeps water off the slab; tiles with cement grout are not watertight on their own.[4] BRANZ recommends a specialist applicator, following the manufacturer's instructions exactly so the product warranty applies, and enough curing time before tiling.[4] Ardex, a membrane manufacturer, gives minimum cure times at 23°C and 50% relative humidity and says cooler or more humid conditions make them longer,[5] so in Dhaka's humid months expect to wait beyond the label minimum.
A flood test proves the membrane before it is buried. Ardex's published procedure for shower floors, in outline:[5]
- Inspect the cured membrane for pinholes, voids and thin spots; repair them first.
- Plug every drain, and fill around the plug first to test the drain joint.
- Flood the floor with clean water 25–100 mm deep at the lowest point.
- Leave it for at least 24 hours, but no longer than 72.
- Check below before the test and at intervals; Ardex suggests every four hours.
- If anything leaks, drain at once, repair, let the repair cure and test again.
- If it passes, drain and dry the floor, then wait at least 24 hours before tiling.
In a flat, step 5 means checking your downstairs neighbour's ceiling, so arrange access in advance, and build a small temporary dam at the doorway. Once tiles are down, standing water no longer tests the membrane on its own; the bucket test, with a neighbour watching the ceiling below while the shower runs, is the sensible final check.
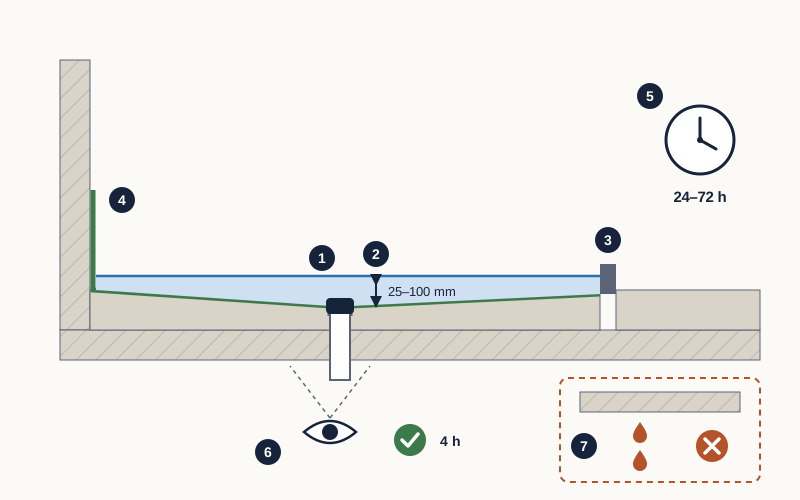
- Drain plugged; the area around the plug is tested first
- Water depth at the lowest point
- Temporary dam at the doorway keeps the water in
- Membrane turned up the wall above the water line
- Test duration: at least 24 hours, no more than 72
- Ceiling below checked before the test and about every four hours
- Any drip means a fail: drain, repair, re-cure and test again
Access to valves, joints and traps
Anything that will need operating or servicing must stay reachable after the tiles are on. Water Regs UK says valves that control flow, and other fittings that need maintenance, must have provision for access.[3] In practice, check that:
- The valve that shuts off the bathroom or kitchen can be reached without tools, and you know which way it closes.
- Isolation valves under basins and behind WCs are not tiled over or boxed in without a removable panel.
- Concealed cisterns and shower mixers have the access panel or cover plate the manufacturer intends.
- Basin, sink and floor trap covers lift out for cleaning.
- Every valve opens and closes fully, with no drip when shut.
- Rodding points (screw caps for clearing blockages) on waste pipes are not covered.
Sealant joints and curing times
Where walls meet the floor, and round basins, trays and worktops, joints should be filled with flexible sealant, not grout; one manufacturer's wet-area system specifies silicone there in place of grout.[6] Cure times depend on the product. Selleys describes one bathroom silicone as shower-ready after an hour but fully cured only after at least 48 hours, while that wet-area membrane system needs 7 days before the shower is used.[8][6] Ask the contractor which wait is longest and keep the bathroom out of use until it has passed.
Protect your neighbours and the shared pipes
In many Dhaka apartment buildings each bathroom drain joins a vertical stack that serves every floor, and supply pipes branch off a shared riser fed by the rooftop tank. Damage to either affects other flats, so tell the building committee or caretaker before work starts, and check these points before you pay:
- No cement slurry, adhesive, grout or rubble went down floor traps or WCs, where it can set and block the shared stack; if drains run slowly, see how to identify and clear blocked drains.
- The joint between your new branch and the shared stack or riser was remade properly and does not weep.
- No one cut into the slab, beams or columns to run pipes; see which wall cracks need a professional.
- Where different metals meet, they are separated by non-metallic material, and any earth bonding on old metal pipes was kept continuous.[7]
- The ceiling of the flat below was photographed before and after the work, ideally together with your neighbour.
Step by step: the final walk-through before you pay
New Zealand's Registered Master Builders advise walking through finished work with the builder, checking services such as plumbing, and agreeing a plan to fix snag items (small defects or unfinished work).[9] For a bathroom or kitchen:
- Open every tap, hot and cold, and check the flow and that hot and cold are the right way round.
- Run each basin, sink and shower for a few minutes and look under every trap and waste with a torch.
- Flush each WC several times and check that the cistern refills and then goes quiet.
- Do the bucket test on each wet floor and look for puddles.
- Check grout and sealant lines for gaps, and confirm the sealant cure time has passed before first use.
- Ask the neighbour below to check their ceiling after the first few days of normal use.
- Write every defect on a dated snag list, signed by you and the contractor.
Handover documents to collect and keep
Registered Master Builders list documents a homeowner may receive at completion, such as product warranties, manuals and a maintenance schedule, and advise keeping them in a file with digital backups because buyers and lawyers may ask for them.[9] Keep yours with your other flat papers; our page on taking the keys, the deed and mutation explains why a defect recorded in writing at handover carries more weight than one raised months later.
- Signed pressure test record for the new supply pipes: method, pressure, duration, result, who tested and who witnessed.[2]
- Flood test record: date, water depth, duration, and confirmation that the area below stayed dry.[5]
- Photos and measured sketches of every concealed pipe, labelled hot and cold.
- Product names of the membrane, adhesive, grout, sealant and pipes, with their data sheets.
- Written warranties for labour, materials and fittings.
- Spare tiles from the same batch, and where they are stored.
- The signed snag list, with the date each item was cleared.
Warning signs after you move back in, and when to call the contractor
Some faults only show once the room is in daily use. The table matches common early symptoms with their likely causes.
| What you notice | Likely cause | What to do |
|---|---|---|
| Puddles stay on the floor after a shower | Too little fall, or a dip in the floor | Add it to the snag list; correcting falls means relaying tiles |
| Damp patch on the ceiling below within weeks | Membrane, floor trap joint or pipe joint leaking | Stop using that fixture, tell the contractor and the neighbour, and ask for the test records |
| Drain smell from the floor trap | Trap missing its water seal, or not sealed into the floor | Pour water in; if the smell returns, call the plumber back |
| Several fixtures drain slowly | Construction debris in a trap or branch pipe | Have the contractor clear it before it reaches the shared stack |
| Damp or loose tiles along a wall with pipes in it | Leaking concealed joint | Use your pipe photos to locate it and call the plumber |
Call the contractor back in writing while the warranty is running. If you need to trace a leak yourself, our bathroom leaks guide sets out the tests in order.
Common mistakes to avoid
- Letting the tiler start before the pressure test and flood test results are written down.
- Tiling onto a membrane that has not cured; BRANZ notes that acrylic membranes can re-emulsify (turn soft again) if tiled too soon.[4]
- Watering down a liquid membrane on site, which leaves it too thin to do its job.[4]
- Building the floor fall only in the tile adhesive, over a flat membrane.
- Boxing in a valve or concealed cistern without an access panel.
- Paying the final instalment before the snag list is cleared.
What drives the cost of doing it properly
We could not find reliable published prices for renovation plumbing in Bangladesh, so this guide gives none. The checks themselves cost mainly time; what they prevent is far dearer: breaking new tiles to reach a leak, relaying a floor with the wrong fall, and repairing the ceiling below. The main cost factors are:
- Time: membrane curing, the flood test and sealant curing add days, more in humid weather.[5]
- Materials: a named membrane system and branded pipe cost more than unbranded alternatives.
- Labour: a specialist waterproofing applicator, as BRANZ recommends.[4]
- Access: access panels and reachable valves need planning more than money.
- Rework: anything found after tiling means breaking and replacing finishes.
Ask for written quotes that name the membrane, the pipe brand and the tests included, and compare like with like; see how to get and compare repair quotes.
Next steps
- Before work starts: agree the scope in writing, including the pressure and flood tests, and tell the committee and the neighbour below.
- Before the chases are closed: witness the pressure test and photograph every pipe with a tape measure in view.
- Before tiling: see the cured membrane flood-tested and the ceiling below checked.
- After tiling: do the bucket test, check traps and valves, and respect the sealant cure time.
- Before the last payment: complete the walk-through and get the snag list signed.
- Afterwards: file the records and add the room to your routine with the plumbing inspection checklist and floor tile and grout care.
Common questions
- Do I need a pressure test if only a few pipes were replaced?
- Yes, if any new joint will be hidden in a wall or floor. UK rules apply testing to all new water systems, not only large ones.[1] Testing the new section before it is covered costs far less than breaking tiles later.
- How long should I wait before using a renovated bathroom?
- Until the longest cure time among the products used has passed. That may be the sealant or the membrane system; one manufacturer's wet-area system needs 7 days before use.[6] Ask the contractor for the data sheets and plan around the slowest product.
- Can a flood test be done after the tiles are laid?
- Ardex recommends flood testing critical waterproofing before tiles go on, so a leak can be fixed without lifting them.[5] After tiling, standing water mainly soaks the grout, which is not the waterproof layer, so use the bucket test and check the ceiling below instead.
- What if the contractor says photos and test records are unnecessary?
- Make them part of the written scope before work starts. The photos take minutes, and a written test record is what you can show a buyer, a future plumber or a neighbour if a leak appears.
- Who deals with a leak into the flat below after my renovation?
- Usually the owner who commissioned the work deals with the neighbour first, then takes it up with the contractor under the warranty; check your contract. Test records, dated photos and the signed snag list make this much easier. If a shared stack or riser is involved, bring in the building committee.
Sources
The facts in this guide were checked against these sources.
- Guidance Note 3: Pressure testing of new water service pipework (Water Supply (Water Fittings) Regulations 1999) — Northumbrian Water (published 2026-02-03). accessed 18 October 2026.
- Hydrostatic Pressure Testing — United Utilities. accessed 18 October 2026.
- Can joints and water fittings be concealed? — Water Regs UK. accessed 18 October 2026.
- Builder's Mate Issue 38: Membranes for tiled floors — BRANZ (published October 2009). accessed 18 October 2026.
- Technical Bulletin TB266.001: Flood Testing of Ardex Waterproofing Membranes — Ardex Australia (Technical Services) (published 2020-05-27). accessed 18 October 2026.
- Wet Area Waterproofing System — Construction Chemicals Pty Ltd (Australia). accessed 18 October 2026.
- Approved Document H: Drainage and waste disposal (2015 edition) — UK Government (Building Regulations 2010, England) (published 2015). accessed 18 October 2026.
- How To Replace Old Silicone — Selleys. accessed 18 October 2026.
- Completing your building project — Registered Master Builders Association of New Zealand. accessed 18 October 2026.
This guide is general information. Have gas, structural and live electrical work done by a qualified, licensed professional. Your building’s rules and committee decisions take precedence over anything written here.
Written from the cited sources by the RUAP.NET editorial team. It has not been reviewed by a licensed engineer, plumber or electrician; for work on gas, structure or live electrics, use a qualified professional.
Spotted a mistake? Tell us — we check it, correct the guide and record the date of the correction. Report an error →
Related guides
Guides: Handover and registration