
Floor Tiles and Grout: Cleaning, Regrouting and Dealing with Cracked or Hollow Tiles
Dark or crumbling grout, a tile that sounds hollow underfoot, or water sitting in a corner of the bathroom: each is a sign that a tiled floor needs attention. This guide explains what the signs mean and what to do.
Most problems start in the grout. Cement grout is not self-cleaning or fully stain-resistant, so clean it with a pH-neutral cleaner and wipe spills quickly.[1] Grout is not the waterproof layer of a bathroom floor; the membrane underneath is.[6]
Cracked grout between firm tiles can be replaced by a careful owner. Tiles that sound hollow in patches, crack or lift into a ridge point to a bond or movement problem below, and usually need a tiler.[7][8] Raking out grout makes silica dust, so keep it damp and wear a proper mask.[9]
Most of this can be done yourself with ordinary tools.
Glazed ceramic and porcelain tiles are hard-wearing. What usually fails first is the grout, the flexible joints at the edges, or the bond underneath. A flat with four bathrooms, a kitchen and four verandas, as in the RUAP buildings, has a lot of floor that gets wet every day, so routine care pays off.
How a tiled floor is built
From the top down there is the tile, a bed of tile adhesive (or, in many older buildings, a sand–cement mortar bed), a screed that levels the floor, and the concrete slab. In wet areas a waterproofing membrane should sit on the screed, under the tiles. Grout fills the joints, locking the tiles together and keeping dirt out of their edges.
Grout is not waterproof: BRANZ, New Zealand's building research body, notes that tiles with cement or even epoxy grout are not impervious, which is why showers need a membrane.[6] Where the floor meets a wall or shower tray, flexible sealant such as silicone is used instead, because grout in an inside corner cannot flex and cracks.[8]
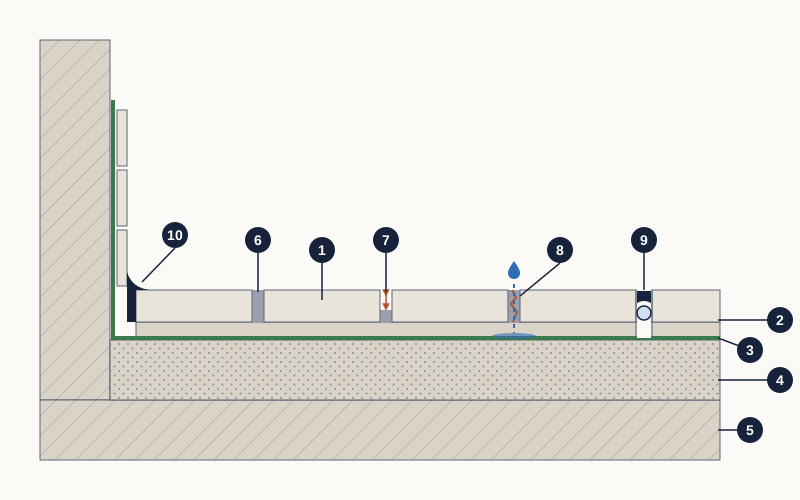
- Floor tile (glazed ceramic or porcelain)
- Bed of tile adhesive under the tile
- Waterproofing membrane on the screed, turned up the wall (in wet areas)
- Screed that levels the floor
- Concrete floor slab
- Grout joint filled to its full depth
- Old grout raked out, leaving about two-thirds of the tile depth open for new grout
- Cracked grout lets water through; the membrane, not the grout, stops it
- Movement joint: backer rod under flexible sealant, no grout
- Flexible silicone at the wall–floor junction instead of grout
Warning signs and their usual causes
Walk the floor with a torch held low so the light skims the surface. Look and listen for:
- Grout near the shower, basin or floor trap that stays dark long after the floor has dried.
- Grout that is cracked, sandy, crumbling or missing.
- A white powdery crust on grout lines (efflorescence); voids under tiles can trap the moisture behind it.[7]
- Tiles that sound dull or hollow when tapped, unlike their neighbours.[7]
- A crack through a tile, or one that runs in a straight line across several tiles.
- Tiles that rock, or a row lifted into a ridge, known as tenting.[8]
- Water that stands in a corner or by the door instead of reaching the floor trap.
Surface wear comes from grit, harsh cleaners and standing water. Loss of bond can come from a poorly prepared base, dirty tile backs, adhesive that had skinned over, or spot-bonding, where adhesive is dabbed only at the corners and centre.[7] Tenting appears when tiles have no room to expand.[8] A crack running straight across several tiles may follow a crack in the slab; read which cracks need a professional before filling it.
Tools and materials
- Soft broom or vacuum, mop, two buckets and microfibre cloths.
- A pH-neutral tile and grout cleaner, plus an alkaline degreaser for kitchens.[1]
- White nylon pads and a nylon grout brush; no abrasive pads or steel wool on polished or glazed tiles.[2]
- For regrouting: grout rake, rubber grout float, grout sponge, small trowel, bucket, and a wet-area grout.[6]
- Safety glasses, gloves, knee pads and an FFP3 disposable mask.[9]
- A hard-handled screwdriver for tap testing, masking tape and a marker.
Routine cleaning that keeps grout sound
- Sweep or vacuum before mopping; grit and sand scratch tiles, and a mat at the door helps.[3]
- Wipe spills straight away. They rarely stain the tile but can stain the grout.[3]
- Mop with a pH-neutral cleaner diluted as the label says. LATICRETE, a grout maker, recommends a neutral cleaner for everyday care and an alkaline one for greasy kitchen soiling.[1]
- For grey grout, scrub the joints gently with a nylon brush, then remove the dirty water before it dries back in, and rinse.[1]
- Dry bathroom floors after use; water left to dry leaves a mineral residue.[2]
- Test any stronger product on a hidden spot and let it dry first.[1]
For mould on grout and sealant, see how to prevent mould in bathrooms; EPA's basic advice is to scrub it off with detergent and water and dry the area completely.[10]
Should you seal cement grout?
A penetrating sealer soaks into cement grout and slows the uptake of water and stains. It is optional: LATICRETE offers sealers for those who want greater protection.[1] Epoxy grout needs no sealer,[4] and nor do some premixed grouts.[5]
- Seal only clean, fully dry grout, and wipe sealer off the tile face before it dries.
- To check it later, drip water on the grout: if it beads, the sealer works; if the grout darkens quickly, reseal.
- Sealing does not make a floor waterproof or stop a leak through cracked grout.[6]
Step by step: regrouting worn joints
Regrout when grout is cracked, crumbling or stained beyond cleaning but the tiles are firm. If tiles rock or sound hollow, deal with them first.
- Tap-test the area and mark hollow tiles. Cover the floor trap grating and open the window.
- Mist the joints, put on mask and glasses, and rake out the old grout by hand, keeping the blade centred so tile edges do not chip. Power tools are far dustier.[9]
- Clear about two-thirds of the tile's depth, as grout makers ask.[4]
- Vacuum, then wipe with a damp sponge. Joints must be free of dust and standing water.[4]
- Mix only what you can use within the working time on the pack.
- Press grout in with the float diagonally across the joints, in patches of about 2 m² or less, then draw the upright float diagonally to remove the excess.[5]
- Clean the tile face with a well-wrung sponge. Too much water can interfere with curing.[5]
- Keep off the floor for the curing time on the label: one premixed grout needs 7 days before a shower floor is used, one epoxy 24 hours before walking.[5][4] Then renew the silicone at the corners.[8]
Cracked, loose and hollow-sounding tiles
A well-bonded tile gives a sharp note when tapped; one with a gap beneath sounds dull.[7] Some floors sound hollow throughout and are fine; what matters is a difference between tiles or areas.[7]
- Tap each tile at its centre and corners, row by row.
- Mark tiles that sound different and photograph the pattern.
- Note which are also cracked or rocking, and whether they cluster by a wall, in a line or round the trap.
- Test again after a few months to see if the area grows.
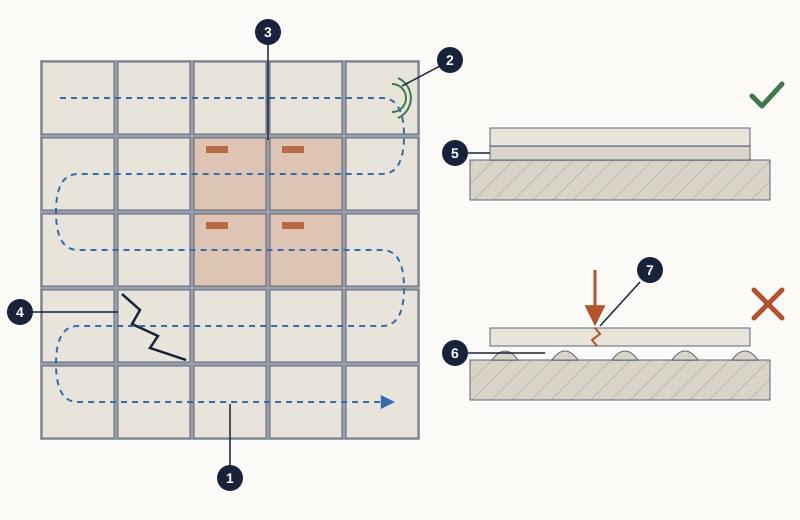
- Tap route: work along each row so no tile is missed
- Firmly bonded tile: a sharp, ringing note
- Group of hollow-sounding tiles, marked with tape
- Cracked tile, often sitting over a void
- Full adhesive bed: the tile is supported all over
- Spot-bonded tile: dabs of adhesive with empty voids between them
- A heavy point load over a void can crack the tile
Voids leave a tile unsupported, so it can crack under a heavy point load, and they hold moisture.[7] Data sheets cite industry practice of at least 80% adhesive contact under indoor floor tiles and 95% in wet areas.[4] One cracked tile on a sound floor can be cut out and replaced, but it is fiddly, so many owners use a tiler. In a bathroom, breaking out a tile can damage the membrane, which then has to be replaced like new work.[6] Keep spare tiles after any renovation.
Movement joints, tenting and lifting tiles
Tiles, adhesive, screed and slab expand by different amounts with heat and moisture. Tiled tight to the walls, the stress has nowhere to go and tiles pop up into a ridge; sunlight on verandas makes this more likely.[8] Good floors leave a gap at the edges, under the skirting, and movement joints across large areas, filled with a backer rod and flexible sealant, not grout.[8][4]
Do not just glue tented tiles back down; that is temporary. The lasting fix is to relay them with perimeter and movement joints, which is a tiler's job.[8]
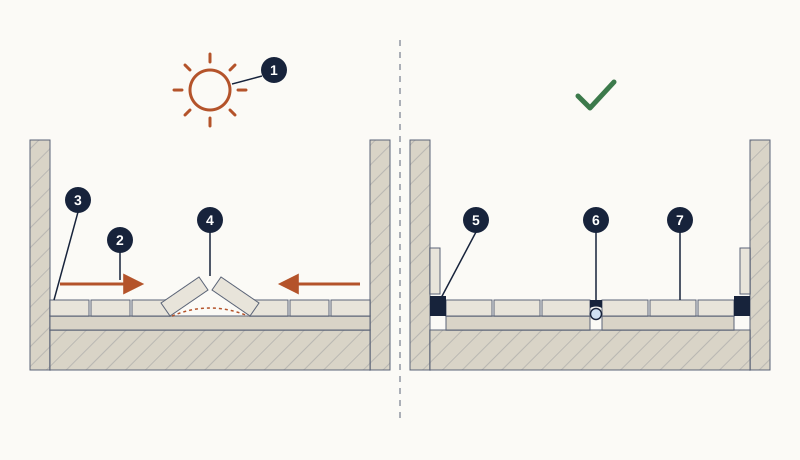
- Heat from sunlight (and moisture) makes the tiles and screed expand
- Expansion pushes along the tiled floor
- Tiles laid tight against the wall have no room to move
- The stress is released as tiles pop up into a ridge (tenting)
- Gap at the edge, hidden under the skirting and filled with flexible sealant
- Movement joint in the field: backer rod under flexible sealant
- Tiles stay flat because the floor can move
Bathroom floors: checking the fall to the floor trap
A bathroom floor should slope gently to the floor trap. In New Zealand, for example, a shower floor without an upstand or screen must fall at least 1:50, about 2 cm per metre.[6] We found no published Bangladeshi figure, so treat this as a guide, not a local rule.
- Clean the trap grating, then pour a bucket of water by the shower and another by the door.
- Watch whether it reaches the trap without stopping.
- After 10–15 minutes, mark any puddles with tape.
- Lay a straight edge across each to see whether it is a dip or a slope running the wrong way.
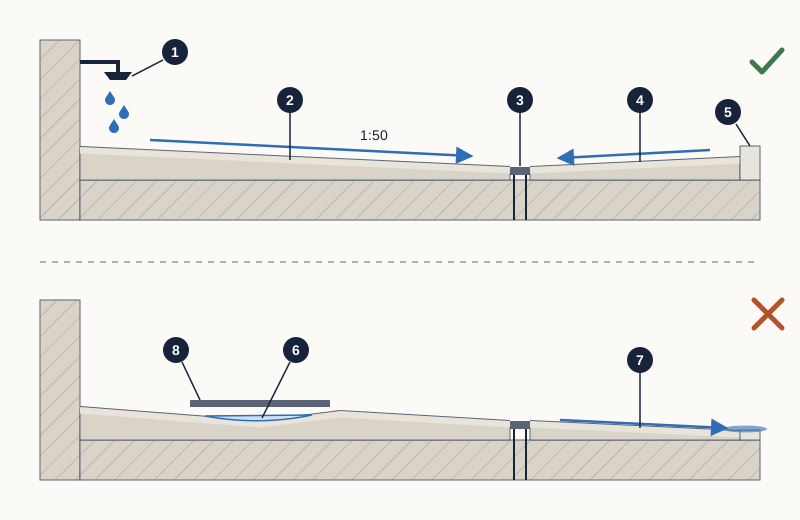
- Shower area, where most water lands
- Floor falls steadily towards the trap; the example ratio of 1:50 is about 2 cm per metre
- Floor trap set flush with the tiles around it
- The floor near the door also falls back towards the trap
- Raised threshold at the door keeps water in the bathroom
- Dip in the floor where water ponds on the grout
- Back-fall: water runs towards the door instead of the trap
- A straight edge laid across the floor reveals the dip
A small dip can be squeegeed after showers. A floor that sends water to the door can only be fixed by relaying it to new falls with new waterproofing; see checks after a renovation. A slow or smelly trap is a drainage problem: see blocked drains.
Epoxy or cement grout?
| Feature | Cement-based grout | Epoxy grout |
|---|---|---|
| Stains | Not stain-proof; needs routine cleaning[1] | Highly stain-resistant if spills are cleaned promptly[4] |
| Sealing | Optional[1] | Not needed[4] |
| Ease of use | Forgiving; suits careful DIY | Two-part mix; clean off excess before it sets[4] |
| Removal later | Rakes out by hand | Extremely hard once cured[4] |
| Waterproof? | No; relies on the membrane[6] | No; still relies on the membrane[6] |
Epoxy costs more and is harder to apply well, so use a tiler who knows the product. Neither grout replaces a waterproofing membrane.[5]
Common mistakes to avoid
- Cleaning grout routinely with acidic descalers or bleach.[1]
- Spreading new grout over old, loose or dirty grout.[4]
- Grouting wall–floor corners or the ring round the floor trap instead of using sealant.[8]
- Regrouting around hollow or rocking tiles.
- Gluing tented tiles down without a movement gap.[8]
- Sealing over mould or damp grout.[10]
- Grinding grout out with no dust control.[9]
Do it yourself, or call a tiler?
| Symptom | Likely cause | DIY? | Call a professional when |
|---|---|---|---|
| Grout grey or stained | Dirt in porous grout[1] | Yes | Deep cleaning fails |
| Grout cracked, tiles firm | Wear, harsh cleaners | Yes, with care | The area is large or the grout is epoxy |
| One or two hollow tiles | Local loss of bond[7] | Monitor | They crack, rock or spread |
| Many hollow tiles, or a ridge | Bond failure or no movement joints[8] | No | Always |
| Crack in a line across tiles | Possible slab or screed crack | No | Always; assess the crack first |
| Water ponds | Poor fall[6] | Manage only | Water heads for the door |
| Stain on the ceiling below | Water past grout or membrane[6] | No | Straight away |
If the ceiling below is affected, first follow how to find bathroom water leaks. Relaying the whole floor makes sense when many tiles are hollow, matching tiles are unobtainable, or new falls and waterproofing are needed anyway.
What drives the cost
We found no reliable published prices for tiling repairs in Bangladesh, so none are quoted. Cost depends on:
- Method: cleaning and sealing cost far less than regrouting, and regrouting far less than relaying.
- Grout: epoxy costs more and takes longer to apply.
- Matching tiles: a discontinued tile can turn a small repair into a full room.
- Waterproofing: relaying bathroom tiles usually means a new membrane, tested before tiling.
- Extras and warranty: chipped neighbours, skirting, the ceiling below, and what the tiler guarantees.
Get written quotes naming the products, the area and how dust will be controlled; see getting and comparing repair quotes.
A routine maintenance checklist
- After use: squeegee or wipe wet bathroom floors.
- Weekly: mop with a pH-neutral cleaner; degrease the kitchen floor.[1]
- Monthly: check grout and silicone near showers, basins and floor traps.
- Every few months: water-drop test sealed grout; reseal if needed.
- Twice a year: tap-test bathroom, kitchen and veranda floors.
- Before the monsoon: check veranda tiles and door thresholds.
Next steps
- Clean the floors with a neutral cleaner and note which grout stays dark.
- Tap-test each bathroom and the kitchen; mark and photograph hollow tiles.
- Pour a bucket of water in each bathroom to check the fall.
- Regrout firm areas yourself with dust control, or book a tiler.
- For tented, widely hollow or line-cracked tiles, get two written quotes.
- Record the tile and grout names and colours, and keep spare tiles.
Common questions
- How often should a bathroom floor be regrouted?
- There is no fixed interval. Regrout when grout cracks, crumbles or stays stained after a deep clean while the tiles are firm. Neutral cleaners and a sealer on cement grout help it last.[1]
- Can I put new grout over the old grout?
- Not as a lasting repair. Grout makers ask for about two-thirds of the tile depth to be clear for grouting;[4] a thin skim over old grout flakes away.
- Is vinegar safe for cleaning grout?
- Rarely, and only highly diluted.[3] A grout maker warns its grout must be kept from acids such as vinegar, especially when new.[5] A pH-neutral cleaner is the safer routine choice.[1]
- My tiles sound hollow but are not cracked. Should I worry?
- Not necessarily; the warning sign is a difference between neighbouring tiles or areas.[7] Mark them and retest in a few months, and call a tiler if they crack, rock or spread.
- Will sealing the grout stop a leak into the flat below?
- No. The membrane under the tiles is the waterproof layer, not the grout.[6] Trace the leak first with the bathroom leaks guide.
- Why did tiles in the middle of my floor suddenly lift?
- Usually tenting: the floor had no room to expand. A lasting repair means relaying the area with movement joints, not gluing the tiles down.[8]
Sources
The facts in this guide were checked against these sources.
- Care & Maintenance of LATICRETE Finish Materials (TDS-1113) — LATICRETE (Australia) (published August 2019 (TDS-1113-0819)). accessed 18 October 2026.
- Tile Protection and Maintenance (Protection and Maintenance of Porcelain Tiles) — RAK Ceramics (India). accessed 18 October 2026.
- Maintenance and cleaning of tiles — RAK Ceramics (India). accessed 18 October 2026.
- Kerapoxy: Premium, Epoxy Grout and Mortar (product data sheet) — MAPEI (via BuildSite) (published 18 March 2026). accessed 18 October 2026.
- READY-TO-USE Pre-Mixed Grout (DS-27-1026) — LATICRETE International. accessed 18 October 2026.
- Bulletin 591: Waterproofing tiled showers — BRANZ (New Zealand) (published June 2016). accessed 18 October 2026.
- Hollow-sounding tiles may signal installation problems — TileLetter (Donato Pompo, Ceramic Tile and Stone Consultants) (published 29 July 2013). accessed 18 October 2026.
- Movement joints in ceramic tile installations — TileLetter (Scott Carothers) (published 3 March 2025). accessed 18 October 2026.
- Construction dust (Construction Information Sheet No 36, Revision 3) — UK Health and Safety Executive (published Revised March 2020). accessed 18 October 2026.
- A Brief Guide to Mold, Moisture and Your Home — US Environmental Protection Agency (published Last updated 18 February 2026). accessed 18 October 2026.
This guide is general information. Have gas, structural and live electrical work done by a qualified, licensed professional. Your building’s rules and committee decisions take precedence over anything written here.
Written from the cited sources by the RUAP.NET editorial team. It has not been reviewed by a licensed engineer, plumber or electrician; for work on gas, structure or live electrics, use a qualified professional.
Spotted a mistake? Tell us — we check it, correct the guide and record the date of the correction. Report an error →