
Repair or Replace? Deciding What to Do About a Damaged Water Pipe
A single leak is easy to fix; a pipe that keeps leaking is not. This guide helps flat owners and building committees choose between a quick repair, a new section of pipe and a full re-pipe, and explains what to ask the plumber for.
Repair a pipe when the fault is local and the rest of it is sound: one leaking joint, a drill hole or a single pinhole in a fairly young pipe. Replace it when leaks keep returning, when corrosion extends beyond the leak, or when old galvanised iron (GI) pipe is rusting from inside and starving the taps of flow.
Clamps, tape and putty buy time; they are not the repair. Even a maker of stainless-steel repair clamps limits some uses to temporary service until the pipe is replaced.[3] Plan the permanent fix within days, not months.
Whatever you choose, insist that the new work is pressure-tested before the wall or floor is closed, and that you receive photos and a written record. Never cut metal pipework yourself: in some buildings it forms part of the electrical earthing.[6]
Some steps carry risk — follow the warnings, and call a tradesperson if in doubt.
Most flats have two kinds of supply pipe: the shared risers and branches that belong to the building, and the pipes inside the flat that run, often hidden in walls and floors, from an isolation valve to each tap, cistern and shower. When one of them leaks, the question is not only how to stop the water but how much pipe to change. Finding a hidden leak in the first place is covered in how to inspect water supply pipes for leakage.
Why water pipes fail: the main causes
Knowing why a pipe failed tells you whether the rest of it is likely to follow. A leak caused by a nail is a one-off; a leak caused by corrosion is a sample of what is happening along the whole length.
Corrosion from the inside
Corrosion is the slow wearing away of metal by a chemical reaction between the water and the pipe.[8] The US Geological Survey (USGS) lists water that is too acidic or too alkaline, high chloride, high dissolved solids and low alkalinity among the conditions that make water corrosive, and warns that corrosive water can eventually cause leaks in plumbing.[7] Corrosion is often patchy: it eats small pits into the inner wall, and one pit breaks through as a pinhole while the outside of the pipe still looks fine.
Galvanised iron that rusts and narrows
Many older buildings in Bangladesh were plumbed with GI pipe: steel coated with zinc. Once the zinc layer is used up, the steel rusts, and rust and scale build up inside the bore. The pipe narrows, flow at the taps drops, water may run brown after a period of disuse, and the wall thins until it leaks, often first at threaded joints, where cutting the thread has already removed metal. When GI fails in this way, the leak you can see is rarely the only weak point.
Joints, fittings and mixed metals
Joints are where most installation faults show: a threaded joint that was poorly sealed, a compression nut that was over-tightened, or a plastic joint that was badly heat-fused. Where two different metals are joined directly, the less resistant one can corrode at the joint. US building guidance, for example, asks installers to join dissimilar metal pipes through a short length of brass pipe or a brass valve, and to bond around any insulating fitting so the pipework stays electrically continuous.[6]
Damage, pressure and age
Pipes are also split by drills and nails during renovation, crushed when floors are re-laid, or stressed by pressure surges such as water hammer. The UK water company United Utilities notes that most domestic water fittings are designed for a maximum working pressure of 10 bar,[5] so a pump or pressure setting that exceeds what the pipes and fittings are rated for shortens their life.
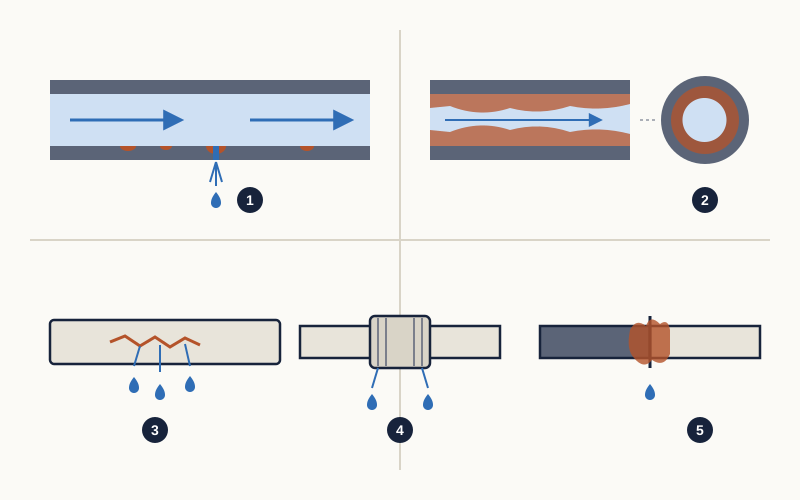
- Pinhole: one of several corrosion pits on the inner wall has broken through, while the outside still looks sound
- Rust and scale inside GI pipe narrow the bore and cut the flow (cross section on the right)
- Split along the pipe, for example from a drill, crushing or excess pressure
- Leaking joint: threaded, compression or a poorly fused plastic joint
- Two different metals joined directly, where the less resistant metal corrodes
Signs a pipe needs more than a patch
One leak on its own does not condemn a pipe. These signs suggest the problem is wider:
- A second or third leak on the same run within a year or two, especially some distance from the first.
- Rust-coloured water from the cold taps after the flat has stood empty, or brown flecks in aerators and at the bottom of cisterns (common with ageing GI).
- Flow that has fallen gradually at one tap or one bathroom while others are normal, once clogged aerators and part-closed valves have been ruled out (see low water pressure).
- Pipe that crumbles, flakes or shows deep pitting when the plumber cuts it open next to the leak.
- Green or white crust on several joints, or a bluish-green stain under taps.[7]
- Damp patches that keep coming back on the same wall, or on the ceiling of the flat below, after earlier repairs.
- Pipes of different ages and materials joined together, with no record of what runs where.
First response: stop the water and protect the flat
Before thinking about repair or replacement, limit the damage.
- If water is near sockets, switches, a geyser or the distribution board, switch off the electricity at the main breaker first and do not touch wet electrical fittings.[1]
- Close the nearest isolation valve. If there is none, or it does not stop the flow, close the flat's main stop valve; on most valves, turning clockwise closes it.[2]
- Open the taps fed by the leaking pipe to drain what is left in it and relieve the pressure.[1]
- Catch and mop up water with buckets and towels, and move furniture and belongings out of the way.[1]
- If the leak is on a riser, in a shaft or before your flat's valve, tell the caretaker or building committee at once so they can isolate it.
- Take dated photos of the leak and any damage, for the plumber, your neighbour and any insurance claim.[1]
- Dry wet walls, floors and furniture within 24–48 hours to prevent mould.[9]
Clamps, tape and putty: stopgaps, not repairs
A temporary fix is useful when no plumber can come the same day or the water must stay on for others. It only reduces the leak until a proper repair.
- A cloth wrapped tightly round the pipe, or tape over a small split, can slow a leak, but British Gas says this only works for a short while and the pipe should not carry water for long.[2]
- Self-amalgamating repair tape and epoxy putty sold for plumbing grip better, but only on a clean, dry pipe, and they are still stopgaps.
- A bolted repair clamp, a metal band with a rubber gasket, is the strongest stopgap. Hawle, which makes stainless-steel clamps for water mains, says installation is for qualified personnel, the hole must not exceed 40% of the pipe diameter, a split along the pipe may only be clamped temporarily until the pipe is replaced, and the repair must be pressure-tested afterwards.[3]
- Repair couplings that join two cut ends, correctly matched and fitted, are a proper repair, not a stopgap (see spot repair below).
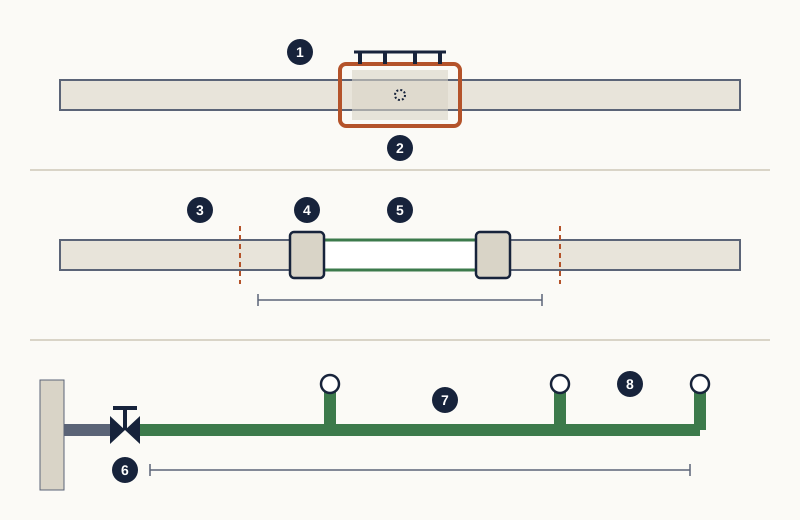
- Bolted repair clamp with rubber gasket, a stopgap
- The hole stays under the clamp; the pipe on either side is unchanged
- Cut back past any corrosion to clean, sound pipe
- A coupling at each end, matched to the pipe material and size
- New length of pipe
- Isolation valve at the start of the run
- Whole run replaced in new pipe from the valve
- Branches to each fixture: every joint is new
Repair, replace a section or re-pipe: how to decide
There are really three choices, and the right one depends on the cause, the age and material of the pipe, and how hard it is to reach. The table summarises typical situations.
| Situation | Usual choice | Why |
|---|---|---|
| One leaking joint on otherwise sound pipe | Remake or replace the joint | The fault is local; the pipe itself is not the problem |
| Accidental hole from a drill or nail | Cut out and replace a short section | The damage is mechanical, not a sign of wider wear |
| First pinhole in a fairly young metal pipe | Replace a section and have the plumber inspect the cut pipe | Check how far pitting has spread before deciding more |
| Second or third leak on the same run | Replace the whole run from its valve | Repeated failures point to corrosion along the run |
| Old GI with rusty water and falling flow | Plan to replace the GI runs, starting with the worst | Rust narrows the bore and thins the wall throughout |
| Pipe split by pressure or poor support | Replace the section and find the cause | Check pump pressure, water hammer and pipe clips first |
| Leak on a shared riser or before your valve | Report it to the building committee | Shared pipes usually belong to, and are repaired by, the building |
Spot repair
A spot repair cuts out the damaged piece back to clean, sound pipe and joins in a new length with two couplings. It suits a mechanical injury or one bad joint. Ask the plumber to show you the inside of the piece removed: smooth walls support a spot repair; deep pits or heavy rust do not.
Replacing one run
A run is the length of pipe from one isolation valve to the fixtures it feeds, such as the cold supply to one bathroom. Replacing the whole run from the valve means every joint on it is new and of one material, and it saves opening the same wall twice. After repeated leaks it is usually the sensible choice.
Re-piping a bathroom, kitchen or whole flat
A full re-pipe makes sense when several runs are failing, when GI is being replaced, or when a bathroom or kitchen is being re-tiled anyway, because the wall and floor finishes are already coming off. It is also a chance to put isolation valves where you can reach them. If you are renovating, read how to inspect plumbing after a flat renovation before the tiles go back.
Pipes the building owns
Risers, the pipes in shared shafts and the branches up to each flat's valve are usually the building's responsibility. In tall buildings fed from a rooftop tank, as many Dhaka blocks are, a riser repair can cut water to several floors, so the committee should plan it and give residents notice.
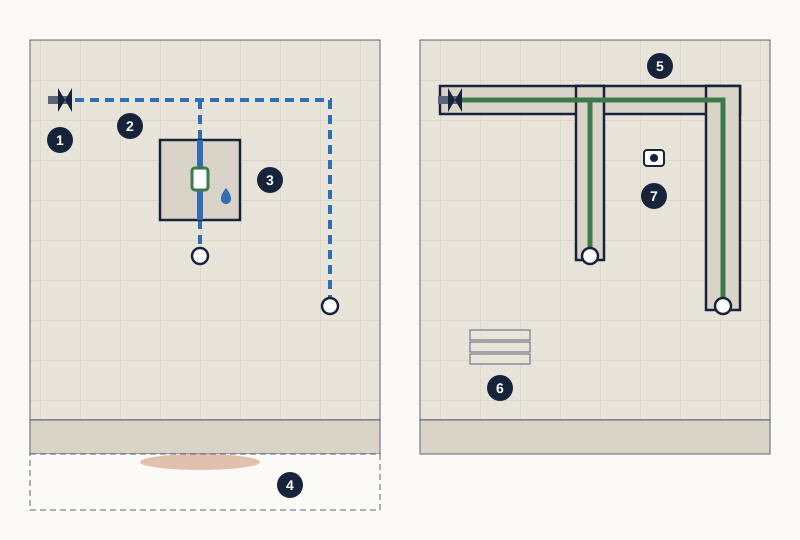
- Isolation valve that shuts off the bathroom supply
- Route of the concealed pipe inside the wall (dashed)
- Spot repair: an opening a few tiles wide, with a new coupling at the leak
- Stain on the ceiling of the flat below, often the first sign
- Whole run replaced: chases opened along the full route for new pipe
- Spare matching tiles from the original job make the openings easier to close neatly
- Photograph the open route, with measurements, before it is closed
Tools and materials: what you need and what the plumber brings
Repairing or replacing supply pipe is plumber's work, but a few things help you get through the first hours and check the job:
- A torch, buckets, towels and a phone camera for dated photos.
- Knowing where every isolation valve is and that each one turns; small valves may need a flat-head screwdriver or a spanner.
- An emergency repair clamp or plumbing repair tape sized to your pipe, kept in the toolbox.
- From the plumber: pipe cutters, threading or fusion tools for your pipe type, matching couplings and fittings, and a test pump with a pressure gauge.
- A reading of the flat's own water meter, if it has one, to check the repair afterwards.[10]
Step by step: getting the repair done properly
- Describe the problem in writing: where the leak is, when it started, earlier repairs on the same pipe, and photos.
- Agree the scope before work starts: spot repair, one run or a re-pipe; the pipe material; and whether metal pipe will be replaced with plastic.
- If metal pipe is being cut out or replaced with plastic, have an electrician check the earthing first and bridge or reconnect it if needed.[6]
- Isolate and drain the section, then open the wall or floor only as far as needed to reach sound pipe.
- Cut back past any corrosion to clean pipe, and look at the removed piece together with the plumber.
- Join different metals only through a suitable transition fitting, never directly.[6]
- Pressure-test the new work before the wall or floor is closed. UK water rules, for example, require pipework to withstand at least 1.5 times its maximum working pressure, and plastic pipe needs a test method that allows for it expanding under pressure.[4]
- Photograph the open pipe route with a tape measure in view, then close up.
- Once the water is back on, watch the area for a few days and, if you have a meter, read it before and after two hours with no water in use; any movement suggests a leak remains.[10]
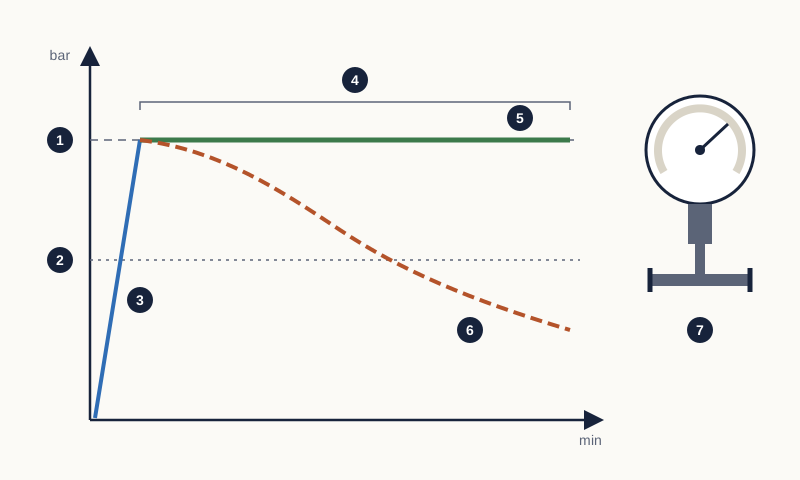
- Test pressure: at least 1.5 times the maximum working pressure under UK rules
- Normal working pressure of the system
- Pumping the isolated section up to test pressure
- Hold period, its length set by the test method
- Pass: pressure holds and no leak is visible; methods for plastic pipe allow for a small early drop as the pipe expands
- Fail: pressure keeps falling; find the leaking joint, fix it and test again
- Test-pump pressure gauge connected to the isolated, capped section
What the plumber should document
A pipe hidden in a wall is invisible to the next plumber, buyer or tenant, so records matter. UK pressure-test certificates, for example, record who carried out the test, the pipe material, size and length, the test pressure, the start and end times and the procedure, and are signed.[5] Ask for a simpler version of the same record:
- The scope: which pipes were repaired or replaced, and why.
- Pipe and fitting material, size and brand, and the pressure rating of the pipe.
- Photos of the open route with measurements from a fixed point such as the floor or a door edge.
- The pressure test: test pressure, how long it was held, the result and who witnessed it.[4]
- Any change to earthing or bonding, signed off by an electrician.[6]
- Warranty terms for labour and materials, in writing.
- Where any new isolation valves were fitted.
- Spare tiles and fittings left behind, and where they are stored.
Common mistakes to avoid
- Clamping the same pipe again and again instead of replacing it.
- Replacing only the length behind one tile when the removed piece shows deep pitting.
- Joining new copper or brass straight onto old GI, which invites corrosion at the joint.[6]
- Closing walls before a pressure test, or 'testing' only by opening a tap and looking.
- Mixing pipes and fittings that their makers do not say are compatible, especially in fused or push-fit plastic systems.
- Painting the stain on the ceiling below before the leak is confirmed as fixed.
- Over-tightening plastic fittings, or using a thread sealant not rated for drinking water.
Prevention: helping new pipes last
- Close and reopen each isolation valve once or twice a year so it still turns in an emergency.
- Ask the building committee whether pump or booster pressure has been checked; most domestic fittings are designed for no more than 10 bar.[5]
- Fit pipe clips at proper spacing so pipes do not sag or vibrate, and fix the cause of any loud banging (water hammer).
- Do not drill walls along known pipe routes; keep the photos from the last repair to hand.
- Fix small leaks quickly; the US Environmental Protection Agency (EPA) advises fixing plumbing leaks as soon as possible and drying everything completely.[9]
- During routine checks, look at exposed pipes and joints; how to spot plumbing problems early has a fuller list.
What drives the cost of a pipe repair or replacement
We could not find reliable, published prices for pipe repairs in Bangladesh, so this guide gives no figures. The main cost drivers are:
- Access: an exposed pipe is quick; a pipe in a wall or floor means breaking and reinstating tiles, plaster and sometimes waterproofing.
- Extent: a spot repair costs far less than a run, and a run far less than re-piping a whole flat, but repeated spot repairs on failing pipe can add up to more.
- Materials: the pipe type, fittings and valves, and whether matching tiles are still available.
- Electrical work: an electrician's visit if the earthing has to be maintained.[6]
- Testing and making good: pressure testing, repainting the ceiling below and repairs in a neighbour's flat.
- Timing: emergency call-outs usually cost more than planned work.
Get written quotes from at least two plumbers for the same scope, and compare what each one includes. Our guide to getting and comparing repair quotes explains how. For damage to walls after a leak, see how to prevent damp walls and seepage.
Next steps
- Today: make the electrics safe, close the valve, drain the pipe and photograph the damage.
- Within days: have a plumber find the cause and show you the removed pipe.
- Decide the scope with the table above: joint, section, run or re-pipe.
- Involve an electrician before any metal pipe is cut out or replaced with plastic.
- Insist on a pressure test before closing up, and keep the written record and photos.
- Report any leak on a riser or shared pipe to the building committee in writing.
Common questions
- Is a pipe repair clamp a permanent fix?
- Usually not. Clamp makers set limits on the size and type of damage a clamp can seal, and Hawle states that a clamp over a split along the pipe is for temporary use only, until the pipe is replaced.[3]
- I have had two pinhole leaks in a year. Should I replace everything?
- Not necessarily everything, but at least the run they are on. Two pinholes on one run usually mean the inner wall is pitted along its length. If the cut-out section is deeply pitted, replacing the run from its isolation valve is usually better value than waiting for the next leak.
- Our GI pipes give brown water. Do they need replacing?
- Brown water after the taps have stood unused, together with falling flow, is typical of rusting GI pipe. First ask your neighbours whether they see the same, to rule out the tank or the building supply. If only your flat is affected, plan to replace the GI runs, starting with the worst.
- Can I replace a metal pipe with plastic?
- Often, yes, but it is a decision for the plumber and, where the metal pipework is part of the earthing, for an electrician too. One US building department, for example, requires the electrical earth to be kept intact when metal water pipe is replaced with plastic.[6] For the choice of material, see how to choose suitable pipe materials.
- Why does the plumber need to pressure-test a small repair?
- Because a joint that seeps under test is easy to fix while the wall is open and very costly once it is tiled over. UK water companies test new pipework at a pressure above normal working pressure and check both for any pressure drop and for visible leaks.[4]
- Who pays when a pipe inside the wall leaks into the flat below?
- As a rule, pipes after your flat's valve are your responsibility and shared risers are the building's. Agree the cause with your neighbour, keep dated photos, and dry the affected areas within 24–48 hours to limit mould.[9]
Sources
The facts in this guide were checked against these sources.
- What should I do if a water pipe bursts? — WaterSafe (UK register of approved plumbers). accessed 18 October 2026.
- Fixing leaking pipes — British Gas. accessed 18 October 2026.
- Operating and maintenance instructions for Stainless steel repair clamp, single or multiple tensioned (Order No. 110-00, 120-00) — Hawle Armaturen GmbH (published 03/2022). accessed 18 October 2026.
- Guidance Note 3: Pressure testing of new water service pipework — Northumbrian Water (published 3 February 2026). accessed 18 October 2026.
- Hydrostatic Pressure Testing — United Utilities. accessed 18 October 2026.
- Electrical Grounding and Water Service Re-piping — City of Bellevue Development Services (Washington, USA) (published 4 March 2020). accessed 18 October 2026.
- Corrosivity — US Geological Survey (USGS) (published 1 March 2019). accessed 18 October 2026.
- Basic Information about Lead in Drinking Water — US Environmental Protection Agency (EPA) (published Last updated 18 June 2026). accessed 18 October 2026.
- A Brief Guide to Mold, Moisture and Your Home — US Environmental Protection Agency (EPA) (published Last updated 18 February 2026). accessed 18 October 2026.
- Fix a Leak Week — US Environmental Protection Agency (WaterSense). accessed 18 October 2026.
This guide is general information. Have gas, structural and live electrical work done by a qualified, licensed professional. Your building’s rules and committee decisions take precedence over anything written here.
Written from the cited sources by the RUAP.NET editorial team. It has not been reviewed by a licensed engineer, plumber or electrician; for work on gas, structure or live electrics, use a qualified professional.
Spotted a mistake? Tell us — we check it, correct the guide and record the date of the correction. Report an error →