
Bathroom Water Leaks: How to Find the Source and Fix the Common Ones
A stain on the ceiling below, a cistern that never stops trickling or grout that stays dark long after a shower all point to a bathroom leak. This guide shows how to work out where the water is coming from and what to do next.
Most bathroom leaks come from the toilet cistern, dripping taps and shower mixers, the connections under the basin, or worn sealant and grout. Worn toilet seals and dripping taps are often easy to fix with a few tools and simple parts.[1]
Work from the easy checks to the hard ones: look and feel round each fitting, do a dye or tissue test on the toilet, close each isolation valve in turn, then run water into one fixture at a time. Dry anything that got wet within 24–48 hours to stop mould.[2]
Call a plumber when water keeps flowing with the fitting's valve closed, when the leak is inside a wall or under the floor, or when the flat below is being damaged. Never work near wet electrics: switch off at the breaker first.
Most of this can be done yourself with ordinary tools.
In an apartment building a bathroom leak is rarely only your problem: water escaping through the floor often shows first on the ceiling of the flat below. Most leaks, though, have a short list of suspects, and you can test for most of them with a torch, toilet tissue and a little food colouring.
Warning signs of a bathroom leak
Some leaks announce themselves with a drip. Others only show up as damage somewhere else. Look out for:
- A stain, bubbling paint or flaking plaster on the ceiling of the flat below, usually under the toilet, the shower area or the floor trap.
- Tiles or grout that stay dark for hours after the bathroom has been used, or tiles that sound hollow or move underfoot.
- A constant hiss or trickle from the toilet, or water running down the back of the pan long after the last flush.
- Damp, peeling paint or mould on the far side of a bathroom wall, such as in a bedroom or corridor.
- A musty smell in the bathroom or the room next to it. The US Environmental Protection Agency (EPA) notes that hidden mould can grow inside walls around leaking or condensing pipes.[2]
- Rust marks, white mineral crust or green staining on pipe joints, valves and the underside of fittings.
Not every wet pipe is leaking. In humid weather, cold-water pipes and cisterns can collect condensation, which looks like a leak but forms evenly along the surface. EPA treats condensation on pipes as a sign of high humidity and recommends running the bathroom fan or opening a window while showering.[2] A real leak usually starts at one joint and spreads from there.
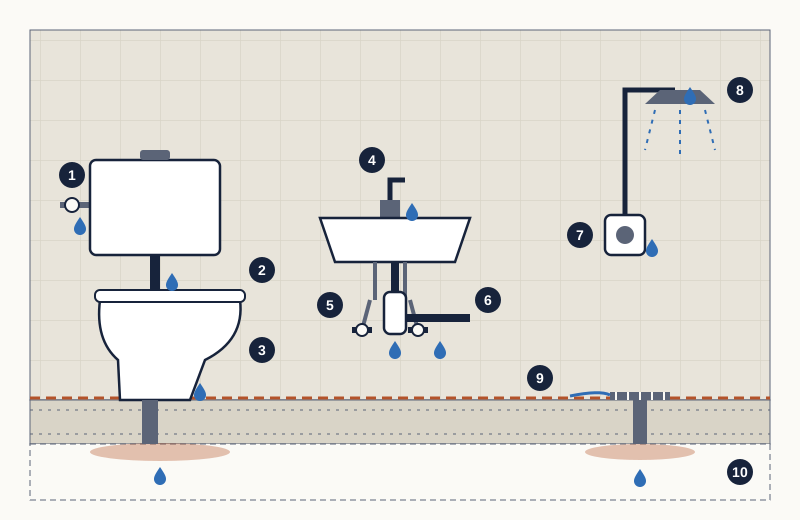
- Supply connection and isolation valve feeding the cistern
- Flush valve seal: when worn, water trickles from the cistern into the pan
- Joint between the pan and the waste pipe in the floor
- Basin tap or mixer: worn washer or cartridge
- Angle valves and flexible hoses under the basin, always under pressure
- Basin trap and waste connection into the wall, which leak only while draining
- Shower mixer where it passes through the wall tiles
- Joint between the showerhead and the shower arm
- Grout and silicone at the wall–floor junction and round the floor trap
- Stain on the ceiling of the flat below, often the first visible sign
Common causes and where the water comes from
The toilet cistern
A worn rubber seal at the bottom of the cistern (the flapper or flush valve seal) lets clean water seep into the pan all day; EPA advises checking it periodically and replacing it at least every five years.[1] The UK water company United Utilities names modern push-button cisterns among the biggest leak culprits, and says a dripping overflow pipe on an older cistern means the cistern is faulty.[3] WaterSafe, the UK register of approved plumbers, estimates such a leak can waste up to 400 litres a day.[4] The other suspect is the fill (inlet) valve: if it does not shut off, the water rises above its normal level and runs away through the overflow.[5] The supply connection behind the cistern and the seal between the pan and the floor waste can leak too.
Taps, mixers and showers
In older screw-down taps, a drip usually comes from a worn washer or gasket.[1] Most modern single-lever mixers use a ceramic cartridge instead; the bathroom manufacturer Crosswater says a drip from these usually means debris between the ceramic discs inside the cartridge, which can be cleaned out or the cartridge replaced.[7] A showerhead that drips at its joint with the arm can often be cured with a tight, taped connection, but a shower valve that drips while switched off is a job for an experienced plumber.[1] Hand-held bidet sprays, common in Bangladeshi bathrooms, have their own small valve and flexible hose, and both wear out and deserve the same checks.
Under the basin
Below most basins there are one or two small isolation valves (angle valves), flexible hoses up to the tap and a trap on the waste pipe. EPA suggests checking fittings and gaskets for water on the outside of the pipe as part of any leak search.[1] Supply-side leaks here drip all the time, because those pipes are always under pressure. Waste-side leaks, at the trap or where the waste pipe enters the wall, drip only while the basin is draining. That difference is the quickest way to tell them apart.
Grout, sealant and the waterproof layer
Tiles look watertight, but the cement-based grout between them is not. BRANZ, New Zealand's building research body, explains that a tiled floor with cement grout relies on a waterproofing membrane underneath, and that poorly applied membranes let water travel out of the wet area and damage floors and finishes elsewhere in the building.[6] BRANZ also notes that showers without screens wet more of the bathroom, all of which needs protecting, as in the open wet bathrooms of many Bangladeshi flats.[6] Flexible silicone joints at the wall–floor junction and round the basin wear out too; Mira Showers notes that old or damaged sealant lets water into gaps, causing leaks and mould.[8] Water that gets past the tiles and membrane usually appears on the ceiling below, not in your bathroom.
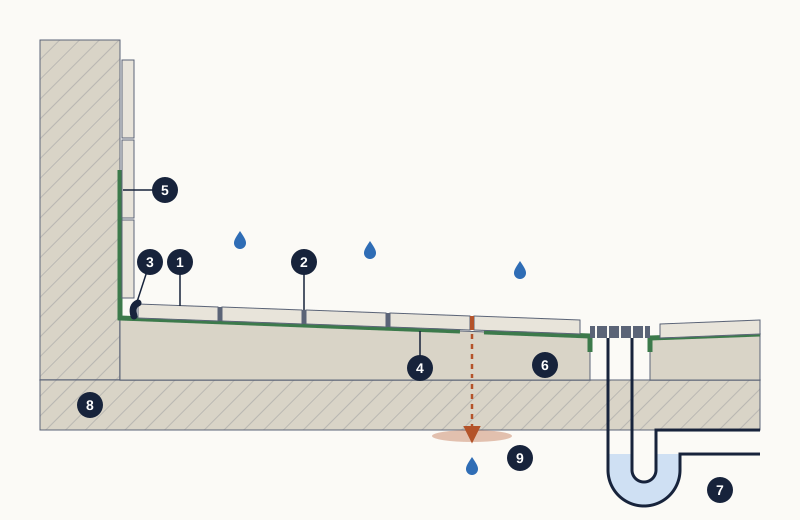
- Floor and wall tiles
- Cement-based grout joint: porous, not a waterproof layer
- Flexible silicone sealant at the wall–floor junction
- Waterproofing membrane on the screed, under the tiles
- Membrane turned up the wall behind the tiles
- Screed laid to a slope so water runs to the drain
- Floor trap: the U-bend holds water that keeps sewer smells out
- Structural floor slab
- A break in the membrane lets water through the slab to the ceiling below
Tools and materials you will need
For the inspection and the simple repairs in this guide, a small kit is enough:
- A bright torch, dry cloths, a bucket and an old towel.
- Toilet tissue and food colouring (or leak-detection tablets) for the toilet tests.
- A flat-head screwdriver for closing isolation valves, and an adjustable spanner.
- A set of Allen keys for lever taps whose fixing screw hides under a cap.
- PTFE (Teflon) tape for threaded showerhead joints.
- For resealing: sealant remover or a sharp knife, masking tape, a sealant gun and a silicone sealant made for bathrooms.
- Spare parts matched to your fitting's make and model.
Step by step: how to trace a bathroom leak
Work through these steps in order. Each one rules out a group of suspects, so by the end you should know whether you have a quick fix or a job for a professional.
- Photograph any stain and mark its edge in pencil with the date, so you can see later whether it is growing.
- If water is near a socket, light or water heater (geyser), switch that circuit off at the breaker first.
- Check every fitting with a torch and dry tissue: cistern connection, pan base, tap bodies, angle valves, hoses, trap and shower mixer. Dry tissue darkens at the slightest seep.
- Do a dye test on each toilet. Add a few drops of food colouring to the cistern, do not flush, and check the bowl after about 10 minutes; colour in the bowl means the seal is leaking. Flush straight afterwards so the dye does not stain.[1]
- Or do the tissue test. About half an hour after a flush, wipe the back of the pan dry, lay a fresh sheet of tissue across it and leave the toilet unused for up to three hours or overnight. A wet or torn sheet means a leak.[4]
- Read the cistern's tide mark. Lift the lid: if the water sits level with the old tide mark yet still trickles into the pan, suspect the flush valve seal; if it is above the mark and running into the overflow, suspect the fill valve.[5]
- Isolate fittings one at a time. Close the valve feeding one tap or the cistern and watch the drip. If it stops, the fault is in that fitting. If water keeps coming with every valve closed, suspect a pipe inside the wall and close the flat's main valve.
- Test the drainage side: run water into one fixture at a time (basin, shower floor, then a flush) while a neighbour watches the ceiling below.
- Test the joints: splash water only on the wall–floor sealant and shower grout, away from the drain, and check below over the next hour or two.
- If your flat has its own meter, read it before and after two hours with no water in use; any change suggests a leak.[1] Many Dhaka flats share a tank without separate meters, so this test is not always possible.
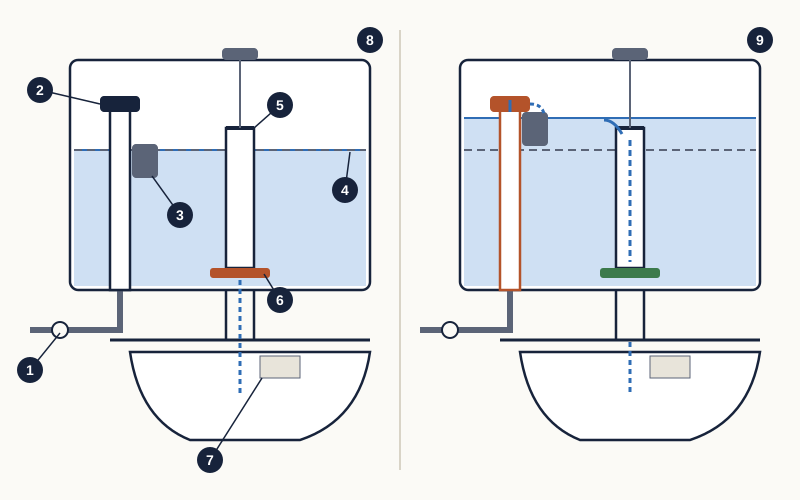
- Supply pipe and isolation valve
- Fill (inlet) valve
- Float that closes the fill valve as the water rises
- Tide mark: the normal full water level (dashed line)
- Top of the overflow tube
- Flush valve seal (outlet washer) at the base of the cistern
- Dry tissue laid across the back of the pan for the tissue test
- Left: level at the tide mark but still trickling into the pan, so the flush valve seal is leaking
- Right: level above the tide mark and spilling into the overflow, so the fill valve is not shutting off
Simple fixes you can do yourself
First close the fitting's isolation valve (or the flat's main valve), open the tap to drain it and plug the basin so small parts cannot fall in. If unsure, read our guide to taps, showers and valves or call a plumber.
Toilet seal or fill valve
Once the tide-mark check points to a part, identify the make of the cistern, buy the matching seal or valve washer, shut the supply, flush to empty the cistern, fit the part following the maker's instructions and turn the water back on.[5] EPA suggests taking the old part, or a photo of it, to the shop so the replacement fits.[1] Our guide to toilet flushing problems explains the mechanism in more detail.
Dripping lever tap
- Close the isolation valves and open the tap to let the water drain.
- Lift off the decorative cap, undo the hidden screw with an Allen key and remove the handle.
- Unscrew the retaining nut with a spanner and lift out the cartridge.
- Clean it, or fit a new cartridge of the exact type for your tap model, making sure it sits correctly aligned.[7]
- Reassemble in reverse order, open the valves slowly and watch for drips. If it still drips, the cartridge may be badly seated or the wrong one for the tap.[7]
Leaking showerhead joint
EPA notes that some dripping showerheads are cured by making the connection to the pipe tight and sealing the thread with PTFE tape, and suggests replacing the washer or O-ring inside the head at the same time.[1] Wind the tape the way the head tightens so it does not unravel.
Worn silicone round the basin, tray or floor junction
- Cut along both edges of the old bead and pull or scrape all of it out; sealant sticks best to clean, dry surfaces.[8]
- Wash off residue and any mould with warm soapy water, then let the joint dry completely. Do not seal over mould.[2]
- Run masking tape about 3 mm either side of the joint, apply an even bead and smooth it with a wet finger, then peel off the tape.[8]
- Keep the area dry until the sealant has fully cured, following the time printed on the tube.[8]
Leaks into the flat below: act quickly and fairly
If your neighbour reports a stain, take it seriously even if your bathroom looks dry. EPA advises drying water-damaged materials within 24–48 hours to prevent mould, and tells renters to report plumbing leaks to the owner or manager straight away.[2] Agree a time to run the tests above together, keep dated photos, and tell the building committee or caretaker if a shared pipe or riser might be involved.
Who pays depends on where the fault is. As a rule, fittings inside your flat are yours and shared pipes belong to the building, but a pipe inside a wall between two flats, or a leak through the floor slab, sits in between. Our flat maintenance guide explains how to settle this before an argument starts. Damp that keeps returning after a repair may have a different cause; see how to prevent damp walls and seepage.
Prevention: a simple bathroom maintenance routine
Most leak damage comes from slow leaks that run for months. A short routine catches them early.
- Monthly: run dry tissue round each tap base, angle valve, hose end and trap.
- Monthly: listen to each toilet after it refills; it should go completely quiet.
- Monthly: look at the grout and silicone in the shower area for cracks, gaps or black spots.
- Monthly: check that the floor trap drains quickly and its grating is clear.
- Every few months: do a dye or tissue test on each toilet.
- Yearly: close and reopen every isolation valve once so it does not seize.
- Yearly: inspect flexible hoses for rust, fraying or bulges and replace any that look tired.
- Before each monsoon: ask the flat below whether any new stains have appeared under your bathrooms.
- At least every five years: replace the toilet flush valve seal.[1]
Ventilation matters too. Running an exhaust fan or opening a window during and after showers keeps grout and sealant drier and helps prevent mould.[2] See how to prevent mould in bathrooms and how to maintain floor tiles and grout for more.
Common mistakes to avoid
- Painting over a ceiling stain before the source is found. The stain comes back and the evidence is gone.
- Laying new silicone over old, dirty or mouldy sealant; EPA advises against caulking over mould.[2]
- Filling the joint between a basin, bath or shower tray and the wall with grout instead of silicone. Grout is not suitable for these joints.[8]
- Patching cracked grout and assuming the floor is now waterproof, when the real fault may be the membrane underneath.[6]
- Overtightening plastic nuts and compression fittings until they crack.
- Buying a 'universal' washer or cartridge without checking the model; cartridge sizes differ even within one brand.[7]
- Ignoring a running cistern because the water bill is shared; it still wastes pumped water.
Repair, replace or call a plumber?
The table sums up which faults most people can handle and which need a professional.
| Symptom | Likely cause | DIY? | Call a professional when |
|---|---|---|---|
| Toilet trickles into the bowl; water level at the tide mark | Worn flush valve seal[5] | Usually | The cistern is concealed in the wall or parts are unavailable |
| Cistern level above the tide mark, water running into the overflow | Fill valve not shutting off[5] | Usually | The valve or its supply connection is corroded or seized |
| Lever tap drips | Debris or wear in the ceramic cartridge[7] | Often | The handle or cartridge will not come out |
| Older two-handle tap drips | Worn washer or gasket[1] | Often | The valve seat inside the tap is damaged |
| Shower drips when switched off | Worn shower valve[1] | Rarely | Always; the valve usually sits inside the wall |
| Drip under the basin only while it drains | Loose or cracked trap or waste joint | Often | The leak is where the waste pipe enters the wall |
| Stain below appears after showers | Failed grout, sealant, floor-trap seal or membrane[6] | Sealant only | Resealing does not stop it |
| Water flows with every valve closed | Leaking concealed supply pipe | No | Immediately; close the flat's main valve first |
Replacing a whole fitting makes more sense than repairing it when the body is cracked or badly corroded, when spare parts are no longer made, or when the same fitting keeps failing. For faults in pipes inside walls, see how to inspect water supply pipes for leakage.

- You notice a sign: a drip, a stain, damp grout or a constant trickle
- Is the water coming through your ceiling from the flat above?
- Tell the upstairs neighbour and the building committee; the source is above you
- Does the damp appear only when a fixture is used (shower, basin, flush)?
- Drainage side: check the trap, waste joints, sealant, grout and floor trap
- Close the isolation valve for the suspect fitting. Does the leak stop?
- The fault is in that fitting (washer, cartridge or cistern valve): repair it or call a plumber
- Possible concealed pipe leak: close the flat's main valve and call a plumber
What drives the cost of a repair
We could not find reliable, published repair prices for Bangladesh, so this guide does not quote figures. What you pay depends mainly on:
- The part: a washer or seal costs far less than a cartridge, and a cartridge far less than a new mixer or cistern.
- Access: an exposed basin trap is quick to reach; a pipe or valve inside the wall means breaking and replacing tiles.
- Matching tiles: if your tiles are no longer sold, a small repair can turn into a larger re-tiling job.
- Waterproofing: renewing a failed membrane means lifting and relaying tiles, far costlier than resealing joints.
- Damage elsewhere: repainting or replastering the ceiling below adds to the bill.
- Call-out and warranty: ask about visit charges and guarantees on parts and labour.
Ask for written quotes that list the parts, the work and the warranty, and compare at least two. Our guide to getting and comparing repair quotes explains how.
Next steps
- Today: make wet electrics safe, close the leaking fitting's valve and dry the area.
- This week: test each toilet and check every tap and trap with dry tissue.
- If the leak reaches the flat below, tell your neighbour and the building committee and keep dated photos.
- Fix what you safely can: a cistern seal, a cartridge, a showerhead washer or a sealant joint.
- For concealed pipes, shower valves or membranes, get two written quotes.
- Put the monthly checklist in your calendar so the next leak is caught early.
Common questions
- How can I tell if the stain on my ceiling comes from the bathroom above?
- Check whether the stain sits under the upstairs bathroom and whether it grows after they shower or flush. Ask your neighbour to run the fixture tests in this guide while you watch the ceiling. A stain that grows only after heavy rain is more likely to come from the roof, an outside wall or a veranda.
- Is a slowly running toilet really worth fixing?
- Yes. WaterSafe estimates that a toilet leaking from cistern to pan can waste up to 400 litres a day.[4] In a building that pumps water up to a rooftop tank, that waste also costs electricity, and the repair is usually just a new seal or valve washer.
- Can I just put silicone over cracked grout to stop the leak?
- Only as a stopgap. Grout is not the waterproof layer; the membrane under the tiles is.[6] If water is already reaching the flat below, sealing the surface may hide the problem without solving it. Replace failed grout properly and, if the leak continues, have the membrane checked by a professional.
- How quickly do I need to dry things out after a leak?
- EPA advises drying wet materials within 24–48 hours to stop mould from growing.[2] Use fans, open windows and remove soaked items. For mould covering more than about 10 square feet (roughly one square metre), EPA points to its professional remediation guidance, so consider an experienced contractor.[2]
- My lever tap still drips after I replaced the cartridge. Why?
- Crosswater lists three usual reasons: the new cartridge is not seated properly, the valve seat is scratched, or the cartridge is the wrong one for that model.[7] Take the old cartridge and the tap's model number to the supplier to get an exact match.
Sources
The facts in this guide were checked against these sources.
- Fix a Leak Week — US Environmental Protection Agency (WaterSense) (published Last updated 13 March 2026). accessed 18 October 2026.
- A Brief Guide to Mold, Moisture and Your Home — US Environmental Protection Agency (published Last updated 18 February 2026). accessed 18 October 2026.
- Find leaks inside your home or business — United Utilities. accessed 18 October 2026.
- How can I tell if I have a leaky loo? — WaterSafe Register. accessed 18 October 2026.
- How to fix a leaky loo — Bristol Water (published 27 October 2025). accessed 18 October 2026.
- Builder's Mate Issue 38: Membranes for tiled floors — BRANZ (published October 2009). accessed 18 October 2026.
- My tap is constantly dripping - How do I fix this? — Crosswater. accessed 18 October 2026.
- Bathroom Sealing Guide: How to Seal Baths, Shower Trays and Sinks — Mira Showers (published 29 August 2024). accessed 18 October 2026.
This guide is general information. Have gas, structural and live electrical work done by a qualified, licensed professional. Your building’s rules and committee decisions take precedence over anything written here.
Written from the cited sources by the RUAP.NET editorial team. It has not been reviewed by a licensed engineer, plumber or electrician; for work on gas, structure or live electrics, use a qualified professional.
Spotted a mistake? Tell us — we check it, correct the guide and record the date of the correction. Report an error →