
How to Inspect Water Supply Pipes for Leaks in a Flat or Apartment Building
A damp patch that never dries, a hiss inside the wall with every tap shut, or water use that climbs for no reason often points to a leaking supply pipe. This guide gives a step-by-step way to check the pipes you can see, test the ones you cannot, and collect the evidence.
Supply pipes are always under pressure, so a leak runs even when no tap is open. Check exposed pipes, joints and valves first, then use your flat's meter or main valve to tell a leak inside the flat from one on shared pipework.[1]
Condensation forms evenly along a cold pipe; a leak starts at one joint.[3] Moisture meters and thermal cameras show where to look but do not prove a leak.[7]
Call a plumber or tell the building committee when the leak is in a concealed pipe, on a riser, or damaging the flat below. Do not break open walls yourself, and switch off at the breaker before going near wet electrics.
Most of this can be done yourself with ordinary tools.
In an apartment building much of the supply pipework is hidden in walls, floors and shared shafts, and the first sign of a leak is often a damp patch some distance from the fault. Work through the checks below in order: they move from what you can see to what you can only test.
How water reaches your flat, and where pipes can leak
Many Dhaka apartment buildings pump water from an underground reservoir up a rising main to a roof tank, then let gravity carry it down risers (vertical pipes, usually in a service shaft) to a branch on each floor. Each flat's branch typically has an isolation valve, after which concealed pipes run through walls and floor screed to the bathrooms and kitchen. Pressure is highest on the lowest floors, roughly 1 bar per 10 metres of height, so the same defect leaks harder lower down; for pressure problems, see our guide to low water pressure.
Knowing this route matters because it splits responsibility. A leak upstream of your flat's isolation valve, on the riser or the branch, usually concerns the building and is for the committee or caretaker to deal with; a leak downstream of it is normally inside your flat. Your first inspection goal is to find out which side of that valve the water is escaping from.
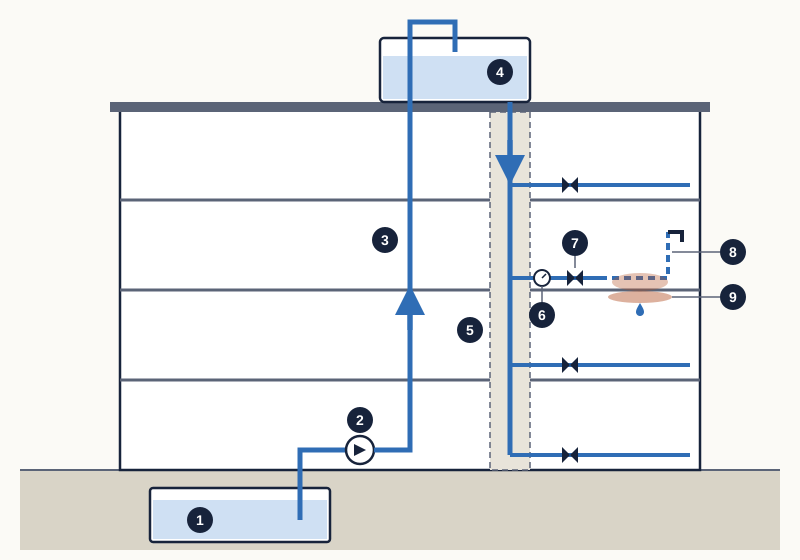
- Underground water reservoir
- Lifting pump
- Rising main up to the roof
- Overhead tank on the roof
- Down-feed riser inside a service shaft
- Flat water meter, where one is fitted
- Flat's main isolation valve: leaks before it usually concern the building, after it the flat
- Concealed pipe through the floor screed and wall to a tap
- Damp on the floor and on the ceiling of the flat below where a concealed joint leaks
Warning signs of a leaking supply pipe
Supply leaks differ from drainage leaks in one useful way: the pipe is always full and under pressure, so the leak does not wait for someone to use a fixture. Look out for:
- A damp patch that stays wet or keeps spreading through the day and night, even when nobody has used the bathroom or kitchen.
- Yellow, brown or dark staining, or paint and plaster that bubbles or peels; WaterSafe lists these as typical signs of water inside a wall.[2]
- A musty smell or mould along pipe routes. The US Environmental Protection Agency (EPA) notes that mould can grow unseen inside walls around leaking or condensing pipes.[3]
- A faint hiss or trickle inside the wall when every tap is shut; listening quietly near suspect areas is one of the first checks WaterSafe suggests.[2]
- A meter that keeps turning, or a bill that rises with no change in use.[2]
- In a tank-fed building, a pump that runs more often or a roof tank that empties faster at night.
- In older galvanised iron (GI) pipework, brown water after a few days unused, falling flow at every tap, or rust crust on joints.[4]
Is it a leak or condensation?
During the monsoon, cold-water pipes and the walls around them can sweat. EPA describes condensation as a sign of high humidity and recommends insulating cold-water pipes.[3] Condensation forms evenly along a cold surface and comes and goes with the weather; a leak starts at one joint and persists in dry air. Wipe the pipe dry, wrap dry tissue round each joint and check after an hour: a wet band at one fitting means a leak, a uniformly damp pipe means condensation.
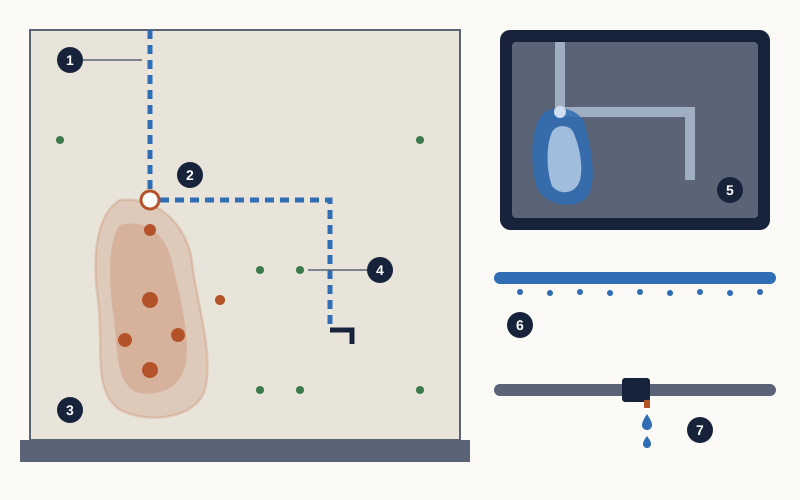
- Concealed supply pipe running down and across the wall to a tap
- Leaking joint at a bend in the concealed pipe
- Visible damp patch, mostly below the leak because water runs down through the plaster; the darker rings are tide marks
- Moisture-meter readings: large red dots are high, small green dots match dry parts of the same wall
- Thermal-camera view of the same wall: the wet area shows as a cooler patch
- Condensation: droplets form evenly along the whole cold pipe
- Leak: drips come from one joint only
Why supply pipes fail
- Corrosion of GI pipe. Galvanised steel rusts from the inside, narrowing the bore and thinning the wall; InspectAPedia notes that threaded joints usually fail first because the wall is thinnest there.[4]
- Mixed metals. Where steel meets copper or brass without an insulating (dielectric) fitting, galvanic corrosion can eat into the joint.[4]
- Badly made PPR (polypropylene random copolymer) heat-fused joints; one fitting maker warns that cracked pipe gives leaking joints, dirty pipe will not form proper beads, and the pipe must not be twisted as it goes in.[5]
- Hurried uPVC or CPVC solvent joints, with the pipe not pushed fully home or the system filled before the cement cured.
- Renovation damage: a nail, screw or drill through a concealed pipe, or a pipe cracked while nearby tiles were broken out.
Tools you need, and what instruments can and cannot show
A basic inspection needs very little:
- A bright torch, dry tissue or toilet paper, and a few dry cloths.
- A pencil, a phone camera and a notebook to mark, date and record stains and readings.
- Access to your flat's main isolation valve and, if your flat has one, its water meter.
- Optionally, a pin or pinless moisture meter for comparing readings across a wall.
- A stable step ladder for ceilings; never stand on fittings or furniture.
Moisture meters and thermal cameras
A moisture meter reads only the surface layer near its tip, and on plaster or brick its numbers are comparisons, not true moisture contents. Take readings in a grid across the damp area and compare them with a dry part of the same wall; the highest readings usually sit below or beside the leak.
A thermal (infrared) camera shows surface temperature, not water. Fluke, a maker of these cameras, explains that wet areas often appear as cooler patches because evaporation cools them, but only under the right conditions, and that confirming the source may still need invasive work.[7] Fluke adds that a bigger temperature difference gives clearer images, which air-conditioning or running cooler water through the pipe can help create.[7] Treat a thermal image as a map of where to look next, not as proof.
Step by step: inspecting the supply pipes in your flat
Work through these steps in order. Each one narrows the search, and the notes you keep will save time if a plumber or the committee gets involved.
- Record what you can see. Photograph each damp patch, mark its edge in pencil with the date and time, and note whether the wall carries pipes to a bathroom or kitchen.
- Make electrics safe. If water is near sockets, switches, light fittings or a water heater, switch that circuit off at the breaker before touching anything.
- Find and try your flat's main isolation valve. Check that it turns and closes fully; a valve that will not shut makes every later test unreliable and needs a plumber.
- Inspect all exposed pipework: under sinks, behind toilets, at the water heater and on verandas. At each joint and valve, look for drips, white or green crust, rust stains and tissue that turns wet.
- If your flat has its own meter, do a meter test. Turn off every tap and appliance, wait about 30 minutes for cisterns to refill, read the meter including the red digits, then use no water for three to six hours and read it again; a higher second reading suggests a leak.[1] EPA describes a shorter version: compare readings before and after a two-hour period with no water use.[9] In tank-fed buildings the WASA meter usually sits before the underground reservoir, so it cannot test the pipes inside your flat.
- Narrow it down. If the meter moved, close your flat's main valve and repeat the test, as United Utilities advises; if the meter still moves, the leak is between the meter and the valve.[1]
- Without a meter, use the valve itself: close the flat's main valve for several hours, ideally overnight. If a hiss stops and a damp patch starts to dry, the leak is inside your flat; if not, suspect a shared pipe, the flat above or rain.
- Isolate fittings one at a time. With the main valve open again, close the small valve feeding each toilet cistern or tap in turn. If the sign stops with one of them closed, that fitting is at fault; see how to find and fix bathroom leaks.
- Trace concealed routes. Pipes usually run straight up, down or across from each tap outlet; mark likely routes lightly and take moisture-meter readings along them.
- At a quiet time, with every tap off, listen with an ear close to the wall along the marked routes.[2]
- Write up the date, tests, readings, photographs and your conclusion, and share them with neighbours and the committee if a riser or shared wall is involved.
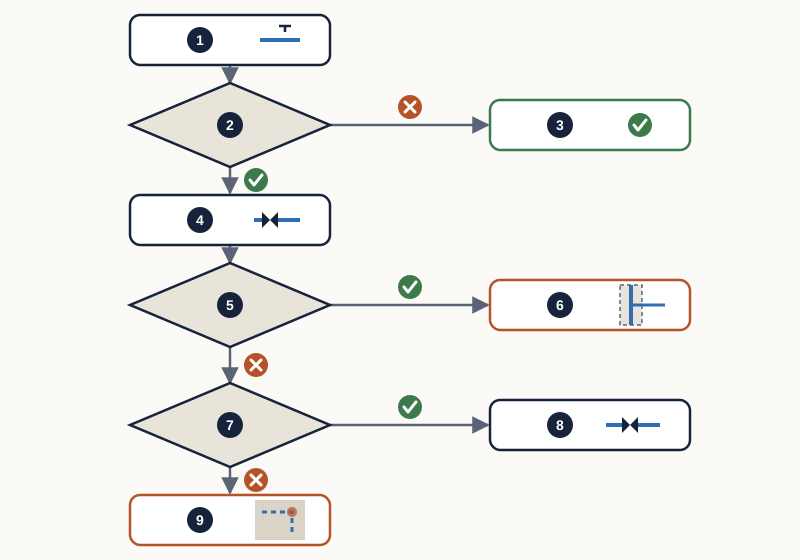
- Turn off every tap, cistern and appliance; wait for cisterns to refill
- Does the meter move, the hiss continue or the damp patch keep spreading?
- No: no active leak now; repeat the check in a few weeks and watch for condensation
- Yes: close your flat's main isolation valve
- With the valve closed, does the meter still move or the hiss continue?
- Yes: the leak is before your valve, on the branch, meter or riser; tell the building committee
- No: reopen the valve, then close each fitting's own valve in turn. Does the sign stop when one is closed?
- Yes: the fault is in that fitting (cistern valve, tap or hose)
- No: suspect a concealed pipe inside the flat; call a plumber
Risers, shafts and shared pipes
A leak on a riser or in a service shaft often shows on several floors at once, along the same vertical line, and does not stop when any one flat closes its valve. Report it to the building committee or caretaker with your notes and photographs rather than waiting for a neighbour to notice. Who pays usually depends on whether the fault is before or after a flat's own valve; the flat maintenance guide explains how to agree this before a dispute starts.
Leaks matter for water quality as well as damage. Research on intermittent supplies found that any crack or hole that lets water out can also let contaminated water in while the pipe is depressurised, and that dirt drawn in during those periods is flushed into homes when supply returns.[8] Where tanks run dry or supply stops for hours, check supply pipes near drains and floor traps with extra care.
What failure looks like in different pipe materials
You do not need to know every material in detail to inspect pipes, but you should know what failure looks like in the ones you can see. For choosing replacements, see how to choose suitable pipe materials.
| Material or joint | Typical weak point | What you may see | What to do |
|---|---|---|---|
| Galvanised iron (GI), threaded | The threads, where the wall is thinnest[4] | Rust stains or crust at joints, brown water after disuse, falling flow at all taps[4] | Note every joint that weeps; repeated leaks point to the pipe's age |
| Steel joined to copper or brass | The junction between the metals[4] | Corrosion and weeping right at the joint | Ask a plumber about an insulating (dielectric) fitting[4] |
| PPR, heat-fused | A badly made fusion joint[5] | A bead that is missing or broken round the joint, or a pipe set at an angle | A good joint shows two fused rings meeting all round[5]; a faulty one has to be cut out and remade |
| uPVC or CPVC, solvent-welded | Pipe not pushed fully home, or joint filled before it cured | Weeping at the socket edge, often soon after installation | Cut out and remake; do not smear glue over the outside |
| Any pipe inside a wall or floor | Nail, screw or drill damage; cracked fittings under tiles | A damp patch that starts after renovation or after new fixings went in | Isolate and call a plumber; record where fixings were made |
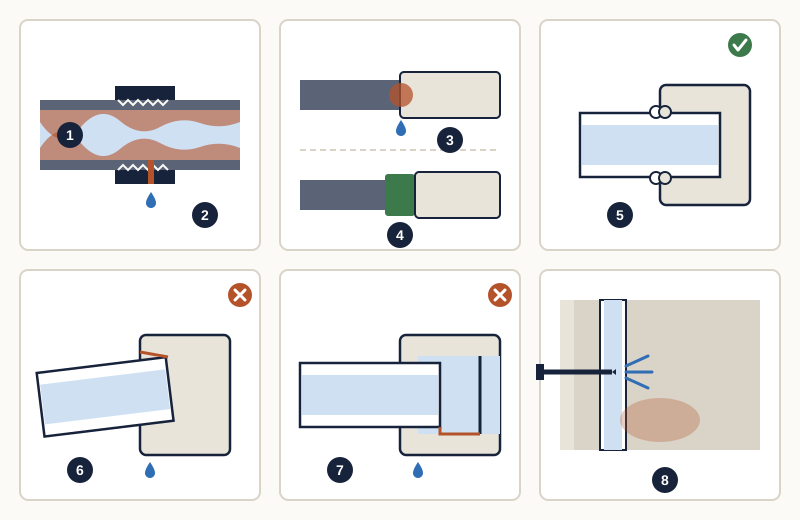
- GI pipe: rust builds up inside and narrows the bore
- Threaded joint: the wall is thinnest at the threads, so rust breaks through and leaks here first
- Steel pipe joined directly to a brass or copper fitting: corrosion and weeping at the junction
- The same joint with an insulating (dielectric) fitting between the metals
- Well-made PPR fusion joint: the two fused rings meet all round the joint
- Faulty PPR joint: pipe set at an angle, a gap at the socket and no continuous ring
- Solvent-welded uPVC or CPVC joint with the pipe not pushed fully into the socket
- Concealed pipe pierced by a screw or nail driven into the wall, with damp spreading round it
What a plumber's pressure test can show
When the leak is inside the flat but cannot be pinned down, a plumber can isolate a section, pressurise it and watch a gauge: if the pressure falls with no water in use, that section leaks, and testing smaller sections narrows the search before any tile is broken. WaterSafe describes a simpler version: with all fixtures off, fit a gauge to an accessible tap and see whether the pressure drops over a few hours.[2]
Under the UK water fittings regulations, for example, a system must withstand at least 1.5 times its maximum working pressure, and United Utilities expects a competent tester to record the pipe material and size, test pressure, start and end times and result.[6] Bangladesh rules may differ, but asking for those details in writing is sensible. A remade PPR joint should be pressure-tested once it has cooled.[5]
A routine to prevent supply-pipe leaks
The most expensive pipe leaks run unnoticed for months. A light routine catches them early.
- Monthly: run dry tissue round every exposed joint, valve and union under sinks, behind toilets and at the water heater.
- Monthly: at a quiet time, with every tap off, listen at walls that carry pipes.
- Monthly, if your flat has a meter: note the reading at the same time each month and compare use.
- Every few months: close and reopen your flat's main valve and each isolation valve so they do not seize.
- Before the monsoon: check walls and ceilings along pipe routes and ask the flats above and below about new stains.
- After any renovation or new wall fixing: watch for new damp for several weeks; keep photographs of where concealed pipes run.
- Yearly: look along exposed GI pipe for rust at the threads, and note any brown water after the flat has stood empty.
- Whenever condensation appears: wipe pipes dry and consider insulating cold-water pipes.[3]
For a whole-building checklist that also covers drains, tanks and pumps, see the plumbing inspection checklist; for early warnings across the whole system, see how to spot plumbing problems early.
Common mistakes and troubleshooting
- Breaking the wall at the centre of the stain. Water travels along pipes and down through plaster, so the leak is often above or beside the patch; trace and test first.
- Taking condensation for a leak, or a leak for condensation. Do the dry-tissue test on each joint before deciding.[3]
- Relying on one thermal image. Without a temperature difference it can miss a leak, and it can show cool patches that are not wet.[7]
- Wrapping a weeping joint in tape or epoxy putty and calling it fixed. That is a stopgap only.
- Forcing a stiff, corroded GI valve or union with a long spanner, which can snap a thinned thread.
- Meter moves but nothing is visible: repeat the test with the flat's main valve closed, then check cistern overflows and water-heater relief pipes before suspecting concealed pipes.
- Damp only after heavy rain: the roof, an outside wall or a window is a more likely cause than a supply pipe; see how to prevent damp walls and seepage.
When to call a plumber, and repair versus replacement
Call a plumber when the leak is in a concealed pipe, when it is on or near a riser, when the valve test cannot separate inside from outside, or when water is damaging the flat below. WaterSafe also advises calling one if you cannot locate the leak after visual checks, listening and meter tests, or if the damage keeps getting worse.[2]
A single weeping joint on otherwise sound pipe can usually be remade. Repeated leaks along old GI pipework, heavy rust at the threads and falling flow suggest that the pipe itself is near the end of its life, which InspectAPedia puts at roughly 40 to 60 years for galvanised steel.[4] Whether to patch, replace a section or re-pipe is covered in when to repair or replace a damaged water pipe.
What drives the cost of finding and fixing a pipe leak
We could not find reliable published prices for leak detection or pipe repair in Bangladesh, so this guide gives none. The main cost drivers are:
- Access: an exposed joint under a sink is quick; a concealed pipe means breaking tiles and plaster, then making good.
- Locating the leak: a plumber's isolation or pressure test, or an instrument survey, adds time but can save opening the wrong wall.
- Scope: remaking one joint costs far less than replacing a run of corroded pipe.
- Shared pipework: riser repairs may need several flats to cooperate and are usually a building cost.
- Damage elsewhere: ceilings, paint and furniture in the flat below.
Ask for written quotes stating how the leak will be located, what will be opened, the pipe and fittings to be used and the warranty; see getting and comparing repair quotes.
Next steps
- Today: make wet electrics safe, photograph and date any stains, and find your flat's main valve.
- This week: inspect the exposed pipes, do the meter or valve test, and isolate fittings one at a time.
- If the leak is before your valve or on a riser, report it to the committee in writing with your notes.
- If it is a concealed pipe inside your flat, call a plumber and ask how they will locate it before anything is broken.
- Get written quotes for any concealed or repeated repair.
- Put the monthly checks in your calendar and keep your notes for next time.
Common questions
- Can a supply pipe leak for months without any visible water?
- Yes. A slow leak in floor screed or behind tiles can soak into masonry before it shows, and mould can grow inside the wall out of sight.[3] A musty smell, a hiss with every tap off or a moving meter are often the first clues.[2]
- My flat has no water meter. How can I tell if a pipe is leaking?
- Use your flat's main valve instead. With every tap off, close the valve for several hours; if a hiss stops and a damp patch begins to dry, the leak is inside your flat. In a tank-fed building, the caretaker can also watch whether the overhead tank level falls faster than usual overnight, which suggests a leak or a running fitting somewhere in the building.
- Will a thermal camera find a hidden leak?
- It can help, but it sees surface temperature, not water; Fluke notes it works only under the right conditions and invasive checks may still be needed.[7] Use it to narrow the search, then confirm with moisture readings, isolation tests or a plumber's pressure test.
- The damp patch only appears in the monsoon. Is it a pipe?
- Probably not, if it grows after rain and dries out in dry weather. Condensation on cold pipes is also more common in humid months; EPA links it to high humidity.[3] A supply-pipe leak tends to stay wet whatever the weather, because the pipe is always under pressure.
- Can a leaking supply pipe affect drinking water?
- It can. Researchers studying intermittent supplies found that the same crack that lets water out can let contaminated water in while the pipe is depressurised.[8] Fix supply leaks near drains or wet floors promptly and keep tanks and reservoirs well maintained; see how to clean and maintain water storage tanks safely.
Sources
The facts in this guide were checked against these sources.
- How to use your water meter to check for leaks — United Utilities. accessed 18 October 2026.
- How do you find a water leak inside a wall? — WaterSafe Register. accessed 18 October 2026.
- A Brief Guide to Mold, Moisture and Your Home — US Environmental Protection Agency (published Last updated 18 February 2026). accessed 18 October 2026.
- Galvanized Iron Water Supply Piping, & Galvanized Drain Piping — InspectAPedia (Daniel Friedman). accessed 18 October 2026.
- PP-R Socket Fusion Instructions (Pro-Connect PP-R Pro, form PPRSF-0417) — Webstone, a brand of NIBCO (published 2017). accessed 18 October 2026.
- Hydrostatic Pressure Testing (guidance leaflet) — United Utilities. accessed 18 October 2026.
- Why thermal imaging is essential for detecting moisture damage — Fluke (published 2019-01-01 (last modified 2026-02-13)). accessed 18 October 2026.
- Analytical scaling relations to evaluate leakage and intrusion in intermittent water supply systems — PLOS ONE (Taylor, Slocum and Whittle), via PubMed Central (published 18 May 2018). accessed 18 October 2026.
- Fix a Leak Week — US Environmental Protection Agency (WaterSense) (published Last updated 13 March 2026). accessed 18 October 2026.
This guide is general information. Have gas, structural and live electrical work done by a qualified, licensed professional. Your building’s rules and committee decisions take precedence over anything written here.
Written from the cited sources by the RUAP.NET editorial team. It has not been reviewed by a licensed engineer, plumber or electrician; for work on gas, structure or live electrics, use a qualified professional.
Spotted a mistake? Tell us — we check it, correct the guide and record the date of the correction. Report an error →