
Water Tank Maintenance: Cleaning and Disinfecting Reservoirs and Rooftop Tanks Safely
Dirty or unscreened water tanks can spoil a whole building's supply, yet cleaning them carelessly can kill. This guide explains how reservoirs and rooftop tanks should be inspected, cleaned and disinfected, and what the building committee should organise.
Underground reservoirs and rooftop tanks need regular outside checks of covers, screens and overflows, periodic sludge removal and cleaning, and disinfection after cleaning or contamination. The World Health Organization (WHO) method is to drain, scrub, rinse, disinfect with chlorine and dispose of the waste water safely.[1]
Entering a tank is confined-space work. The UK Health and Safety Executive (HSE) counts storage tanks as confined spaces, where lack of oxygen and fumes can kill both workers and untrained rescuers, so it is a job for a trained crew with air testing, ventilation and a rescue plan.[2]
The committee's role is to organise and record: set dates, hire a competent contractor, insist on a written method and chemical dose, keep covers locked, and have the water tested when its taste, colour or smell changes.
Some steps carry risk — follow the warnings, and call a tradesperson if in doubt.
Most apartment buildings in Dhaka store water twice before it reaches a tap: in an underground reservoir that collects the WASA supply, and in a rooftop tank that feeds the flats by gravity. Their condition matters as much as that of the pipes. This guide is for owners, committees and caretakers who organise tank care, not for anyone planning to climb into a tank.
How water storage works in an apartment building
Typically the city main fills the reservoir through a float-controlled inlet, pumps lift water up a rising main to the roof tank, and risers (vertical supply pipes) carry it down to each floor. Because water stands in both tanks for hours or days, whatever gets in, whether dust, insects, surface water or sediment, has time to settle and multiply. Layouts vary, so ask your caretaker to show you every reservoir, pump and roof tank.
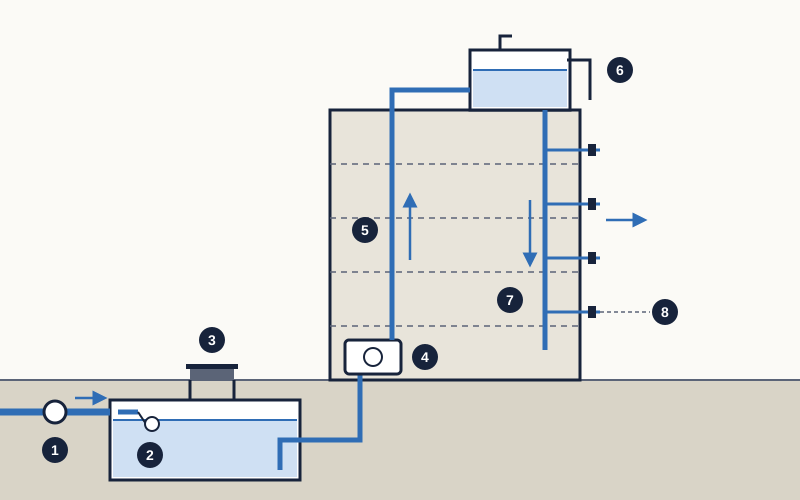
- City (WASA) supply main and meter
- Float-controlled inlet into the underground reservoir
- Underground reservoir, with its lockable manhole cover raised above ground level
- Pump set lifting water to the roof
- Rising main to the roof tank
- Rooftop tank with screened vent and overflow
- Down-feed riser supplying each floor by gravity
- Branch pipe and valve into a flat
Common causes of dirty or contaminated tank water
- Sediment in the incoming supply. Fine silt, rust and organic matter settle on the tank floor and build up into a layer of sludge over months.
- Loose, broken or missing covers that let in dust, leaves, birds, rats, lizards and insects.
- Unscreened vents and overflow pipes, which give mosquitoes and small animals a way in. NSW Health in Australia recommends close-fitting fine insect screens, about 1 mm mesh, on inlets and overflows.[4]
- Surface water. An underground reservoir whose manhole sits level with or below the yard can take in rainwater, wash-down water or even overflowing drain water during monsoon flooding.
- Long gaps between cleaning. In June 2025 Dhaka WASA's managing director told The Daily Star that foul-smelling water often comes from customers not cleaning their underground tanks regularly.[9]
Warning signs that a tank needs attention
- A change in the water's taste, colour or smell. The US Centers for Disease Control and Prevention (CDC) advises testing well water sooner when you notice such a change, and the same reasoning applies to a building supply.[8]
- Particles, worms, larvae or insects in the water, mosquitoes coming out of vents, or brown or black grit in tap aerators and filters.
- Slime or a dark film on the inside walls, or thick sludge on the floor, seen with a torch from the open manhole.
- A cover that is cracked, missing, unlocked or sitting loose; a vent or overflow with a torn or missing screen.
- Damp ground, cracks or puddles around the underground reservoir, or water standing over its manhole after rain.
A drop in water pressure is usually a different problem, involving the tank level, pumps, valves or pipes. It is covered in common causes of low water pressure in apartment buildings.
Who is responsible: residents, caretaker and committee
The reservoir, pumps and roof tanks are shared, so their care normally falls to the building committee or owners' association, carried out by the caretaker and outside contractors. Individual flat owners rarely have the right, or any reason, to open a shared tank. How decisions and spending are agreed is explained in our guide to running the building committee.
- Appoint one committee member as the person responsible for water storage, with a deputy.
- Keep a simple log: dates of inspections, cleaning, disinfection, test results and repairs, and who did each job.
- Keep the keys to tank covers and the roof door with named people only.
- Budget for cleaning and repairs as a regular item rather than an emergency expense; our guide to planning a preventive maintenance schedule shows how.
Safety first: confined spaces and chlorine
HSE explains why. Oxygen can be used up inside steel tanks as rust forms, gas can enter through connecting pipes, and residues can give off fumes.[2] Its first rule is to avoid entry when the work can be done from outside, for example with a camera or long-handled tools. If entry is unavoidable, it expects a safe system of work: a supervisor, trained and fit workers, pumps and inlets isolated and locked off, air tested with a calibrated gas detector, ventilation, and rescue arrangements ready before anyone goes in.[2] Relying on the emergency services for rescue is not enough.[3]
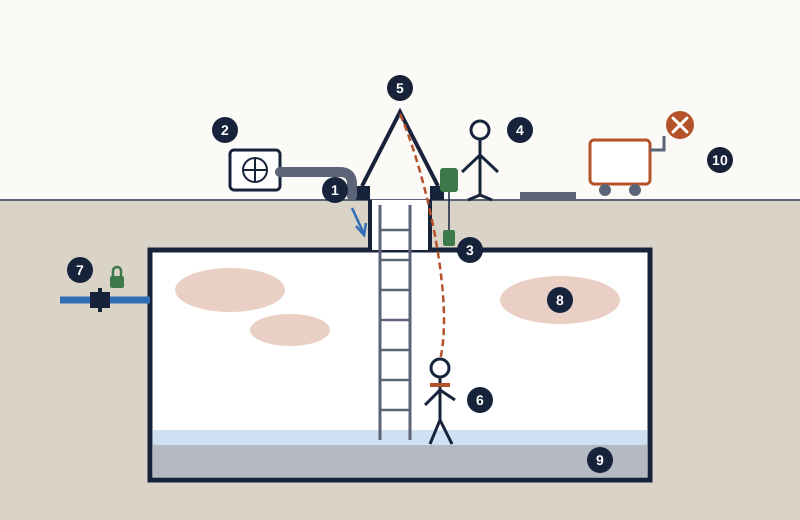
- Raised kerb and sealed manhole cover to keep surface water out
- Fan and duct blowing fresh air into the reservoir
- Gas detector testing the air before and during entry
- Standby person who stays at the hatch and never goes in
- Harness lifeline running to a fixed point outside
- Trained worker wearing gloves, boots and eye protection
- Pump and inlet valve isolated and locked off
- Hazard: lack of oxygen, or gas and fumes collecting in the space
- Sludge and a slippery floor
- Petrol-driven pump or generator: never at the hatch or inside
Tools, materials and equipment a cleaning crew should bring
- A submersible or surface pump and hoses to drain the tank, and a route to dispose of the water.
- Stiff brushes, including long-handled ones so much of the scrubbing can be done from outside; WHO's note suggests a brush fixed to a long pole for this.[1]
- A blower or fan to push fresh air into the tank before and during the work; WHO advises always blowing fresh air in before anyone enters.[1]
- A calibrated gas detector, used by someone trained to operate it.[2]
- Gloves, boots, eye protection and a hat, and a harness with a lifeline running to a point outside the tank.[1][2]
- Extra-low-voltage lights and tools protected by a residual current device (RCD); for inside metal tanks HSE gives typically less than 25 V.[2]
- Chlorine (bleach or calcium hypochlorite), a plastic mixing bucket, and chlorine test strips or a simple test kit.
Step by step: how a professional tank clean should run
The sequence below follows WHO's method of cleaning, disinfecting and safely disposing of the waste water, adapted for a building's fixed tanks.[1] The committee's job is not to do the work but to make sure each step happens and is recorded.
- Agree the date with residents and tell them how long the water will be off. Ask flats to store enough water for that period.
- Close the inlet from the main supply, and switch off and lock off the pumps at their breaker, so no water can flow in and no pump can start while people are working.[2]
- Drain the tank through its washout (drain) valve at the base if it has one, rather than the normal outlet, so the sediment leaves with the water; WHO recommends this for permanent tanks.[1] Do not let the dirty water run down the riser to the flats.
- Ventilate the tank and test the air before anyone enters. Keep a person at the hatch the whole time someone is inside.[1][2]
- Remove the sludge, then scrub the walls, floor, corners and underside of the cover with detergent and water, working from outside with long-handled brushes where possible.[1]
- Rinse and flush until no trace of detergent remains, and pump the rinse water out.[1]
- Repair before refilling: seal cracks, replace damaged screens, gaskets and cover hinges, and clean the float valve and pipe openings.
- Disinfect with the method and dose the contractor has stated in writing, keeping the tank closed for the full contact time. To disinfect the pipes too, CDC's cistern method runs each tap until chlorine can be smelt, then leaves the solution for at least 12 hours.[5]
- Drain the chlorinated water carefully to a sewer, not into a pond, canal or river; WHO warns that high chlorine levels can kill fish and plants.[1]
- Refill with clean supply water, then run each tap until the chlorine smell fades; CDC describes this final flushing step for cisterns.[5]
- Record the date, who did the work, what was found, the chemical and dose used, and any repairs. Lock the covers.
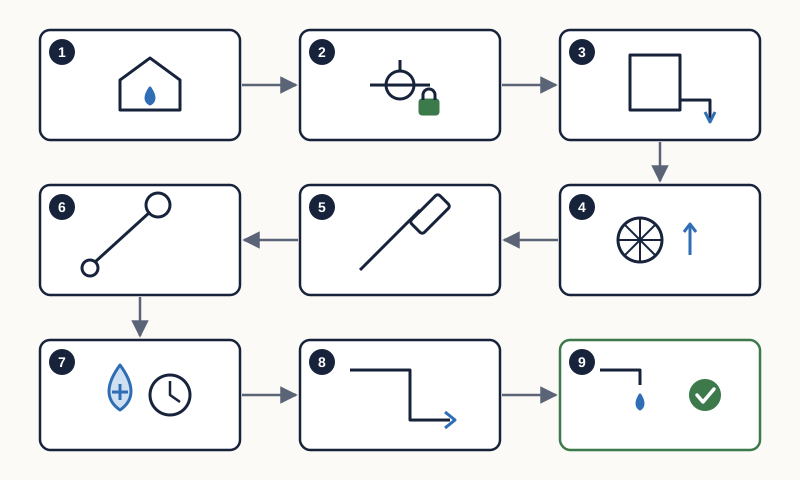
- Notify residents and ask them to store water
- Close the inlet and lock off the pumps
- Drain through the washout valve
- Ventilate, test the air, place a standby person
- Remove sludge, scrub and rinse
- Repair cracks, covers and screens
- Disinfect for the stated contact time
- Drain the chlorinated water to a sewer
- Refill, flush the taps, test and record
Disinfection: what the published methods say
Published methods differ because they were written for different situations and use different chemicals. The table summarises three of them. They are shown so that you can question a contractor's method, not as a recipe for untrained people.
| Source and purpose | Chemical and dose as stated | Contact time | Afterwards |
|---|---|---|---|
| WHO technical note: tanks brought into use in emergencies[1] | Granular high-strength calcium hypochlorite, 80 g per 1,000 litres of tank capacity, added with the tank a quarter full and then topped up | 24 hours (doubling the dose shortens it to 8 hours) | Empty completely, dispose of the strong solution safely, fill with drinking water, leave about 30 minutes, empty again |
| NSW Health: routine disinfection of household rainwater tanks[4] | About 5 mg/L chlorine: roughly 7 g calcium hypochlorite or 40 mL sodium hypochlorite per 1,000 litres | At least 2 hours; ideally wait 24 hours before use | Aim for at least 0.5 mg/L free chlorine 30 minutes after dosing |
| CDC: cisterns holding treated public water after a disaster[5] | 3 cups of unscented 5–9% bleach per 100 US gallons (about 380 litres) | At least 12 hours in the tank and pipes | Drain to a sanitary sewer, refill, run taps until the chlorine smell has gone |
Whichever method is used, ask the contractor to write down the chemical, its strength, the amount for your tank's volume and the contact time. For a rectangular tank, WHO's note gives the volume as length × width × depth in metres × 1,000 litres.[1] Bleach strength varies by brand and fades with age, one more reason to leave dosing to trained people. Water contaminated with fuel or chemicals cannot be made safe with chlorine and must be drained.[5]
Covers, vents, overflows and mosquito screens
Most contamination is easier to keep out than to clean out. WHO's note says water stays clean only if it is stored safely, in a covered tank with a lockable access lid.[1] NSW Health adds that hatches should be tightly sealed against animals and children, and that ground-level covers on in-ground tanks should be sealed against stormwater.[4]
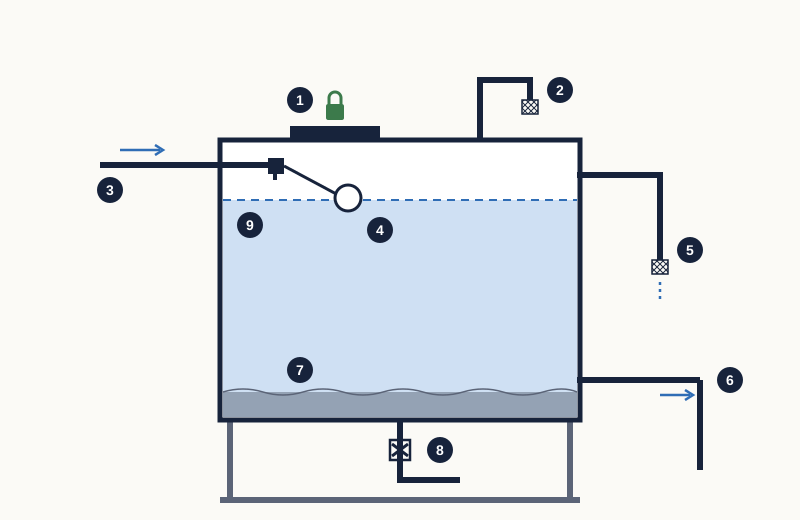
- Lockable, close-fitting access cover
- Vent with a downturned end and fine insect mesh
- Inlet pipe from the pump
- Float valve that shuts the inlet when the tank is full
- Overflow pipe with an insect screen, discharging where it can be seen
- Outlet to the flats, set slightly above the floor
- Sludge layer that settles on the floor
- Washout (drain) valve at the base for emptying and flushing out sediment
- Normal water level
- Covers: rigid, close-fitting, lockable and not cracked. A raised kerb round an underground manhole helps keep yard water out.
- Vents: turned down or capped, with intact fine mesh.
- Overflow: screened, and discharging where you can see it run. A running overflow tells you the float valve is not shutting off.
- Screens: NSW Health suggests close-fitting insect-proof screens of about 1 mm, cleaned regularly and checked at least once a year.[4]
- Mosquitoes: WHO's dengue guidance is to cover, empty and clean domestic water storage containers weekly.[7] A building tank cannot be emptied weekly, so a sealed cover and intact screens matter most. Never pour kerosene or oil in to kill larvae.[4]
Testing the water
Looking into a tank shows sludge and screens, not germs. CDC explains that total coliform bacteria are used as an indicator because they reach water by the same routes as disease-causing germs, and that E. coli points to faecal contamination.[8] These tests need a certified laboratory.[8] In Bangladesh, ask a recognised government, university or accredited private laboratory how to collect and deliver the sample.
- When the water's taste, colour or smell changes.[8]
- After flooding or surface water has reached the reservoir, or after repairs to the tanks or pipes.[8]
- When a dead animal, larvae or heavy contamination is found in a tank; NSW Health suggests considering a test if small animals are found or the water smells or tastes bad.[4]
- Once a year as a baseline; CDC suggests yearly coliform testing for private wells.[8]
- After disinfection, a simple chlorine test kit at the tap shows whether chlorine is still present; it does not replace a bacteria test.
A routine inspection and cleaning schedule
We found no official Bangladeshi schedule for cleaning building tanks. NSW Health suggests looking inside every six to twelve months and removing sludge when found.[4] A practical approach is to inspect from outside regularly, clean and disinfect whenever an inspection or incident calls for it, and in any case on a fixed yearly or twice-yearly date. Add these checks to your monthly building maintenance checklist; for roof safety see how to inspect a flat roof before the monsoon.
- Weekly: check every cover, lock and screen, look for mosquitoes or larvae, and make sure no water stands over the reservoir manhole.
- Monthly: shine a torch in from outside the hatch to look for floating debris, slime and sludge; never lean in.
- Monthly: check that the inlet float valve shuts off and the overflow is not running.
- Monthly: walk round the reservoir and roof tank looking for cracks, damp patches and leaking joints.
- Every 6–12 months: have a professional inspect the inside and remove sludge.[4]
- Before and after each monsoon: check reservoir covers and kerbs, and inspect again after any flooding or waterlogging.
- Yearly: send a sample for bacteria testing and file the report.[8]
Common mistakes to avoid
- Sending a caretaker or day labourer into the reservoir with a bucket and no air test, standby person or rescue plan.[2]
- Running a petrol pump or generator near the open hatch to drain the tank; HSE warns that carbon monoxide from petrol engines is so dangerous that such equipment should never be used in confined spaces.[2]
- Trying to freshen the air inside with oxygen; HSE warns this greatly increases the risk of fire or explosion.[2]
- Mixing bleach with other cleaners, guessing the dose, or using the tank before the contact time is over.[4][6]
- Cleaning the tank but leaving a broken cover or missing screen, so it is dirty again within weeks.
- Keeping no record, so nobody knows when the tank was last cleaned.
When to call a professional and what to ask
Work inside a tank, disinfection of shared tanks and structural repairs to a reservoir should go to a contractor who does this regularly. NSW Health strongly recommends professional cleaners where entry is needed, citing heat exhaustion, carbon monoxide, falls and electric shock.[4] Call one at once if you find a dead animal, a sewage or fuel smell, a cracked reservoir or surface water getting in. Supply-pipe leaks are covered in how to inspect water supply pipes for leakage.
- How will you test the air, ventilate the tank and rescue a worker if something goes wrong?
- Who will stand at the hatch, and what training do your workers have?
- How will the pumps and inlet be isolated and locked off?
- Which chemical will you use, at what strength and dose, and for how long?
- Where will the dirty water and the chlorinated water go?
- Will you give us a written report with photos of the tank before and after?
What drives the cost of tank cleaning
We could not find reliable published prices for tank cleaning in Bangladesh, so this guide gives no figures. The price will mainly depend on:
- The number and volume of tanks, and how much sludge has built up.
- Access: a large underground reservoir with a small manhole takes longer and needs more safety equipment than a small roof tank.
- Safety equipment and trained staff: air testing, ventilation, harnesses and a standby person add cost, and are worth paying for.
- Disinfection, water testing and a written report, if included.
- Repairs found during cleaning, such as new covers, screens or valves, or crack sealing.
Get at least two written quotes for the same scope of work so you can compare like with like. Our guide to getting and comparing repair quotes explains how. A suspiciously cheap quote often means the safety steps are being left out.
Next steps
- This week: walk round with the caretaker and check every cover, lock, vent and overflow screen.
- Find out when the tanks were last cleaned; if nobody knows, book a professional clean and disinfection.
- Make one committee member responsible for water storage, and start a log.
- Get two written quotes that include air testing, a standby person, disinfection details and a report.
- Arrange a laboratory bacteria test, and repeat it yearly or whenever the water changes.[8]
- Tell residents and the caretaker clearly that nobody enters the reservoir without a trained crew.
Common questions
- How often should our building clean its water tanks?
- We could not find a single official figure for Bangladesh. NSW Health suggests looking inside storage tanks every six to twelve months and removing sludge.[4] Many committees fix one or two cleaning dates a year and add an extra clean after flooding, contamination or major repairs.
- Can our caretaker clean the underground reservoir?
- Not by going inside unless trained, equipped and supervised. HSE says the people killed in confined spaces include untrained rescuers, and expects air testing, ventilation and rescue arrangements before entry.[2] A caretaker can do the outside checks: covers, screens, overflow, leaks and the log.
- Is bleach safe for disinfecting a drinking-water tank?
- Unscented household bleach is one option: CDC's cistern method uses unscented 5–9% bleach, and NSW Health mentions household bleach or pool chlorine but not stabilised chlorine.[5][4] The dose depends on the tank's volume and the product's strength, and the tank must stand for the full contact time and then be flushed.
- The water smells of chlorine after cleaning. Is it safe?
- A faint chlorine smell soon after disinfection is expected, and CDC's method has you run the taps until the smell fades.[5] A strong smell means too much chlorine is left, so flush for longer before drinking. If the smell is of sewage, rotten eggs or fuel instead, stop using the water and call a professional.
- We cleaned the tank but the water still smells or has insects. Why?
- The cause may be elsewhere: a loose cover or screen, sludge left in the reservoir, contamination in the pipes, or the incoming supply. In a 2025 Daily Star report, Dhaka WASA blamed poorly maintained household tanks, while one resident said cleaning his tank twice had not solved the problem.[9] Check covers and screens, have the water tested, and report persistent supply problems to WASA.
Sources
The facts in this guide were checked against these sources.
- Cleaning and disinfecting water storage tanks and tankers (Technical notes on drinking-water, sanitation and hygiene in emergencies, No. 3) — World Health Organization, prepared by WEDC, Loughborough University (published Updated July 2013). accessed 18 October 2026.
- Confined spaces: A brief guide to working safely (INDG258 rev1) — UK Health and Safety Executive (HSE) (published January 2013). accessed 18 October 2026.
- Introduction to working in confined spaces — UK Health and Safety Executive (HSE) (published Updated 12 January 2026). accessed 18 October 2026.
- Managing rainwater tanks for safe drinking water — NSW Health (New South Wales Government, Australia) (published Current as at 11 September 2026). accessed 18 October 2026.
- Cistern Safety and Disasters: Before, During, and After — US Centers for Disease Control and Prevention (CDC) (published 20 August 2024). accessed 18 October 2026.
- How to Safely Clean and Sanitize with Bleach — US Centers for Disease Control and Prevention (CDC) (published 26 August 2026). accessed 18 October 2026.
- Dengue and severe dengue (fact sheet) — World Health Organization (published 21 August 2025). accessed 18 October 2026.
- Guidelines for Testing Well Water — US Centers for Disease Control and Prevention (CDC) (published 1 July 2024). accessed 18 October 2026.
- Wasa water stinks — The Daily Star (Bangladesh) (published 20 June 2025). accessed 18 October 2026.
This guide is general information. Have gas, structural and live electrical work done by a qualified, licensed professional. Your building’s rules and committee decisions take precedence over anything written here.
Written from the cited sources by the RUAP.NET editorial team. It has not been reviewed by a licensed engineer, plumber or electrician; for work on gas, structure or live electrics, use a qualified professional.
Spotted a mistake? Tell us — we check it, correct the guide and record the date of the correction. Report an error →