
Washroom Fittings Maintenance: A Routine Plan for Cleaning, Descaling and Safety
Chrome ruined by the wrong cleaner, taps choked with limescale, loose towel rails and a neglected geyser: most washroom problems can be avoided with a little regular care. This guide shows how to clean and check each fitting, step by step.
Match the cleaner to the surface. On chrome taps, put a mild citric-acid cleaner on a cloth, leave it briefly and rinse it off; hydrochloric acid, bleach, vinegar and scouring powders can damage chrome.[1] Ceramic basins and WCs are far tougher, but scouring powders should be kept off them too.[2]
Never mix bleach with acid or ammonia cleaners; together they release toxic gas.[4]
Clean weekly and do a short inspection monthly: tap flow, health-faucet hose, floor trap, wall fittings and exhaust fan. On the water heater, the owner's job is observation and simple checks; servicing and electrical work belong to a trained technician.[7]
Most of this can be done yourself with ordinary tools.
A washroom has more working parts than any other room in a flat: taps, basin, WC, health faucet, floor trap, exhaust fan, often a water heater, and the rails, mirror and cabinet on the walls. The cleaner that suits one surface can damage the one beside it. With four bathrooms in every RUAP flat, a short, regular routine saves far more than it costs.
The fittings in a washroom and what each needs
This guide treats the washroom as one maintenance job: what to clean, with what, how often, and what to check while you are doing it. Repairs to individual parts have their own guides. For dripping taps, cartridges and shower valves see how to maintain taps, showers and valves; for a running or weak flush see toilet flushing problems; and to trace water that is escaping, see how to find and fix bathroom leaks.
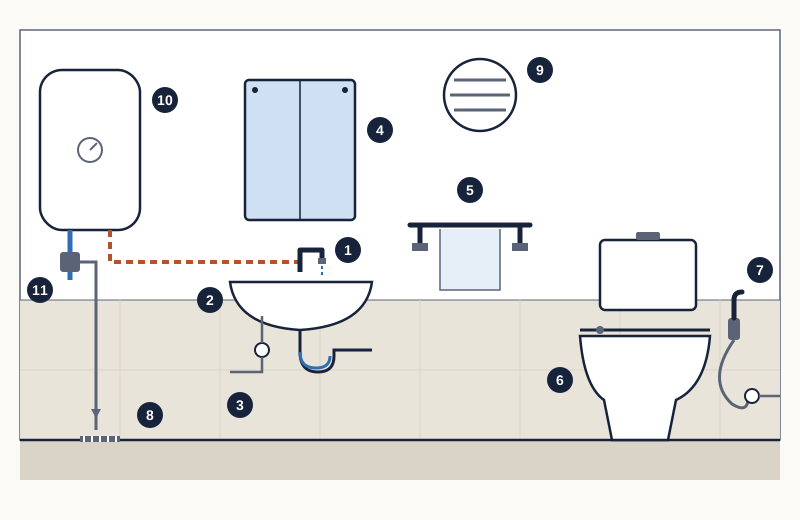
- Basin tap and the aerator at its tip, where limescale collects
- Glazed ceramic basin
- Angle valve, flexible hose and trap under the basin
- Mirror cabinet: hinges, shelves and wall fixings
- Towel rail and its wall brackets
- WC pan, seat hinges and cistern
- Health faucet: spray head, hose and its valve
- Floor-trap grating
- Exhaust-fan grille
- Wall-hung electric water heater (geyser)
- Geyser safety valve and the discharge pipe running down to a drain
Warning signs that a fitting needs attention
Most fittings give notice before they fail. During a care round, look and listen for:
- A tap or health faucet that splutters, sprays sideways or runs slower; limescale in the aerator is a common cause.[3]
- White crust on spouts, shower heads and the WC rim, a sign of hard-water minerals.[9]
- Chrome that is dull, spotted or peeling; damage from the wrong cleaner cannot be polished out.
- A rail, mirror or cabinet that moves when pulled gently, or rust stains below its screws.
- A health-faucet hose that is kinked, cracked, bulging or wet at either end.
- A floor trap that drains slowly or smells.
- An exhaust fan that is noisy, slow or barely draws a tissue to its grille.
- On the water heater: drips from anywhere but the discharge pipe, a warm plug, or a breaker that keeps tripping.
Know your finishes: chrome, ceramic and stainless steel
Most damage to washroom fittings comes from cleaning, not from use. The basic rule: choose the cleaner for the surface, read the label, and rinse it off when you finish.
Chrome-plated taps, mixers and shower heads
Chrome is a thin plated layer. Hansgrohe, a German tap maker, advises a mild citric-acid cleaner at the dose on the bottle, left on for no more than 10 minutes and rinsed off with clean water, sprayed onto a cloth rather than the tap. It warns that cleaners containing hydrochloric, formic or acetic acid (the acid in vinegar) or chlorine bleach, and scouring powders or scourer sponges, can cause significant damage.[1] Check the care leaflet for your own brand.
Ceramic basins and WCs
Glazed ceramic is much tougher. Villeroy & Boch describes its glazed ceramics as resistant to common household acids and alkalis; water and a damp cloth are usually enough, with a bathroom or vinegar-based cleaner for water marks and soap residue.[2] It advises against scouring creams and powders, highly concentrated drain cleaners, tap or steel cleaners and powdered toilet cleaners, and recommends a soft sponge.[2] Fluoride compounds in rust removers and some toothpastes can stain ceramic if left on, so wipe them off promptly.[2]
At the basin the advice pulls both ways: vinegar suits the ceramic bowl but, according to Hansgrohe, not the chrome tap on it, and tap cleaners should not sit on ceramic.[1][2] Clean and rinse the tap first, then the bowl.
Stainless steel rails, shelves and grab bars
Many towel rails and accessories are stainless steel or chrome-plated brass. The Australian Stainless Steel Development Association (ASSDA) explains that chlorine, the active part of bleach, is very aggressive to stainless steel, and that attack can start where bleach-laden washdown water is left standing.[5] If you use bleach on nearby tiles, rinse splashes off metal fittings and dry them.
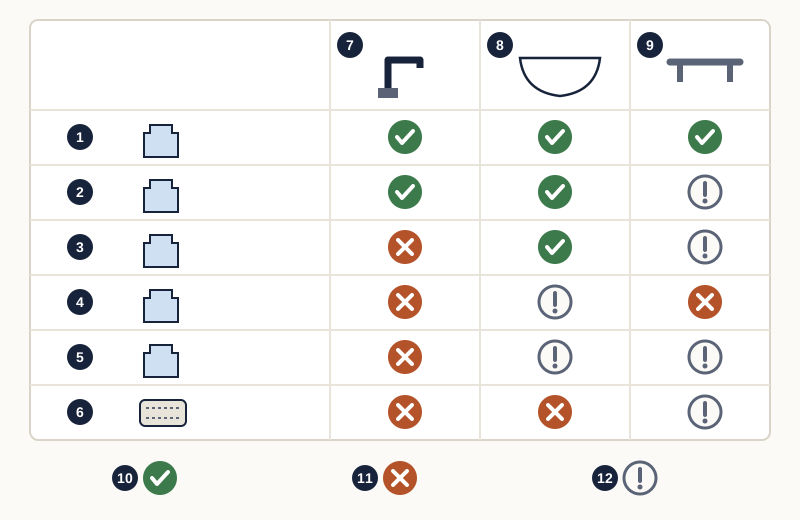
- Mild detergent and water
- Mild citric-acid descaler (short contact, then rinse)
- Vinegar or vinegar-based cleaner (acetic acid)
- Chlorine bleach
- Hydrochloric-acid or other strong acid tile and toilet cleaners
- Scouring powder, cream or scourer pad
- Chrome-plated taps and shower fittings
- Glazed ceramic basin and WC
- Stainless steel rails and accessories
- Suitable according to the cited sources
- Avoid: the cited sources say it can cause damage
- Caution: not clearly covered by the cited sources, or only with care; test a hidden spot, keep contact short and rinse
Tools and materials for routine care
- Soft cotton cloths and a non-scratch sponge; one cloth kept for chrome.
- Mild liquid detergent and a citric-acid descaler or your tap maker's cleaner.
- White vinegar, for ceramic only.
- An old soft toothbrush and wooden toothpicks.
- A small bowl, or a plastic bag and rubber band, for soaking.
- Rubber gloves and safety glasses.
- Screwdrivers and an adjustable spanner, with a cloth to protect plating.
- A torch and a notebook or phone for records.
Step by step: a care routine for one washroom
Allow about half an hour per washroom the first time. After that, most rounds take less.
- Open the window or run the exhaust fan, put on gloves and clear away toiletries.
- Rinse surfaces with clean water first so grit is not rubbed into the finish.
- Clean taps and shower fittings with a suitable cleaner on a cloth, no longer than the label allows, then rinse and dry.[1]
- Clean the basin and WC with a ceramic-safe cleaner and soft sponge, including under the rim and round the seat hinges.[2]
- Check the flow from each tap and the health faucet; if it splutters or sprays sideways, descale (see below).
- Run dry tissue round the angle valves, hoses and trap under the basin; it shows even a faint seep.
- Listen to the cistern after it refills; it should go quiet. If not, see the toilet flushing guide.
- Clear hair from the floor-trap grating and pour in a mug of water to keep the trap's water seal.
- Pull gently on each rail, hook, mirror and cabinet; tighten loose screws by hand, without overtightening into tiles.
- Wipe the exhaust-fan grille with the fan off, and glance at the heater's discharge pipe and plug.
- Dry the chrome with a soft cloth and note anything that needs repair.
Descaling taps, aerators and spray heads
Limescale is the mineral hard water leaves behind, mainly calcium and magnesium. The US Geological Survey (USGS) notes that it builds up in fixtures and forms scale in water heaters that lowers their efficiency.[9] Water hardness depends on the source, so watch your own fittings to judge how often to descale.
The aerator is the small screen at the tip of the spout. When it scales up, the tap flows more slowly and sprays in different directions.[3] To clean it:
- Close the basin plug so small parts cannot fall into the waste.
- Wrap a cloth round the spout tip and unscrew the aerator by hand, or with a wrench over the cloth.[3] If it will not move, stop rather than force it.
- Separate the screen or insert, housing nut and rubber washer, noting their order.[3]
- Soak them in citric acid; Kärcher suggests half a tablespoon of powder in 100 ml of warm water for about 15 minutes.[3]
- Brush the screen, clear the holes with a toothpick, rinse and refit in order, washer included.[3]
- For a head that does not come apart, tie a bag of solution round it so the nozzles are covered, keep the soak short on chrome, then rinse.[3][1]
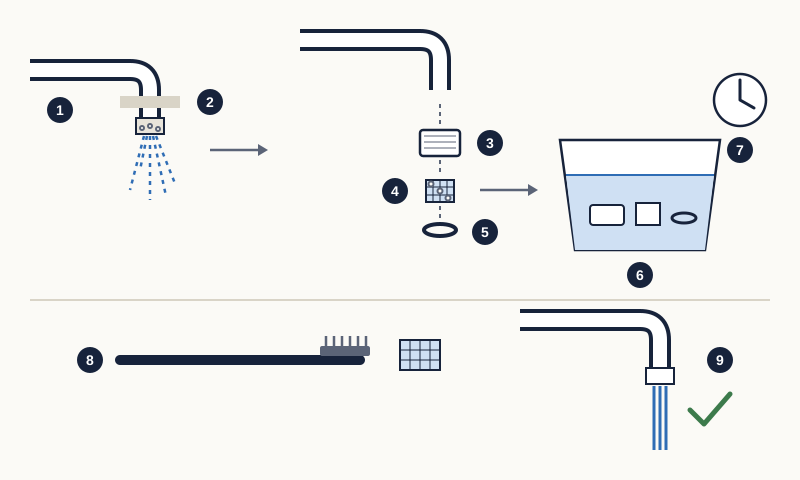
- Scaled aerator: the stream splutters and sprays sideways
- Cloth wrapped round the spout while unscrewing
- Aerator housing nut
- Screen or insert, where scale particles lodge
- Rubber washer: do not forget to refit it
- Parts soaking in warm citric-acid solution
- Short soak, about 15 minutes or until the scale softens
- Brush the screen with a soft toothbrush and rinse
- An even, straight stream after refitting
Kärcher also mentions vinegar, but as Hansgrohe lists acetic acid among cleaners that damage its fittings, this guide suggests citric acid for anything plated.[3][1] If the fault is a cartridge or valve rather than the aerator, see how to maintain taps, showers and valves.
Health faucets, WCs and floor traps
Health faucet (hand spray)
The hand spray beside the WC is used many times a day, and its hose often stays under pressure. Kohler's installation sheet for one health faucet sets a maximum working pressure of 5 bar, with a pressure reducer above that, shows a flow regulator and washer at the hose end, and warns against keeping the spray near a heater.[8] Wipe the head, clear its nozzles, check the hose is not kinked or rubbing, and look for drips at the valve and both hose ends. A worn hose is cheap to replace; a burst one floods the floor.
WC pan and seat
Clean the pan with a ceramic-safe toilet cleaner, avoid powders and scourers that scratch the glaze, and do not leave strong drain or tap cleaners standing in the bowl.[2] Check the seat hinges and fixing nuts, which loosen with use, and look for stains at the joint where the pan meets the floor.
Floor trap
The floor trap holds a small pool of water that blocks smells from the drain. Clear the grating regularly, and run water into rarely used washrooms every week or two so the seal does not dry out. Persistent smells or slow drainage are covered in how to find and fix drain odours and how to clear blocked drains.
Towel rails, mirrors, cabinets and the exhaust fan
Wall fittings hang on screws in plastic wall plugs, and steam and wet towels slowly work them loose. If a rail moves, tighten the screws; if the plug spins, it needs a new or larger plug, which may mean drilling tiles. Grab rails that people lean on should be fixed by someone who can confirm they will take a person's weight.
Mirrors suffer when water gets in at the edges, where the silvering can darken, so spray glass cleaner onto a cloth, not the mirror. Check cabinet hinges and shelf supports are tight.
The exhaust fan removes the moisture that feeds mould; the US Environmental Protection Agency (EPA) advises running it or opening a window when showering.[10] Every few months, switch it off and wipe dust from the grille. Fan sizing and run times are in how to prevent mould in bathrooms. If the fan hums without turning or smells hot, leave it off and call an electrician.
Water heater (geyser) safety basics
Many Dhaka flats have a wall-hung electric storage water heater in at least one washroom. It combines pressure, heat and electricity, so the owner's part is observation and simple checks; installation and servicing are for a qualified technician. One maker's manual for such a heater (Electrolux) shows what needs looking after.[7]
- Safety valve: the one-way valve on the cold inlet releases water if pressure rises too far. The manual says to operate it regularly to clear lime and confirm it is not blocked; some dripping while heating is normal, and its outlet must never be blocked.[7]
- Discharge pipe: it should run continuously downward to a drain.[7]
- Earth-leakage breaker (ELCB): if there is a test button, press it regularly; the heater should switch off, and the reset button restores power.[7]
- Plug, socket and cable: check they are sound, do not get warm and are earthed.[7] A damaged cord must be replaced by the maker, its agent or a similarly qualified person.[7]
- Service: the manual recommends cleaning deposits off the heating parts yearly and having the magnesium anode, a rod that protects the tank from corrosion, checked at least every six months by the authorised service.[7]
- Fixings: the heater must hang on a solid wall able to carry twice its full weight.[7] Rust streaks, a tilt or cracked plaster round the bolts mean stop and call the installer.
- Temperature: the US Consumer Product Safety Commission (CPSC) urges about 49 °C (120 °F), noting that most adults suffer third-degree burns after two seconds at about 66 °C (150 °F) and six seconds at 60 °C (140 °F).[6] Test the water by hand before bathing a child or older person.[6]
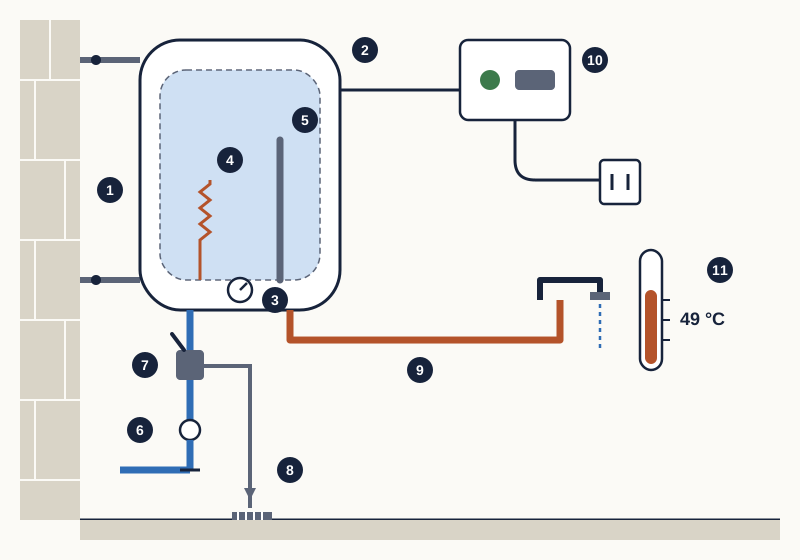
- Solid wall and mounting bolts able to carry twice the full heater's weight
- Water tank
- Temperature knob
- Heating element (inside): scale is cleaned off at the annual service
- Magnesium anode rod (inside): checked by a technician
- Cold-water inlet and isolation valve
- One-way safety valve with its lever
- Discharge pipe running continuously down to a drain; never block its outlet
- Hot-water outlet to the mixer
- Earth-leakage breaker with test and reset buttons, and a plug and socket away from splashes
- Check the water temperature at the tap before bathing; about 49 °C is recommended
Prevention: a washroom maintenance schedule
In a four-bathroom flat, taking one washroom a week gives each a full round every month. The list is per washroom.
- Weekly: clean taps, basin and WC with surface-safe cleaners; clear the floor-trap grating.
- Weekly: run water into rarely used washrooms to keep traps full.
- Monthly: check each tap and health-faucet stream; descale if it has changed.
- Monthly: run dry tissue round valves, hoses and traps; listen to each cistern.
- Monthly: press the heater's earth-leakage test button, if fitted.[7]
- As the manual directs: operate the heater's safety valve, with the discharge pipe running to a drain.[7]
- Every few months: clean the fan grille; check rails, mirrors and cabinets are firm.
- Every six months: have the heater's anode checked.[7]
- Yearly: have the heater descaled and serviced; replace tired hoses.
- Before each monsoon: make sure the exhaust fan works well for the humid months.
Common mistakes to avoid
- Using one strong cleaner everywhere: acidic tile and toilet cleaners can damage chrome, and tap cleaners should not sit on ceramic.[1][2]
- Spraying cleaner straight onto taps, where it runs into joints.[1]
- Scouring chrome or WC glaze with abrasive powder or a green scourer.[1][2]
- Mixing bleach with acid or ammonia cleaners, or using one straight after the other.[4]
- Leaving bleach splashes to dry on stainless steel.[5]
- Forcing a seized aerator with bare pliers.
- Ignoring a dripping heater or warm plug because the water still gets hot.
Repair, replace or call a professional?
Regular care keeps fittings working longer, but some faults need parts or skills. The table shows where routine care stops.
| Fitting | Your routine care | Repair or replace when | Who to call |
|---|---|---|---|
| Tap or mixer | Clean with a suitable cleaner, descale the aerator[1][3] | It drips when closed, the handle is stiff, or the chrome is peeling | Plumber; see the taps guide |
| Health faucet | Descale the head, check the hose and washers | The hose bulges, cracks or leaks at the ends; the trigger sticks | Usually a simple part swap; a plumber if the valve leaks |
| Basin and WC | Clean with ceramic-safe products[2] | The ceramic is cracked or chipped through the glaze, or the pan rocks | Plumber |
| Floor trap | Clear the grating, keep water in the trap | Smells persist or water drains slowly | Plumber; see the drain guides |
| Towel rail, mirror, cabinet | Tighten screws, keep metal rinsed and dry[5] | Plugs spin in the wall, or the item has rusted through | Handyperson or plumber |
| Exhaust fan | Clean the grille with the fan switched off[10] | It is noisy, slow, hot or stops | Electrician |
| Water heater | Watch for leaks, press the ELCB test button, keep the discharge pipe clear[7] | The tank leaks, the breaker trips, or descaling and an anode check are due | The maker's service or a qualified technician |
Replace rather than repair when the body is cracked, corrosion has broken through the plating, parts are no longer made, or the same part keeps failing. For water escaping from an unknown point, start with how to find and fix bathroom leaks. Who pays for fittings inside a flat is discussed in our flat maintenance guide.
What affects the cost of care and repairs
We could not find reliable published prices for washroom maintenance in Bangladesh, so this guide gives no figures. The relative costs are clear enough:
- Routine care costs little beyond cleaners and time; what it prevents, such as replacing a mixer stripped by the wrong cleaner, costs far more.
- Small parts such as an aerator, hose, washer or wall plugs cost far less than the fitting itself.
- A part matched to your brand and model may cost more than a generic one but avoids repeat visits.
- Work behind tiles or inside a wall costs more than work on an exposed part.
- Water-heater work usually has a call-out charge, and some warranties depend on servicing by the maker's own agents, as the Electrolux manual says of anode checks.[7]
Get written quotes that name the parts, the brand and the warranty. Our guide to getting and comparing repair quotes explains how to compare them.
Next steps
- Today: identify your finishes and read the labels on each washroom's cleaners; store bleach apart from acid and ammonia products.[4]
- This week: do one full routine in one washroom and note what needs attention.
- Descale any aerator or spray head whose stream has changed.
- Find the heater's manual, press its earth-leakage test button if fitted, and book a service if due.
- Set a reminder for one washroom a week.
- Hand repairs to the right person, with written quotes.
Common questions
- Can I use vinegar to clean chrome taps?
- Some tap makers advise against it. Hansgrohe lists acetic acid, the acid in vinegar, among the cleaners that can damage its fittings, and recommends a mild citric-acid cleaner left on for no more than 10 minutes and rinsed off.[1] Villeroy & Boch says vinegar is fine on glazed ceramic, so keep it for the basin and WC.[2] Check the care leaflet for your own taps.
- Is bleach safe on washroom fittings?
- Use it carefully, and never with other cleaners. Hansgrohe says chlorine bleach can damage its taps, and ASSDA notes that chlorine is very aggressive to stainless steel.[1][5] Health Canada warns that bleach mixed with acid or ammonia cleaners releases toxic gas.[4] If you use it on tiles or the WC, rinse nearby metal fittings afterwards.
- How often should I descale the aerators?
- There is no fixed interval; it depends on how hard your water is.[9] Check each tap's stream once a month. When it splutters, sprays sideways or slows down, the aerator needs cleaning.[3]
- What temperature should my geyser be set to?
- The US Consumer Product Safety Commission recommends about 49 °C (120 °F) to reduce scalding, and notes that even water at that temperature can cause serious burns after five minutes.[6] Set it with the external knob, if there is one, and test bath water by hand, especially for children and older people.
- Water is dripping from a small pipe under the geyser. Is it leaking?
- Not necessarily. On many storage heaters a little dripping from the safety valve's discharge pipe while the water heats is normal, and the pipe should lead to a drain.[7] Water coming from the tank body, the joints or near the plug is different: switch off and call the service agent.
Sources
The facts in this guide were checked against these sources.
- Cleaning & maintenance - FAQ — Hansgrohe. accessed 18 October 2026.
- Cleaning Ceramic: How to Clean Your Bathroom Properly — Villeroy & Boch (published 2024-06-05). accessed 18 October 2026.
- Descaling taps — Kärcher. accessed 18 October 2026.
- Reduce your risk from toxic gases: Never mix bleach with other cleaning products — Health Canada (Government of Canada) (published 2021-02-08). accessed 18 October 2026.
- Chlorine And Chloride: Same Element, Very Different Effect — Australian Stainless Steel Development Association (ASSDA). accessed 18 October 2026.
- Avoiding Tap Water Scalds (Publication 5098) — US Consumer Product Safety Commission (published 2012-03). accessed 18 October 2026.
- EYE05021WE / EYE10021WE Electric Storage Water Heater: Installation Guide & User Manual — Electrolux (Indonesia). accessed 18 October 2026.
- Installation Instructions: Health Faucet 12925ME / 12927ME — Kohler (Middle East). accessed 18 October 2026.
- Hardness of Water — US Geological Survey (USGS) Water Science School. accessed 18 October 2026.
- A Brief Guide to Mold, Moisture and Your Home — US Environmental Protection Agency. accessed 18 October 2026.
This guide is general information. Have gas, structural and live electrical work done by a qualified, licensed professional. Your building’s rules and committee decisions take precedence over anything written here.
Written from the cited sources by the RUAP.NET editorial team. It has not been reviewed by a licensed engineer, plumber or electrician; for work on gas, structure or live electrics, use a qualified professional.
Spotted a mistake? Tell us — we check it, correct the guide and record the date of the correction. Report an error →