
Bathroom Taps, Showers and Valves: How They Work and How to Keep Them Working
A tap that drips, a shower that runs hot then cold, or a valve that will not turn when you need it are small faults that waste water and become emergencies at the worst moment. This guide explains how each fitting works and how to look after it.
Most tap faults come down to one worn part: the rubber washer in an older multi-turn tap, or the ceramic cartridge in a lever or quarter-turn tap. Both can usually be cleaned or replaced once the water is isolated and you have the exact replacement.[1]
Limescale and grit are the other common enemy. Clean aerators and shower heads regularly with a mild citric-acid descaler rather than harsh chemicals, and clean and disinfect shower heads to limit the growth of bacteria.[3][4]
Operate every stop and isolation valve gently about twice a year so it does not seize, and replace flexible hoses that show rust, bulges or fraying.[8][9] Call a plumber for a seized valve, a concealed shower valve that drips, or a thermostatic mixer that will not hold its temperature.
Most of this can be done yourself with ordinary tools.
Every flat has more small valves than most people realise. A typical bathroom has a basin tap or mixer, a shower mixer with a hose or fixed head, a hand-held bidet spray (health faucet), angle valves under the basin and beside the cistern, and often one or more stop valves set into the wall that shut off the whole bathroom. Each has a few moving parts and seals that wear out. Knowing which kind you have is half the repair.
How taps, mixers and showers work
Compression (washer) taps
Older two-handle taps, and some cheap modern ones, are compression taps. Turning the handle screws a spindle down until a rubber washer on its end presses onto a brass seat and stops the flow. Every use squeezes the washer a little more, so over time it hardens, cracks or collects limescale, and the tap starts to drip.[1] The retailer Tap Warehouse notes that washers split as they wear and that this design is found mainly on traditionally styled taps.[2] A simple test: if the handle needs several full turns to go from off to fully on, it is almost certainly a washer tap.
Ceramic disc cartridges and single-lever mixers
Most modern taps use a ceramic cartridge instead. Inside are two hard ceramic discs with openings; one stays still while the other turns with the handle, and water flows only when the openings line up.[2] These taps go from off to full in a quarter or half turn. Single-lever mixers use a larger cartridge that blends hot and cold as well as controlling the flow. Cartridges outlast washers, but how long they last depends on water hardness and the quality of the tap,[2] and a drip usually means the cartridge is worn or clogged with scale or grit.[1]
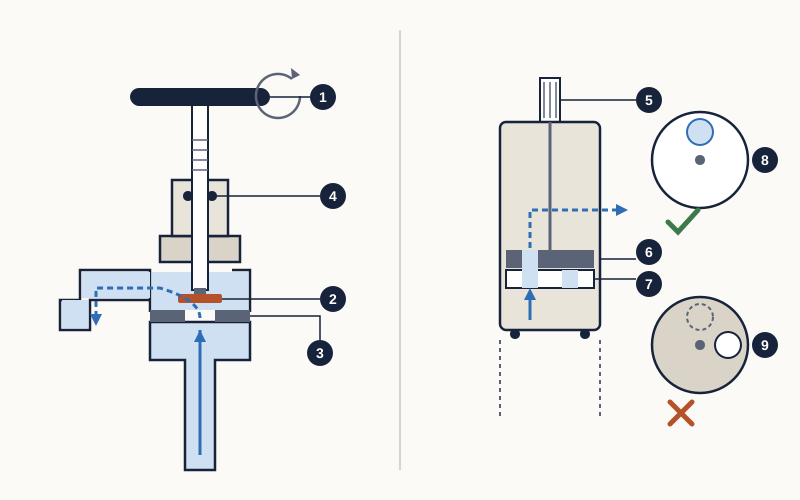
- Handle and spindle: several turns move the spindle up or down its thread
- Rubber washer on the jumper, which causes drips when worn
- Brass seat that the washer presses against
- O-ring seals round the spindle; when worn, water appears at the handle
- Ceramic cartridge with a splined stem, working with a quarter or half turn
- Ceramic disc that turns with the handle
- Fixed ceramic disc
- Plan view: openings aligned, water flows
- Plan view: openings moved apart, flow stopped
Shower mixers and thermostatic valves
A manual shower mixer simply blends hot and cold in whatever proportion the handle is set to, so the temperature shifts whenever the pressure on either side changes. A thermostatic mixing valve (TMV, or thermostatic mixer) contains a temperature-sensitive element that adjusts the blend to hold your setting. WaterSafe, the UK register of approved plumbers, explains that such a valve keeps its temperature when pressure changes and shuts off the flow if either supply fails, and says these devices should be maintained every year.[6] The UK Health and Safety Executive (HSE) treats them as the main control against scalding in care settings, recommending that bath and shower water there should not exceed 44°C and that the valves are monitored and maintained.[5] Hot water stored at around 60°C to control Legionella bacteria is hot enough to scald, which is why the point where it is mixed matters.[4]
Valves you should know
- Angle valve: the small valve under a basin or beside a toilet, between the wall pipe and the flexible hose. Most close with a quarter turn of a small handle or a screwdriver slot.
- Lever (ball) valve: a quarter-turn valve with a flat lever. When the lever lies along the pipe the valve is open; across the pipe, it is closed.
- Screw-down stop valve: a wheel or crutch handle that takes several turns, clockwise to close. It works like a compression tap, with a washer inside.
- Concealed wall valve: many Bangladeshi bathrooms have stop valves set into the wall behind a chrome cover, one for each supply line. Find out which line each one controls before you need it.
- Non-return (check) valve: a one-way valve, often built into mixer inlets or shower connections, that stops used or mixed water flowing back into the supply pipes.
Warning signs and what usually causes them
Match what you see to the likely part before you buy anything:
| Symptom | Likely cause | What to try first |
|---|---|---|
| Multi-turn tap drips from the spout when closed | Worn, cracked or scaled washer[1]; sometimes a damaged seat | Replace the washer |
| Lever or quarter-turn tap drips from the spout | Worn or clogged ceramic cartridge[1] | Clean or replace the cartridge |
| Water seeps round the handle while the tap is running | Worn O-ring or spindle seal | Replace the seal in the headgear |
| Weak or uneven spray from a tap or shower head | Limescale or grit in the aerator or nozzles[3] | Clean and descale |
| Shower swings between hot and cold | Uneven supply pressure, other taps in use, a faulty thermostatic valve or a hot-water problem[7] | Check other outlets, then clean the mixer's filters |
| Shower head drips at the arm or hose joint | Loose thread or worn hose washer[11] | Re-seal the joint and renew the washer |
| Pipes bang when a tap is shut quickly | Water hammer from quick-closing valves, loose pipes or high pressure[12] | Close taps more gently; ask a plumber to secure the pipes |
Weak flow at every outlet in the flat, rather than at one fitting, is usually a supply problem, not a tap fault; see low water pressure in apartment buildings. To trace water that is getting into walls or floors, use our bathroom leaks guide.
Tools, parts and materials
- An adjustable spanner and slip-joint pliers, with a cloth to wrap round chrome so it does not get scratched.
- Flat and cross-head screwdrivers, and a set of Allen (hex) keys for lever handles.
- Replacement washers, O-rings or a cartridge matched to your tap's make and model; take the old part with you.
- PTFE (Teflon) tape for threaded shower joints.
- A mild citric-acid descaler, a soft brush (an old toothbrush) and a small bowl or plastic bag for soaking.
- Silicone grease suitable for taps and drinking water, if the maker's instructions call for it.
- A towel to lay in the basin or shower tray so small parts cannot fall into the drain.
Step-by-step maintenance and repairs
1. Isolate the fitting
- Find the nearest valve: the angle valve under the basin, a concealed wall valve, or the flat's main stop valve.
- Close it gently. A quarter-turn valve needs only a quarter turn; turn a screw-down valve clockwise until it stops, without forcing it.[8]
- Open the tap or shower to let the trapped water drain, and check that the flow stops completely.
- Put the plug in, or lay a towel in the basin or tray, to catch small parts.[1]
- Take a photo of the fitting before you take it apart, so you can put it back the same way.
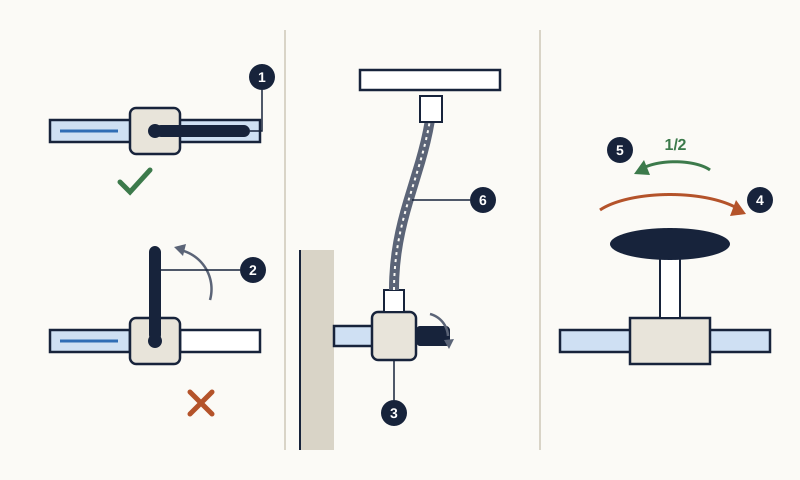
- Lever valve open: lever lies along the pipe
- Same valve closed: lever turned a quarter turn, across the pipe
- Angle valve under the basin, between the wall pipe and the tap hose
- Screw-down stop valve: turn clockwise to close
- After opening fully, turn back half a turn so it does not seize
- Flexible hose: check for rust, bulges, broken strands and kinks
2. Replace a washer in a compression tap
- Prise off the cap on the handle (often marked hot or cold), undo the screw beneath it and pull the handle off.
- Hold the tap body steady with one hand and unscrew the headgear (the large brass nut) with a spanner.
- Remove the old washer from the jumper at the bottom of the headgear. WaterSafe suggests a scaled washer can be descaled, but a cracked or brittle one should be replaced.[1]
- Look into the tap body at the seat. If it is pitted or scored, a new washer will not seal for long; the seat needs regrinding by a plumber, or the tap needs replacing.
- Fit the new washer, refit the headgear firmly but not too tightly, and replace the handle.[1]
- Open the isolation valve slowly and check for drips at the spout and round the spindle.
3. Clean or replace a ceramic cartridge
- Remove the handle, usually held by a grub screw under a small cap, then unscrew the cover or retaining nut.
- Note which way round the cartridge sits, then pull it straight out.[1]
- Wipe off grit and scale with a damp cloth and a mild descaling solution, and check the small rubber seals on its base.[1]
- If it is cracked or worn, or still drips after cleaning, replace it with the exact model; cartridges that look alike often differ in size and in the number of splines on the stem.
- Refit it the same way round, tighten the nut evenly, restore the water and test the hot, cold and middle positions.
4. Descale aerators, shower heads and hoses
- Unscrew the aerator from the tap spout by hand or with a cloth-wrapped spanner.
- Soak it in water with a citric-acid cleaner until the scale loosens from the screen; Hansgrohe suggests about ten minutes in hot water with a little mild cleaner.[3]
- On shower heads with rubber nozzles, rub the nozzles with a finger while the water runs to break off light scale.[3]
- For heavier scale, unscrew the hand shower from the hose and soak only the spray face in descaler, then rinse it thoroughly.
- Rinse everything in clean water and wipe the chrome dry with a soft cloth; Hansgrohe advises against vinegar-based cleaners, strong acids, bleach and metal scourers on its finishes.[3]
- Clean and disinfect shower heads regularly. HSE advises landlords to tell tenants to do this, because showers produce fine droplets that can carry Legionella bacteria.[4]
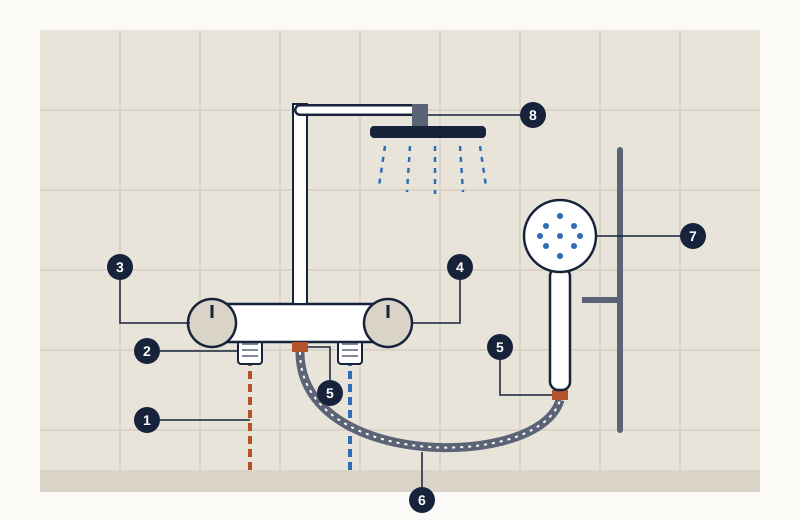
- Hot and cold supply pipes inside the wall
- Inlet connectors; many mixers have a filter and non-return valve here
- Temperature control (with a cartridge inside on thermostatic models)
- Flow control and diverter, sending water to the hand shower or the overhead shower
- Sealing washers at both ends of the hose
- Flexible shower hose
- Hand-shower spray face and nozzles, where scale builds up
- Threaded joint between the shower arm and the overhead head
5. Replace a shower hose or connector hose
- Inspect braided hoses for rust spots, bulges, broken strands and sharp kinks; the insurer Allianz treats each of these as a sign that a hose may soon burst.[9]
- Close the isolation valve and unscrew the old hose at each end by hand or with a spanner.
- Buy a replacement of the same length and thread size, with new sealing washers at both ends.
- Fit it hand-tight plus a little more, without twisting the hose or bending it sharply.[9]
- Open the valve slowly and check both ends with dry tissue after an hour.
6. Look after a thermostatic mixer
If you have a thermostatic shower or bath mixer, the parts that need regular attention are the small filters and non-return valves at its inlets and the thermostatic cartridge itself; your model's manual shows where they are and how often to clean them. WaterSafe recommends annual maintenance by a qualified plumber.[6] If the shower swings between hot and cold, first check whether another tap, a toilet or a washing machine is running at the same time, because uneven flow on one side is a common cause.[7] If it keeps happening with nothing else running, have the valve and the hot-water supply checked rather than adjusting the temperature stop yourself.
Prevention: a simple routine for taps, showers and valves
- Weekly: run any little-used shower or tap, such as in a guest bathroom, for a few minutes; HSE advises using outlets at least once a week.[4]
- Monthly: wipe aerators and shower nozzles, and look for drips at spouts, handles and hose ends.
- Every few months, sooner in hard water: descale and disinfect shower heads.[4]
- Every six months: gently close and reopen every stop and angle valve; leave lever valves fully open, and turn screw-down valves back half a turn from fully open.[8]
- Every six months: check flexible hoses for rust, bulges, fraying and kinks.[9]
- Yearly: have thermostatic mixers serviced, including their filters and non-return valves.[6]
- Yearly: label each concealed wall valve with the supply it controls.
- Every ten years: WaterSafe says check valves should be replaced, citing the British Standard BS EN 806-5.[10]
Hard water and a dirty supply both shorten the life of washers and cartridges. In hard-water areas, wiping fittings dry after use stops scale settling on the chrome.[3] For cleaning chrome, ceramic and other washroom surfaces without damaging them, see our washroom fittings maintenance guide.
Common mistakes and troubleshooting
- Overtightening a tap to stop a drip. It squashes the washer further and can damage the seat or crack a ceramic disc.
- Forcing a stiff valve with a long spanner or a length of pipe. WaterSafe warns against force and recommends a plumber if a stop tap is hard to turn.[8]
- Leaving a stop valve hard against its open stop for years, which makes it more likely to seize; turn a screw-down valve back half a turn.[8]
- Buying a cartridge that 'looks the same'. Take the old one and the tap's brand and model to the shop.
- Soaking a whole chrome mixer in vinegar or using scouring powder, which can dull or corrode the finish.[3]
- Leaving a hand shower or bidet spray lying in a bucket or a full basin. WaterSafe warns that a hose end under water can let dirty water be siphoned back into the supply.[10]
- Ignoring a slow drip. The US Environmental Protection Agency (EPA) estimates that a tap dripping once a second wastes more than 3,000 gallons (over 11,000 litres) a year,[11] and in a building that pumps water up to a rooftop tank, that waste costs electricity too.
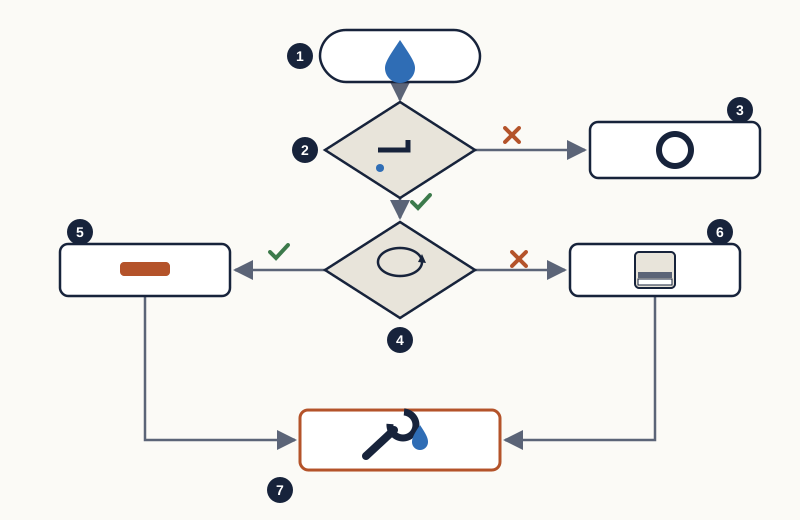
- A tap is dripping or seeping
- Is water coming from the spout while the tap is closed?
- No, it seeps round the handle while running: replace the O-ring or spindle seal
- Does the handle need several full turns from off to fully on?
- Yes: a washer tap; replace the washer and check the seat
- No: a ceramic cartridge; clean it or replace it with the exact model
- Still dripping with a new part: the seat or body may be damaged; call a plumber or replace the tap
Repair, replace or call a plumber
Repair is usually the right first step: a washer, O-ring, hose or cartridge costs far less than a new fitting and takes minutes once the water is off. Consider replacing the whole tap or mixer when:
- The body is cracked or badly corroded, or water is escaping from the casting rather than from a seal.
- The seat is damaged and the tap keeps dripping after new washers.
- Spare cartridges for the model are no longer available.
- The same fitting fails again and again.
Call a plumber for a shower valve that drips when switched off, since it usually sits inside the wall;[11] for a valve that will not move; for any leak behind tiles; and for a thermostatic mixer that will not hold its temperature. If pipes keep banging, a plumber can clip them securely or fit a pressure-reducing valve.[12] If the building's shared riser or main supply needs closing, contact the caretaker or committee; do not operate valves in shared shafts yourself.
What affects the cost
We could not find reliable published prices for these repairs in Bangladesh, so no figures are given here. The cost depends mainly on:
- The part: a washer or O-ring is cheapest, then a hose, then a cartridge, and a new mixer costs the most.
- Brand and model: branded cartridges and thermostatic parts cost more but fit properly; a cheap mismatched part often fails quickly.
- Access: an exposed basin tap is quick work, while a concealed shower valve or wall stop valve may mean removing tiles.
- Whether a seized valve has to be replaced before any other work can start.
- The call-out charge, and any warranty offered on parts and labour.
Ask for written quotes that name the parts and the work, and compare at least two; our guide to getting repair quotes explains how.
Next steps
- Walk round the flat and note every tap, mixer, shower and valve, and which type each one is.
- Find and gently test the main and bathroom stop valves, and label them.[8]
- Fix any drip now, starting with the cheapest part: washer, then O-ring, then cartridge.
- Descale aerators and shower heads, and replace any tired flexible hose.
- Put the routine above in your calendar, and get written quotes for anything inside a wall.
Common questions
- How do I know whether my tap has a washer or a cartridge?
- Count the turns. A tap that needs several full turns from off to fully on is a compression tap with a rubber washer. One that goes from off to full in a quarter or half turn, or any single-lever mixer, has a ceramic cartridge.[2]
- My new cartridge still drips. What went wrong?
- Usually the cartridge is not fully seated, its base seals are damaged, or it is not the exact model for that tap. Take it out, check which way round it goes and the state of its seals, and compare it with the old one. If a correct, properly seated cartridge still drips, the tap body may be damaged and needs a plumber.
- Is vinegar safe for descaling a shower head?
- It depends on the finish. Some advice suggests vinegar, but Hansgrohe advises against vinegar-based cleaners on its products and recommends a mild citric-acid cleaner instead.[3] Follow your fitting maker's care instructions, soak only the removable part, and rinse it thoroughly.
- Why does my shower suddenly turn hot or cold?
- Often because someone else has opened a tap or flushed a toilet, changing the flow on one side. WaterSafe also lists fluctuating pressure, a faulty thermostatic valve and problems with the hot-water system.[7] If it happens regularly, have it checked.
- How often should I turn my stop valves?
- WaterSafe suggests operating your stop tap gently about every six months, so you know it works in an emergency. If it is hard to turn, call a plumber rather than forcing it.[8]
- Do I need a non-return valve on my hand shower or bidet spray?
- Many mixers and shower connections have non-return valves built in, and a plumber can confirm whether yours does. Whatever the fitting, never leave the spray head lying in water, because a submerged hose end can let dirty water be siphoned back into the supply.[10]
Sources
The facts in this guide were checked against these sources.
- How do you stop a dripping tap? — WaterSafe Register. accessed 18 October 2026.
- The Benefits of Ceramic Discs in Your Taps — Tap Warehouse (published 18 June 2013). accessed 18 October 2026.
- How to correctly descale and clean taps — Hansgrohe. accessed 18 October 2026.
- Legionella and landlords' responsibilities — UK Health and Safety Executive (HSE) (published Last updated 30 September 2024). accessed 18 October 2026.
- Scalding and burning — UK Health and Safety Executive (HSE) (published Updated 14 November 2024). accessed 18 October 2026.
- What can I do to reduce the risk of burns and scalding? — WaterSafe Register. accessed 18 October 2026.
- Why does my shower keep going hot and cold? — WaterSafe Register. accessed 18 October 2026.
- Check your stop tap as clocks fall back — WaterSafe Register. accessed 18 October 2026.
- Under the sink: How to prevent flexi-hose bursts — Allianz Australia (published Last updated 14 July 2026). accessed 18 October 2026.
- Double-check your outside tap — WaterSafe Register. accessed 18 October 2026.
- Fix a Leak Week — US Environmental Protection Agency (WaterSense) (published Last updated 13 March 2026). accessed 18 October 2026.
- What Causes Water Pipes Banging? — WaterSafe Register. accessed 18 October 2026.
This guide is general information. Have gas, structural and live electrical work done by a qualified, licensed professional. Your building’s rules and committee decisions take precedence over anything written here.
Written from the cited sources by the RUAP.NET editorial team. It has not been reviewed by a licensed engineer, plumber or electrician; for work on gas, structure or live electrics, use a qualified professional.
Spotted a mistake? Tell us — we check it, correct the guide and record the date of the correction. Report an error →