
Toilet Flushing Problems: Why a Toilet Flushes Weakly, Runs On or Refills Slowly, and What to Do
A toilet that needs two flushes, hisses after filling, refills slowly or ignores its button usually has a fault in one of a few cistern parts. This guide shows how to find it, what you can fix yourself and when to call a plumber.
Most flushing faults come from two parts inside the cistern: the fill valve that lets water in and the flush valve that lets it out into the pan. When a toilet runs on or refills at odd times, one of these is usually to blame.[5]
For a weak flush, check the water level first (at the maker's mark, or about 2.5 cm below the top of the overflow), then the chain or button linkage, then limescale in the rim holes.[1] For a slow refill, open the isolation valve fully and flush debris out of the fill valve.[2]
If the bowl fills high and drains slowly, the problem is a blockage or poor venting, not the cistern: stop flushing.[7] Call a plumber for concealed cisterns you cannot open, cracked ceramics, or a leak you cannot stop at the isolation valve.
Most of this can be done yourself with ordinary tools.
Flushing problems are among the commonest complaints in any flat, and every RUAP flat has four toilets. A cistern has only a handful of moving parts, and most faults show clear symptoms once you lift the lid and watch one flush. If water is escaping from the toilet or cistern, see how to find and fix bathroom water leaks.
How a toilet flush works
A cistern stores a measured amount of water and releases it quickly. The fill valve (also called the inlet or float valve) lets water in and shuts off when a float rises with the water. The flush valve in the bottom of the cistern holds the water in until you press the button or lever, opens to let it rush into the pan, then closes so the cistern can refill.[5] Many push-button cisterns, including concealed ones, use an upright drop valve worked by actuator rods; older and lever-operated toilets often use a rubber flapper on a chain.[9]
Water enters the pan through small holes under the rim and, on many designs, a jet near the bottom that drives water into the trapway, the curved channel that carries waste away and holds a water seal against smells.[1] An overflow tube sends excess water into the pan, so a fill valve that will not shut off shows up as a steady trickle into the bowl, not a flood.[5]
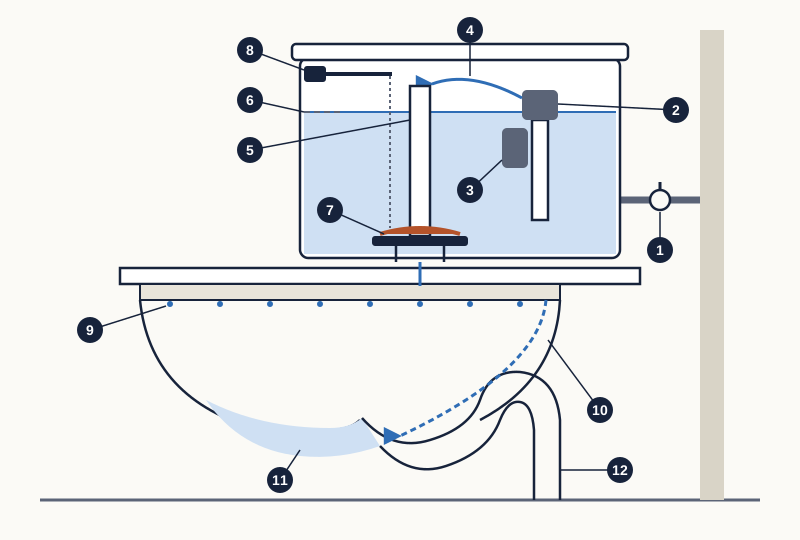
- Supply pipe and isolation valve
- Fill (inlet) valve
- Float: rises with the water and shuts the fill valve
- Refill tube: tops up the bowl through the overflow
- Overflow tube: carries excess water into the pan
- Normal water level (waterline)
- Flush valve with its flapper seal at the cistern outlet
- Button or lever and its chain or linkage to the flush valve
- Rim holes: wash the bowl during the flush
- Siphon jet channel: drives water into the trapway
- Water seal held in the bowl and trap
- Trapway to the outlet and soil pipe
Symptoms and their usual causes
Weak or incomplete flush
If the bowl does not clear, start inside the cistern. Fluidmaster, a maker of cistern valves, says a water level more than about an inch (2.5 cm) below the top of the overflow may not give a strong flush, and suggests raising it with the fill valve's adjustment screw.[1] Too high is also a fault: Kohler says that if water reaches the overflow, the toilet will keep running.[6]
Next, a flush valve that closes too soon: on a flapper toilet, a slack chain lets the flapper drop before the cistern empties, and Fluidmaster suggests only about half an inch (around 1 cm) of slack.[1] Then scale: minerals can build up in the rim holes and jet until they restrict the flow.[1]
If none of these is the cause, look downstream. Kohler links a slow flush, water rising in the bowl, gurgling drains and having to hold the handle down to poor venting or a blocked waste stack, a drainage problem covered below.[7]
Double flushing
Needing a second flush is usually the weak-flush problem in another form: too little water is released because the level is low or the valve shuts early. On dual-flush valves with adjustable volumes, the setting may simply be too low. Fluidmaster's method is to start at the maximum, then step down one setting at a time, testing with a few sheets of toilet paper, until the bowl no longer clears, and go back up one.[4] It also notes that if the water level is too low, the valve can close as soon as you let go of the lever.[4]
Slow refill
A cistern that takes many minutes to refill is starved of water. Fluidmaster names debris in the fill valve, supply hose or wall shut-off valve as the usual cause, and says fill valves start to wear after about seven years.[2] Reduced supply pressure is the other main cause.[5] In a tall building that often depends on your floor (see the low-pressure section below).
Running toilet, or one that refills by itself
A hiss or trickle long after the flush means water is going in and straight out again. If the level rises until it spills into the overflow, the fill valve is not shutting off, often because grit is caught under its seal.[6] If the level is right but the cistern refills briefly every so often, water is seeping past the flush valve seal; Fluidmaster warns this is often mistaken for a fill valve fault.[5] Rule out two simple causes first: a refill tube pushed too far down inside the overflow,[3] and a lever arm or chain that catches and holds the valve slightly open.[6] The dye and tissue tests for a cistern-to-pan leak are in our bathroom leaks guide.
Button or lever faults
If the button or lever moves but nothing happens, the link to the flush valve has failed: a chain off its hook, a broken lever arm, or rods or a cable out of adjustment. If the toilet runs until you press again, the link may be holding the valve open, for example a sticking lever or a button that does not spring back.[6] On a concealed cistern the rods sit behind the flush plate (see below).[9]
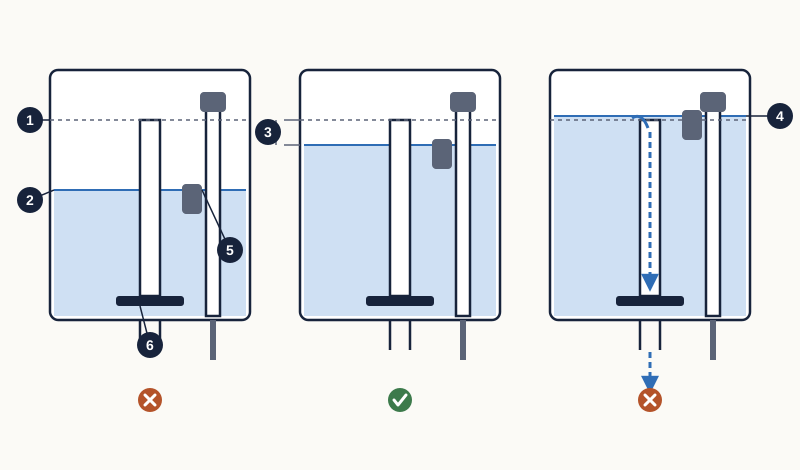
- Top of the overflow tube (dashed line)
- Level too low: not enough water for a full flush
- Correct level: at the maker's mark, or about 2.5 cm below the top of the overflow
- Level too high: water spills into the overflow and the toilet keeps running
- Fill valve float; moving it or its adjuster sets the level
- Flush valve at the cistern outlet
Blockage or flush fault? Tell them apart first
Before adjusting the cistern, watch the bowl. With a cistern fault the flush is feeble, but the bowl water settles back to its normal level. With a blockage or venting problem the bowl water rises higher than normal and falls slowly, sometimes with bubbles or gurgling from other drains.[7] If the cistern empties properly and the bowl still rises, the cistern is not the problem.
Many blockages start with things that should never be flushed. The UK water company Thames Water asks people to flush only pee, poo and toilet paper, and says even wipes sold as 'flushable' can block sewers.[12] Keep a lidded bin in every bathroom.
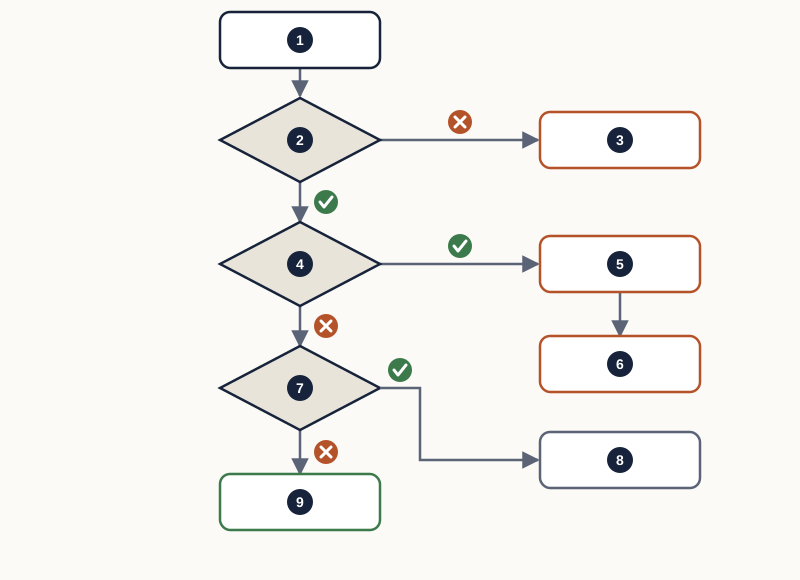
- The toilet does not flush properly
- When you flush, does the cistern empty fully?
- No: a cistern fault. Check the water level, chain or rods, button and flush valve
- Does the bowl water rise high and drain away slowly?
- Yes: a blockage or vent problem. Stop flushing and close the isolation valve
- If other toilets or floor traps also back up, the shared stack may be blocked: tell the committee and call a plumber
- Does the cistern take a long time to refill?
- Yes: the supply side. Open the isolation valve fully, clean the fill valve and check the pressure
- No: clean scale from the rim holes and jet, then test again
Tools and materials you will need
- A torch and a towel to protect the floor; the cistern lid is heavy ceramic, so decide where you will rest it safely.
- A flat-head screwdriver to close and reopen the isolation valve, and an adjustable spanner.
- A plastic cup for flushing grit out of the fill valve.[2]
- A short length of stiff wire or an old wire hanger, a small mirror and a limescale bowl cleaner for the rim holes.[1]
- The toilet's make and model, or photos of the parts, before buying spares; concealed cisterns have a model code printed inside.[9]
Step by step: diagnose and fix a flush fault
Work through these steps in order and test after each change.
- Rule out a blockage first, as in the previous section. If the bowl rises and drains slowly, stop and treat it as a drain problem.
- Lift the lid, rest it somewhere safe and watch one flush and refill: does the cistern empty fully, how long does it take to refill, and where does the water settle?
- Check that the isolation valve on the supply pipe is fully open.
- Compare the water level with the mark inside the cistern or the overflow. If it is more than about 2.5 cm below the overflow top, raise it with the fill valve's screw or clip; if water spills into the overflow, lower it.[1][6]
- On a flapper toilet, leave about 1 cm of chain slack, and make sure the chain cannot catch under the flapper or round the lever.[1][6]
- On a dual-flush valve, check that both buttons lift the valve fully and no volume dial or slide has been turned down.[4]
- If refilling is slow or the valve will not shut off, clean the fill valve: water off, flush, remove the valve cap as the maker shows, check the seal for grit, then hold a cup upside down over the valve and run the water fully for 10 to 15 seconds.[2]
- Clip the refill tube to the top of the overflow so it pours in from above; do not push it down inside.[3]
- If the flush is still weak, drain the cistern, pour a limescale bowl cleaner down the flush valve opening, leave it for several hours or overnight, then work a wire through the rim holes.[1]
- Turn the water on, flush several times, and refit the lid only when the bowl clears and the cistern goes quiet after refilling.
Concealed cisterns and flush plates
Many newer bathrooms hide the cistern in a frame behind the tiles, with only the flush plate showing. Inside are the same parts as in an exposed cistern: an isolating valve, a fill valve and float, a flush valve, and actuator rods from the buttons, reached through the opening behind the flush plate and its protection plate.[9]
Geberit, a major maker of concealed cisterns, says a flush that keeps running is often caused by debris trapped between the flush valve seal and the outlet; the valve can be taken out, rinsed or wiped clean, and refitted.[8] It advises against descaling the inside of the cistern, because loosened scale can break away and block it.[8] Order parts using the model code printed inside the cistern, not a sticker on the protection plate, which Geberit says is not linked to the product code.[9]
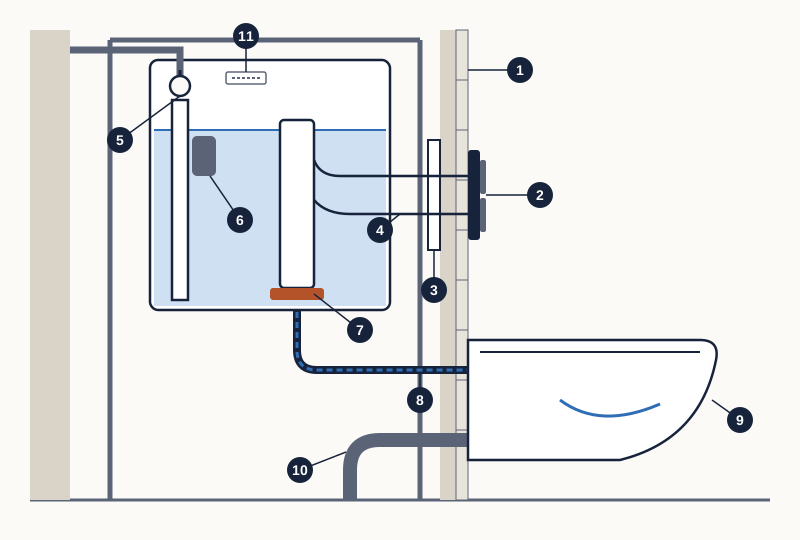
- Tiled false wall in front of the installation frame
- Flush plate with buttons for full and part flush
- Protection plate and service opening behind the flush plate
- Actuator rods linking the buttons to the flush valve
- Isolating valve on the supply inside the cistern
- Fill valve and float
- Flush valve and its seal at the outlet
- Flush pipe (elbow) carrying water to the pan
- Wall-hung pan
- Waste connection to the soil pipe
- Model code printed on the inside back wall of the cistern
If the plate will not come off easily, or you cannot see how the valve unlocks, stop and call a plumber. A concealed cistern can leak into the wall unseen, so check the wall and the area below the pan for damp over the following days. For routine care of flush plates and other fittings, see our washroom fittings maintenance guide.
Low pressure, tall buildings and slow refills
In many Dhaka apartment buildings, water is pumped to a rooftop tank and flows down to the flats by gravity. The pressure at a cistern depends on the height of water above it, so top-floor flats just below the tank get the least; roughly, every 10 metres of height adds about one bar.
A fill valve still works at low pressure, only more slowly. The data sheet for one widely sold fill valve gives an operating range of 0.1 to 10 bar, with a flow of about 3.7 litres a minute at the bottom of that range and about 14 at the top.[10] It also says the valve's flow restrictor must be removed on gravity-fed systems, which shows how a valve set up for mains pressure can refill very slowly from a tank.[10] Check your own valve's instructions before removing anything, or ask a plumber.
If every tap and toilet on your floor is slow, the cause is probably the supply; see common causes of low water pressure in apartment buildings. When the rooftop tank runs dry during a supply cut or load-shedding, the cistern will not refill until the pump runs again; that is not a toilet fault.
Prevention: routine checks that keep the flush working
- Monthly: listen to each toilet after it refills; it should go completely quiet.
- Monthly: watch one flush on each toilet and note whether the bowl clears first time.
- Every few months: lift the lid and check the water level against the mark or the overflow.
- Every few months: check the chain or button linkage for slack, kinks or wear.
- Yearly: close and reopen each toilet's isolation valve so it does not seize; our taps, showers and valves guide explains how.
- Yearly: use a mirror to look under the rim for scale, and clean the holes if you find it.
- Once a fill valve is around seven years old, expect wear and keep its model details handy for a replacement.[2]
Avoid drop-in cistern tablets containing bleach or chlorine: Fluidmaster warns they can damage cistern parts and lead to flooding.[1] A small notice in guest bathrooms asking people to bin wipes helps prevent blockages.[12]
Common mistakes to avoid
- Bending the float arm or turning the level up until water spills into the overflow, so the toilet runs all the time.[6]
- Taking every bit of slack out of a flapper chain; Fluidmaster and Kohler both suggest leaving a little.[1][6]
- Replacing the fill valve because the cistern refills now and then, when the real fault is a leaking flush valve seal.[5]
- Descaling the inside of a concealed cistern with acid; Geberit warns that loosened scale can block it.[8]
- Buying 'universal' parts without checking the cistern model, especially for concealed cisterns.[9]
Repair, replace or call a plumber?
Which faults most people can handle, and which need a plumber:
| Symptom | Likely cause | Can you fix it? | Call a plumber when |
|---|---|---|---|
| Weak flush; cistern refills normally | Low water level, valve closing early or scaled rim holes[1] | Usually | Cleaning and adjustment make no difference |
| Two flushes needed | Flush volume or water level set too low[4] | Usually | The valve has no adjustment or will not hold its setting |
| Bowl water rises high and drains slowly | Blockage or poor venting[7] | Only if one toilet is affected | Plunging fails or several fixtures are affected |
| Cistern takes ages to refill | Debris in the fill valve, a worn valve or low pressure[2] | Often | Every fixture on the floor is slow, or the valve is in a concealed cistern |
| Water spills into the overflow | Fill valve not shutting off[5] | Often | Cleaning fails and you cannot identify the valve |
| Cistern refills briefly every so often | Flush valve seal leaking into the pan[5] | Often | A new seal does not cure it |
| Button or lever does nothing, or sticks | Broken or misadjusted linkage[6] | Sometimes | The cistern is concealed and the plate will not come off |
| Concealed cistern keeps running after a flush | Debris under the flush valve seal[8] | With care | You cannot unlock the valve or parts are unavailable |
Replacing a whole fill valve or flush valve is a normal repair. Fluidmaster advises a new flush valve if a new seal does not stop the cistern draining down,[5] and a new fill valve if cleaning does not cure it.[2] Replace the toilet itself only if the pan is cracked, parts are no longer made, or it is old and very thirsty: the US Environmental Protection Agency (EPA) notes that older toilets can use up to 6 US gallons (about 23 litres) a flush, against 1.28 gallons (about 4.8 litres) or less for WaterSense-labelled models.[11]
What drives the cost of a flush repair
We found no reliable published prices for toilet repairs in Bangladesh, so we give none. The cost depends mainly on:
- The part: a seal or flapper costs far less than a complete valve, and a valve far less than a new toilet; the EPA describes flappers as inexpensive and quick to replace.[11]
- Matching: genuine parts for a particular concealed cistern may need ordering, while generic valves for exposed cisterns are easier to find.
- Access: an exposed cistern is a short job; a concealed one is worked through a small opening, and a frame fault may mean removing tiles.
- The call-out charge and any warranty on parts and labour.
- Waste while the fault continues: where water is pumped to a rooftop tank, a running toilet also costs pumping energy.
Ask for written quotes that name the part and its make, and compare them as explained in how to get and compare repair quotes.
Next steps
- Today: if the bowl is filling up, stop flushing and close the isolation valve.
- Lift the lid, watch one flush and use the chart above to decide which symptom you have.
- Try the simple adjustments: water level, chain or rods, refill tube, then clean the fill valve.
- If the flush is still weak, clean the rim holes; if the bowl drains slowly, follow the blocked-drain guide instead.
- Call a plumber for a concealed cistern you cannot open, cracked ceramics or a fault that keeps coming back.
- Add the monthly checks to your calendar for every toilet in the flat.
Common questions
- Why do I have to hold the button or handle down to get a full flush?
- Usually the flush valve is dropping back before the cistern has emptied. On a flapper toilet, check the chain slack and any adjustable setting on the flapper.[1] If the cistern empties properly but the bowl still drains slowly, note that Kohler lists having to hold the handle down among the signs of a blocked vent or waste stack, which is a job for a plumber.[7]
- My toilet starts refilling on its own when nobody has used it. Why?
- Water is escaping from the cistern, usually past the flush valve seal into the pan, and the fill valve is topping it up.[3] Clean the seal and the seat it sits on, check that the refill tube is not pushed into the overflow, and replace the seal if needed. Fluidmaster points out that this is often mistaken for a fill valve fault.[5]
- We live on the top floor and every toilet refills slowly. Is the cistern faulty?
- Not necessarily. With the rooftop tank only a few metres above you the pressure is low, and fill valves fill far more slowly at low pressure.[10] Clean the fill valve first. If that does not help and the taps are weak too, read our low water pressure guide and ask a plumber whether your valve suits a low-pressure supply.
- Can I service a concealed cistern myself?
- Simple jobs, such as taking out and rinsing the flush valve, are designed to be done through the opening behind the flush plate.[8] Identify the model from the code inside the cistern before buying parts.[9] If the plate or valve will not come out easily, call a plumber rather than forcing it, because a leak inside the wall can go unnoticed for a long time.
Sources
The facts in this guide were checked against these sources.
- How to Fix a Weak or Incomplete Toilet Flush — Fluidmaster. accessed 18 October 2026.
- Toilet Tank Won't Fill Up Or is Filling Slowly — Fluidmaster. accessed 18 October 2026.
- Solutions for a toilet making refill sounds on its own or ghost flushing — Fluidmaster. accessed 18 October 2026.
- Solutions for common Dual Flush toilet Problems — Fluidmaster. accessed 18 October 2026.
- The Little Guide Book of Toilet Repairs — Fluidmaster UK. accessed 18 October 2026.
- Toilet Constantly Leaking or Running — Kohler. accessed 18 October 2026.
- Poor Flush — Kohler. accessed 18 October 2026.
- Service for showers, traps and cisterns — Geberit. accessed 18 October 2026.
- Spare Parts Help Guide — Geberit UK. accessed 18 October 2026.
- Torbeck Fill Valve Side Entry: Technical Data Sheet — Fluidmaster (hosted by Wickes). accessed 18 October 2026.
- Residential Toilets — US Environmental Protection Agency (WaterSense) (published Last updated 29 May 2026). accessed 18 October 2026.
- 'Hedgehog' customer awareness campaign cuts flushed wipes by almost two-thirds — Thames Water (published 21 August 2026). accessed 18 October 2026.
This guide is general information. Have gas, structural and live electrical work done by a qualified, licensed professional. Your building’s rules and committee decisions take precedence over anything written here.
Written from the cited sources by the RUAP.NET editorial team. It has not been reviewed by a licensed engineer, plumber or electrician; for work on gas, structure or live electrics, use a qualified professional.
Spotted a mistake? Tell us — we check it, correct the guide and record the date of the correction. Report an error →