
How to Prevent Bathroom Mould: Ventilation, Safe Cleaning and Sealant Care
Black lines in the grout, grey patches in the ceiling corner and a musty smell are common in bathrooms, especially in the humid monsoon months. This guide explains why mould grows there, how to stop it coming back and how to clean it without harming yourself.
Bathroom mould is a moisture problem. Shower steam condenses on cold tiles, mirrors and ceilings, and wet floors, towels and old sealant stay damp long enough for mould to grow. EPA's advice is to control the moisture first.[1]
The most effective fix is an exhaust fan sized for the room that vents straight outside and keeps running for about an hour after each shower.[7] Squeegee wet surfaces, keep towels out of the bathroom and clean off soap scum every week.
Clean small patches (under about 1 m²) with detergent and water, wearing a mask, gloves and goggles, and never mix bleach with other cleaners.[2][3] Call a professional for large areas, hidden mould or mould after sewage.
Most of this can be done yourself with ordinary tools.
Mould in a bathroom is a moisture problem before it is a cleaning problem; as EPA puts it, the key to mould control is moisture control.[1] Scrubbing removes what you can see, but unless the room dries properly between showers the spots soon return.
Why bathrooms grow mould: the main causes
Mould needs moisture, something to grow on and time. A bathroom offers all three every day.
Steam that condenses on cold surfaces
When shower steam meets a cooler surface such as a mirror, tiles or the ceiling, some of it turns back into water, just as droplets form on a glass of iced tea.[6] The UK government's damp and mould guidance names condensation from showering, cooking and drying laundry as the most common cause of damp in homes.[4] Ceiling corners, where air moves least, often show spots first.
Water that never gets the chance to dry
A soaked bath mat, towels hung inside the bathroom and puddles that never reach the floor trap keep surfaces wet for hours. EPA advises drying wet materials within 24–48 hours to prevent mould;[1] a floor that is wet again before it dries never gets there. Slow leaks feed hidden mould too, for example inside walls around leaking pipes;[1] if you suspect one, use our guide to finding bathroom leaks first.
Soap scum and rough surfaces
Selleys, a sealant manufacturer, notes that soap scum and dirt encourage mould growth.[9] Grout lines and old, scratched silicone hold that film and moisture far longer than smooth glazed tile, which is why black lines usually appear there first.
The Dhaka climate
In the monsoon (roughly June to October) Dhaka's outdoor air is very humid, so bathrooms dry slowly even with the window open. EPA recommends indoor relative humidity below 60 per cent, ideally 30–50 per cent,[1] and CDC says no higher than 50 per cent; both mention air conditioners or dehumidifiers to get there.[1][3] During load-shedding the fan stops and the steam stays.
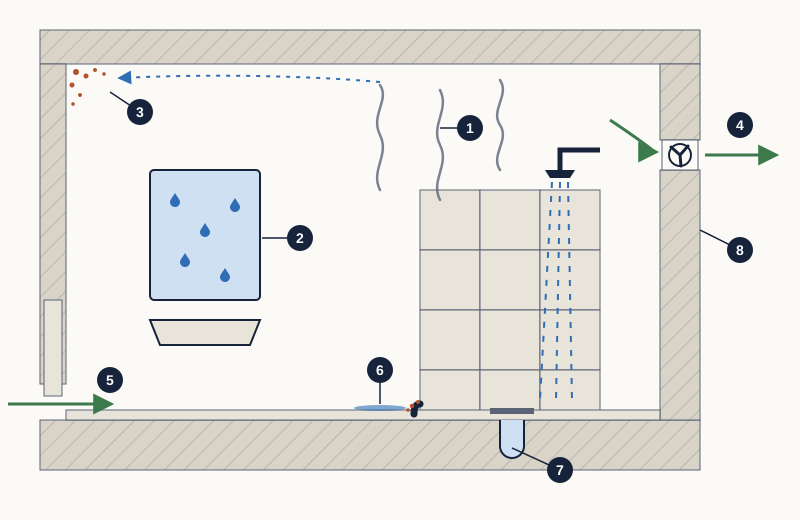
- Steam from a hot shower rises and spreads through the room
- Vapour condenses into droplets on cooler surfaces such as the mirror and tiles
- Mould often starts in ceiling corners where moist air lingers
- Exhaust fan in the outside wall pushing moist air straight outside
- Drier replacement air entering through the gap under the door
- Water left standing on the floor and at the sealant joint, where mould grows
- Floor trap: the floor should fall towards it so no puddles remain
- Outside wall: the exhaust must pass through it to open air
Warning signs and where mould hides
Mould is easiest to deal with while it is small. Look for:
- Black, grey or pink spots along grout lines, especially low on shower walls and round the floor trap.
- Dark spots inside the silicone round the basin or the wall–floor joint that do not wipe away.
- Grey or black patches on the ceiling, usually above the shower or in the corner furthest from the fan.
- Blistering or peeling paint on the ceiling or on the far side of a bathroom wall.
- A musty smell with no visible source, which EPA treats as a sign of hidden mould.[1]
- Mirror and walls still running with water long after a shower, or a fan grille clogged with fluff.
Is bathroom mould a health risk?
Most people who breathe in mould spores have no symptoms, according to NSW Health.[5] Others get a stuffy nose, sore throat, cough, itchy eyes or a rash, and people with asthma or mould allergies can react severely.[3] The UK government's guidance names those most at risk:[4]
- babies, children and older people;
- people with asthma, allergies, COPD or other lung or heart conditions;
- people with weakened immune systems;
- pregnant women and women who have recently given birth.
You do not need to identify the mould: CDC says to remove any you can see or smell and fix the moisture.[3] If someone at home has a health condition, EPA advises asking a health professional before cleaning.[2]
Ventilation: let an exhaust fan do the work
A fan that removes moisture where it is produced (spot ventilation) is the most useful single step.[6] EPA suggests running the fan or opening a window while you shower,[1] but the US Department of Energy's Building America guidance advises against relying on a window alone.[7]
How big a fan do you need?
Fans are rated in cubic feet per minute (CFM) or cubic metres per hour (m³/h); 1 CFM is about 1.7 m³/h. The US standard quoted by Building America asks for at least 50 CFM from a fan used intermittently, or 20 CFM from one that runs all the time.[7] For bathrooms under 100 square feet (about 9.3 m²), fan maker Broan-NuTone suggests multiplying length × width × ceiling height in feet by 0.13 and rounding up to the next ten.[8]
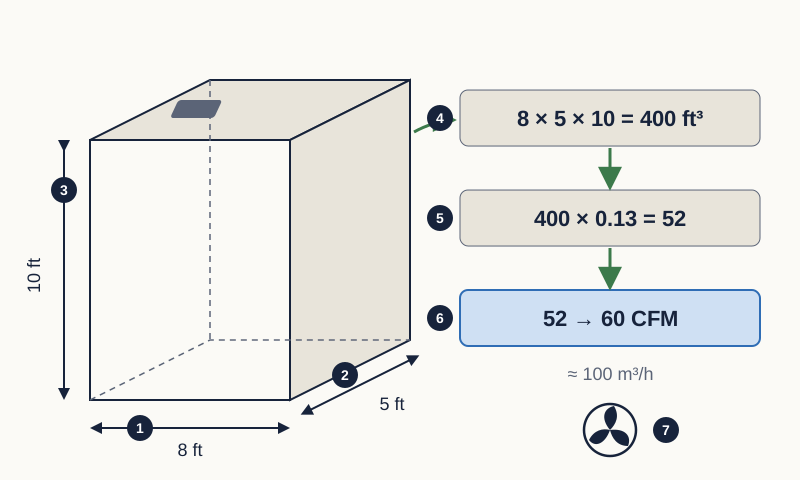
- Length of the bathroom, in feet
- Width of the bathroom, in feet
- Ceiling height, in feet
- Multiply the three to get the room volume in cubic feet
- Multiply the volume by 0.13
- Round up to the next ten: the minimum fan rating in CFM, here about 100 m³/h
- Choose a fan rated at or above this, with extra allowance for ducts and bends
Choose a fan rated above your answer, because ducts and bends cut the airflow once it is installed; Building America notes that ENERGY STAR suggests a fan rated at least 70 CFM to deliver 50 CFM in use.[7] A quiet fan (it cites 3 sones or less) is less likely to be switched off early.[7] If a fan is labelled only by blade size, ask for its rated airflow.
Where the air must go
The Department of Energy says bathroom vents should lead directly outside,[6] and Building America rules out discharging into wall cavities or the space between floors.[7] In a flat that means a fan in an outside wall or window, or a short duct to one, never a fan blowing into a false ceiling. Building America recommends a direct route with few bends, smooth rigid duct with the first three feet (about 1 m) straight, and a flap (backdraft damper) at the outlet.[7] Before connecting to a shared building shaft, ask the building committee and a qualified installer.
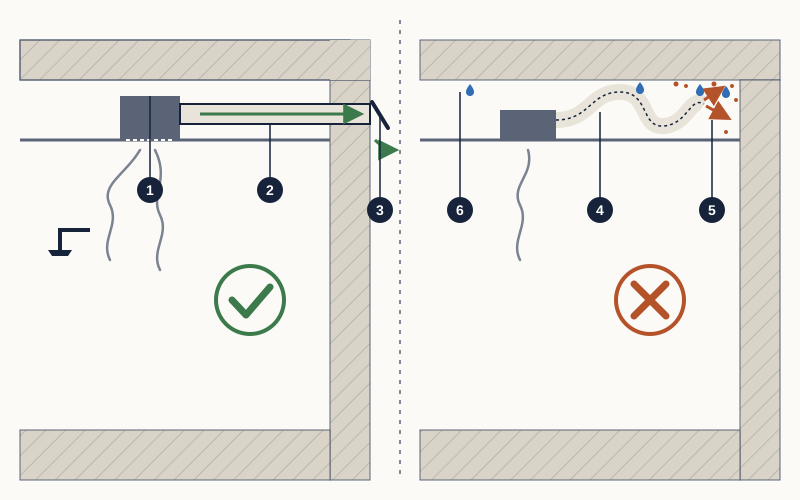
- Fan close to the shower, drawing the steam up
- Short, straight, rigid duct to the outside wall
- Flap (backdraft damper) at the outlet, closed when the fan is off
- Long, sagging flexible duct with several bends
- Duct ending inside the false-ceiling void, so the moist air stays in the building
- Condensation and mould forming unseen on the underside of the slab
How long to run it
Switch the fan on before the shower. Building America suggests leaving it on for about an hour afterwards, with a timer switch so it turns itself off;[7] the UK guidance suggests humidity-controlled fans or fans with an overrun.[4] Leave a gap under or beside the door so drier air can replace what the fan removes. Fitting a timer is electrical work; see when to call a qualified electrician.
Tools and materials you will need
- A sponge, an old toothbrush for grout lines and microfibre cloths.
- Ordinary household detergent: EPA recommends detergent and water for mould on hard surfaces.[2]
- A rubber squeegee for walls, glass and floor.
- Protective gear: a well-fitting N-95 respirator, long rubber or nitrile gloves, and goggles without ventilation holes.[1]
- Optionally, a hygrometer (humidity meter); EPA notes these are inexpensive.[1]
- For resealing: a sealant-removing blade, sealant remover, a sealant gun and a mould-resistant bathroom silicone.
- A sturdy, dry step stool for the ceiling and fan grille.
Step by step: cleaning small patches of mould safely
EPA says patches up to about 10 square feet (roughly 1 m²) can usually be cleaned by the householder.[2]
- Plan how you will deal with the moisture; the UK guidance is clear that removing surface mould alone will not stop it returning.[4]
- Open the window, switch on the fan and keep children and anyone with asthma away.
- Put on the respirator, gloves and goggles.[1]
- Scrub tiles, grout, glass and the basin with detergent and water.[2] NSW Health also suggests four parts vinegar to one part water for routine cleaning.[5]
- Rinse and dry the surface completely.[2]
- Throw away mouldy sponges and bath mats; EPA notes that mould may be impossible to remove from porous materials.[2]
- Check again after a week and after six weeks; the UK guidance recommends a check at least six weeks after remedial work.[4]
Bleach: use it carefully, or not at all
EPA does not recommend chlorine bleach for routine mould clean-up, and notes that dead mould can still cause allergies, so it must be removed, not just killed.[1] The UK guidance also prefers mould and mildew products.[4] If you do use bleach on a hard surface, CDC and NSW Health set the same limit: about one cup per gallon, or 250 mL in 4 litres of water,[3][5] with ventilation, gloves and eye protection.[5]
Replacing mouldy silicone sealant
Black spots inside a silicone bead cannot be scrubbed out; Selleys calls them impossible to clean.[9] Sealing or painting over them fails too, because EPA warns such coatings are likely to peel.[1] Cut the old bead out and start again.
- Pick a time when the area can stay unused for at least a day.
- Wearing gloves, scrape out the old bead with a blade, then use sealant remover on what is left.[9]
- Clean off residue and any remaining mould, rinse and let the joint dry completely.[9]
- Apply a mould-resistant silicone in an even bead and smooth it within the time on the pack; Selleys gives 5 to 10 minutes.[9]
- Let it cure fully; for the Selleys product that takes at least 48 hours.[9]
Deeply stained or crumbling grout needs regrouting; see our guide to floor tiles and grout.
Prevention: a daily, weekly and monthly routine
Habits help, but the UK guidance stresses that they do not replace fixing ventilation or building faults.[4]
- Every shower: switch the fan on before you start and leave it running for about an hour afterwards, or use a timer.[7]
- Every shower: squeegee the walls, glass and floor towards the floor trap.
- Daily: dry towels and bath mats outside the bathroom, in sun or moving air if you can.
- Daily: leave the door ajar after use so drier air can replace the moist air.
- Weekly: clean tiles, grout lines and silicone with detergent to remove soap scum, which encourages mould.[9]
- Monthly: hold a sheet of toilet tissue against the fan grille while it runs; Building America says a working bathroom fan should have enough suction to hold it.[7]
- Monthly: wash the fan grille and check that the outside flap opens and closes freely.
- Before the monsoon: check silicone and grout for gaps or spots.
- When repainting: CDC suggests adding a mould inhibitor to paint;[3] see repainting walls and ceilings for the preparation.
Care of the fittings themselves, and which cleaners suit chrome and ceramic, is in our washroom fittings guide.
Common mistakes to avoid
- Cleaning the spots and changing nothing else. The moisture is still there, so the mould comes back.[4]
- Mixing bleach with another cleaner to make it work harder.[3]
- Painting or sealing over mould instead of removing it first.[1]
- Switching the fan off the moment you leave the bathroom.
- Letting the fan blow into a false ceiling or a wall cavity instead of outside.[7]
- Blocking a noisy fan or a vent; fit a quieter fan or an insect screen instead.
- Drying laundry in the bathroom, which adds moisture the fan then has to remove.[4]
- Paying for mould tests before cleaning. CDC does not recommend testing; remove the mould and fix the moisture.[3]
When to call a professional
Most bathroom mould is a do-it-yourself job, but not all of it.
| What you see | Likely cause | DIY? | Call a professional when |
|---|---|---|---|
| Spots on tiles and grout return within weeks | Weak fan, not vented outside or switched off early[7] | Cleaning, yes | The fan, duct or timer needs work |
| Black spots inside silicone | Mould grown into old sealant[9] | Yes | Tiles behind it are loose |
| Mould over more than about 1 m² | Long-term damp or a leak | No | Always[2] |
| Musty smell, no visible mould | Hidden mould behind panels or inside walls[1] | No | Always; opening it up can release many spores[1] |
| Mould after sewage backflow or flooding | Contaminated water | No | Always, with sewage experience[2] |
| Damp patch on the other side of a bathroom wall | Leak, failed waterproofing or seepage | Check only | The leak and damp checks do not find the source |
| Mouldy ceiling board that has gone soft | Long soaking of a porous material[2] | No | The board needs removing and replacing[2] |
New ducting through an outside wall and fan wiring are jobs for a builder and an electrician; on a high-rise, facade work may also need the building committee's permission.

- Mould found in the bathroom
- Is it larger than about 1 m², or caused by sewage or flood water?
- Yes: call a professional experienced in mould clean-up
- No: what is it growing on?
- Hard surface such as tile, glass or grout: clean with detergent and water, then dry
- Inside silicone sealant: cut it out and reseal
- Porous material such as gypsum board, wood or fabric: remove and replace it
- Has it come back within a few weeks?
- Yes: find and fix the moisture source, such as a weak fan, a leak or seepage
- No: keep up the prevention routine
What drives the cost
We could not find reliable published prices for this work in Bangladesh, so this guide gives no figures. What you pay depends mainly on:
- Cleaning and resealing yourself: materials only.
- A like-for-like fan in an existing opening: the fan plus an electrician's visit.
- A new opening or duct through an outside wall: much more, because of drilling, making good and possibly work at height.
- A timer or humidity switch: a small part, but fitting it needs an electrician.
- Ceiling boards or regrouting: the area and whether matching materials exist.
- Fixing a leak or failed waterproofing: far more than cleaning, so catch it early.
Get at least two written quotes naming the fan model, its rated airflow, the duct route and the warranty; see getting and comparing repair quotes.
Next steps
- Today: clean any small patches safely, without mixing products, and dry the surfaces.
- Tonight: run the fan through and after your shower, and check that it holds a tissue.
- This week: check that your fan discharges straight outside; if not, get a quote.
- This month: cut out and replace mouldy silicone, and rake out badly stained grout.
- If mould keeps returning, or there is a musty smell with no visible cause, look for a leak or seepage before cleaning again.
- Put the weekly and monthly checks in your calendar, especially before and during the monsoon.
Common questions
- Does opening the bathroom window stop mould?
- It helps while you shower, and EPA lists it as an option,[1] but Building America advises against relying on a window alone,[7] and monsoon air is already humid. Use both.
- How long should I run the bathroom exhaust fan?
- From the start of your shower until about an hour afterwards, according to Building America; a timer switch makes this automatic.[7] A fan that stops when you leave the room leaves most of the moisture behind.
- Is vinegar or bleach better for bathroom mould?
- Start with detergent and water.[2] NSW Health uses vinegar solution for routine cleaning and keeps diluted bleach for stubborn mould on items that cannot be thrown away.[5] Never use the two together.[3]
- Can I just paint over mould on the ceiling?
- No. EPA advises against it because the paint is likely to peel; clean and dry the surface first,[1] then fix whatever kept the ceiling damp.
- The black spots in my silicone will not come off. What now?
- They are inside the sealant and, according to Selleys, cannot be cleaned out. Replace the bead with a mould-resistant silicone.[9]
Sources
The facts in this guide were checked against these sources.
- A Brief Guide to Mold, Moisture and Your Home — US Environmental Protection Agency (published Last updated 18 February 2026). accessed 18 October 2026.
- Mold Cleanup in Your Home — US Environmental Protection Agency (published Last updated 4 June 2026). accessed 18 October 2026.
- Mold — US Centers for Disease Control and Prevention (published 26 September 2024). accessed 18 October 2026.
- Understanding and addressing the health risks of damp and mould in the home — UK Government (Office for Health Improvement and Disparities, DHSC; MHCLG; UKHSA) (published Updated 1 April 2026). accessed 18 October 2026.
- Mould — NSW Health (New South Wales Government) (published Last updated 20 December 2022). accessed 18 October 2026.
- Consumer Guide to Home Ventilation — US Department of Energy (Energy Saver). accessed 18 October 2026.
- Bathroom Exhaust Fans — US Department of Energy, Building America Solution Center (Pacific Northwest National Laboratory) (published Last updated 4 December 2022). accessed 18 October 2026.
- How do I properly size an exhaust fan for my bathroom? — Broan-NuTone. accessed 18 October 2026.
- How To Replace Old Silicone — Selleys. accessed 18 October 2026.
This guide is general information. Have gas, structural and live electrical work done by a qualified, licensed professional. Your building’s rules and committee decisions take precedence over anything written here.
Written from the cited sources by the RUAP.NET editorial team. It has not been reviewed by a licensed engineer, plumber or electrician; for work on gas, structure or live electrics, use a qualified professional.
Spotted a mistake? Tell us — we check it, correct the guide and record the date of the correction. Report an error →