
Repainting Walls and Ceilings: The Preparation That Makes Paint Last
New paint that bubbles, peels or turns black within months almost always failed because of what was underneath it. This guide shows how to prepare walls and ceilings in a flat so the paint lasts.
Most early failures come from damp, mould, loose old paint or new plaster painted too soon. Fix the cause first: stop the leak, let the wall dry and clean off mould, because paint over mould is likely to peel.[9]
Scrape, fill and sand, prime bare plaster with an alkali-resistant primer, then apply two finish coats. Use a mould-resistant paint in bathrooms and kitchens.[1][4]
Keep windows open while painting, because paint solvents build up indoors.[10] Do not dry-sand old paint of unknown age, and do not stand on the top steps of a stepladder.
Most of this can be done yourself with ordinary tools.
In a Dhaka flat, repainting usually follows a problem: a ceiling stain after the monsoon, flaking paint behind a wardrobe, black spots in a bathroom. Paint is a thin film that only stays put on a surface that is dry, clean, sound and sealed, so most of a good repaint happens before the first coat.
Why paint fails early: the usual causes
- Moisture behind the paint. Dulux lists seepage through worn joints and leaks in roofs or walls among the main causes of peeling.[7]
- Mould painted over instead of removed, which makes it more likely to come back.[8]
- New plaster painted too soon. Fresh cement plaster is wet and alkaline; without a suitable primer, salts from concrete and brick can react with the paint.[3]
- Loose, powdery or glossy old paint, or kitchen grease. New paint only sticks as well as the layer under it.[6]
- The wrong paint for the room. Bathrooms and kitchens stay humid for hours a day, and ordinary emulsion may not resist mould there.[4]
- No primer, or over-thinned paint. Porous plaster soaks up paint unevenly,[3] and over-thinned or over-stretched paint leaves too thin a film.[1]
Warning signs to read before you repaint
| Sign | Likely cause | First job |
|---|---|---|
| Brown or yellow ring on a ceiling | A leak from the flat above, the roof or a pipe | Stop the leak; let the slab dry fully |
| Bubbling, blistering or peeling paint | Moisture or salts pushing from behind, or a dusty, greasy surface[7] | Find the cause, then scrape back to a firm edge |
| Black, green or grey spots | Mould on a damp surface[8] | Clean, dry and improve ventilation |
| White, fluffy crystals on plaster | Salts carried out by moisture (efflorescence) | Brush off dry and fix the moisture source |
| Fine hairline cracks | Shrinkage of plaster or putty | Fill and sand; watch whether they widen |
| Wide, diagonal or recurring cracks | Possible structural movement | Do not just fill them; get advice first |
Dulux treats water stains and bubbling or peeling paint as early signs of hidden moisture and mould.[8] If you see them, the painting should wait.
Deal with damp, leaks and mould first
Paint does not stop water. In many Dhaka buildings, damp comes from bathroom leaks in the flat above, monsoon seepage through outer walls and windows, the roof over the top floor, or condensation. Our guide to damp walls and water seepage explains how to tell these apart, and how to trace bathroom water leaks covers the most common source of ceiling stains.
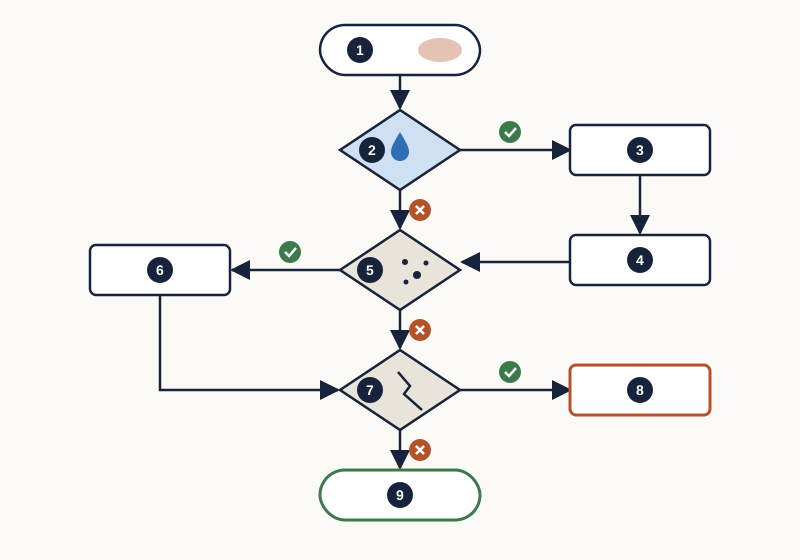
- You notice a problem: a stain, bubbling or peeling paint, mould or a crack
- Is the surface damp now, or is the stain growing?
- Find and fix the source of water: a leak, the roof, an outer wall or condensation
- Let the wall or ceiling dry completely; confirm with a moisture reading if you can
- Are there mould spots on the surface?
- Wash the mould off, dry the surface and improve ventilation
- Is any crack wide, diagonal or reopening after filling?
- Get professional advice before painting
- Prepare and paint: scrape, fill, sand, prime, then apply the finish coats
The US Environmental Protection Agency (EPA) says to fix the water problem, clean off mould and dry the surface before painting, since paint over mould is likely to peel. It advises professional help for mould larger than about 10 square feet (roughly 1 square metre), and never mixing bleach with ammonia cleaners.[9] See also how to prevent mould in bathrooms.
After the repair, give the wall time to dry; a soaked slab can take weeks in the monsoon. Berger's putty instructions set a maximum of 15% moisture, measured with a moisture meter.[2] Without a meter, wait until the stain stops changing and the plaster looks evenly dry.
Ceiling stains and cracks
A water stain usually shows through ordinary emulsion, so once the ceiling is dry, seal it with a stain-blocking primer; paint makers such as Dulux sell one alongside their ceiling paints. Repaint the whole ceiling, because touching up a small area can make patchiness more visible.[5] On a top-floor ceiling, suspect the roof: see how to inspect a flat roof before the monsoon.
Asian Paints suggests a crack filler for cracks up to 3 mm, and putty or a 1:3 white cement and fine sand mix for holes.[1] Wide, diagonal or reopening cracks may mean structural movement; read which wall cracks need a professional inspection before painting over them.
Old paint, lead and dust
Scraping and sanding old paint makes fine dust. EPA warns that work disturbing old paint can release large amounts of lead dust, with young children most at risk,[11] and WHO states that no level of lead exposure is known to be safe.[12] Bangladesh has a 90 ppm limit for lead in paint, and large makers are reported to be mostly compliant, but a 2026 ESDO study found 68 of 161 samples over the limit, especially spray and industrial paints and small producers.[13]
- Do not dry-sand, burn or heat-strip old paint of unknown origin. If you must sand, wet the surface first, sand the smallest area needed and clean up thoroughly.[11]
- Keep children and pregnant women away, and clean up with damp cloths, not a broom.
- Do not strip large areas yourself; EPA advises against removing lead paint on your own.[11]
- Buy decorative paint from established makers that state no added lead, as the Asian Paints primer data sheet does,[1] and avoid industrial or spray paint indoors.[13]
Tools and materials
- Dust sheets, masking tape and plastic for fittings and furniture you cannot move.
- Scraper, wire brush, medium and fine sandpaper, and a sanding block.
- Bucket, sponge and mild detergent or sugar soap for washing walls.[6]
- Wall putty, crack filler and a putty knife.[1]
- Alkali-resistant cement primer for bare plaster, and a stain-blocking primer for water marks.[1]
- Interior emulsion, mould-resistant for bathrooms and kitchens.[4]
- Brush, roller, tray and extension pole; Dulux suggests a 10–18 mm nap roller for most ceilings.[5]
- A sound stepladder, safety glasses, gloves and a dust mask.[1]
New plaster: wait, then prime
Asian Paints recommends letting new masonry cure for 28 days before priming,[1] while Berger asks for at least two months of drying for best results, with 15 days as an urgent minimum.[2] Follow your product's data sheet, and allow longer in the monsoon.
A cement primer seals porous, alkaline plaster so the finish dries evenly and resists alkali attack.[1][3] One maker's system runs: sand, prime, putty, sand, prime again, sand lightly, then the finish coats.[1] Treat new patches of plaster or filler in an old wall the same way, or they will show through as dull patches.
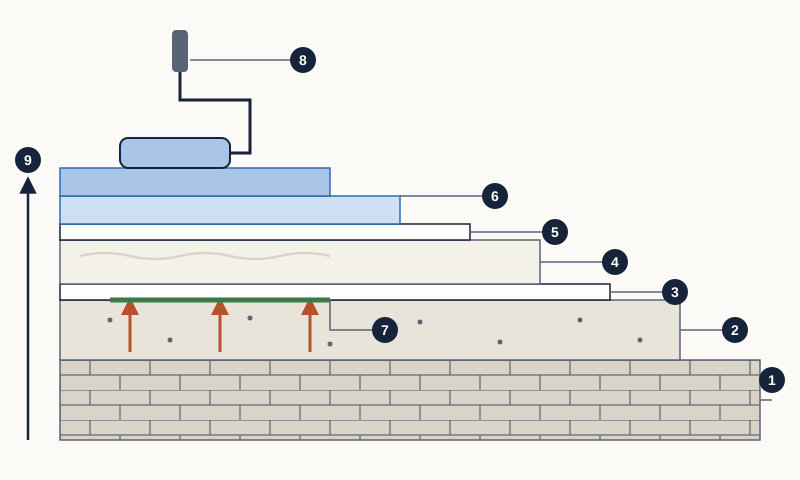
- Brick or concrete masonry
- Cement plaster: wet and alkaline when new, so it needs time to cure and dry
- First coat of alkali-resistant cement primer, sealing the porous plaster
- Putty to fill small holes and smooth the wall, sanded once dry
- Second coat of primer over the putty, then a light sanding
- Two finish coats of emulsion
- Moisture and alkali rising from the plaster are held back by the primer
- Roller applying the final finish coat
- Order of work: from the wall outwards, each layer after the previous one has dried
Step by step: repainting a room
- Make sure leaks are repaired, damp has dried and mould is cleaned off.[9]
- Clear the room and cover what remains with dust sheets.[6]
- Mask around switches and sockets. If you remove a cover plate, switch that circuit off at the breaker first.
- Scrape loose paint back to a firm edge.[7]
- Fill holes and cracks, let them dry and sand smooth.[6]
- Sand glossy areas dull, then wash off grease and dust and let the wall dry.[6]
- Prime bare plaster, patches and stains. Asian Paints quotes 3–4 hours between primer coats at 25 °C and 50% humidity; humid weather can slow this.[1]
- Mask edges and press the tape down firmly.[6]
- Paint the ceiling first. Cut in edges with a brush, then roll in sections about one metre wide while the edge is still wet.[5]
- Apply a second coat when the first is dry; many emulsions are designed for two.[4]
- Peel off the tape at an angle before the paint fully dries.[6]
- Keep the room ventilated, and never pour leftover paint down a drain.[1][10]
On a ceiling, start in a corner and work across, then down. Dulux recommends finishing each section by laying off: drawing an unloaded roller across it in one direction without pressure.[5]
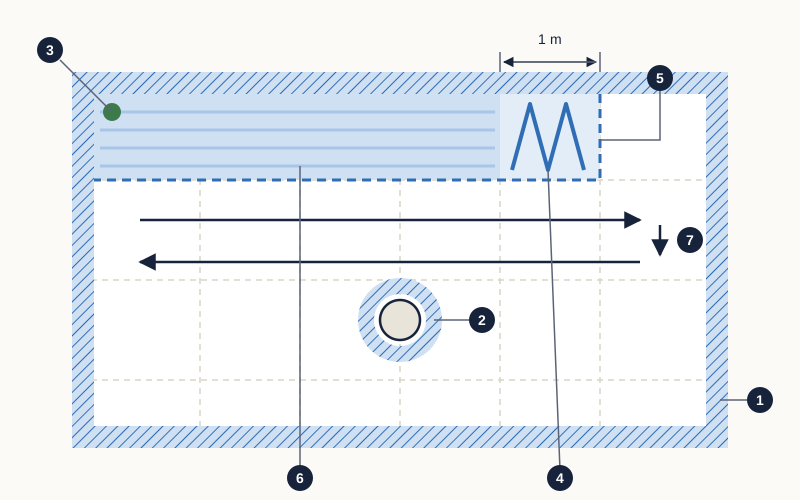
- Cut-in band brushed along the wall–ceiling edges
- Cut-in ring brushed around a light fitting
- Start in one corner
- A section of about one metre being rolled: spread the paint, then fill the section in
- Wet edge: blend the next section into it before it dries
- Finished sections, laid off in one direction with an unloaded roller and no pressure
- Order of work: across first, then down to the next row
Choosing paint for bathrooms, kitchens and ceilings
Paint makers sell finishes that resist mould on the dry film. Jotun describes its Fenomastic Hygiene emulsion as suited to humid kitchens and bathrooms,[4] and Dulux sells mould-resistant kitchen-and-bathroom wall and ceiling paints.[5][8] Paint cannot replace ventilation: without a working exhaust fan or window, mould returns. Asian Paints advises washing fungal growth off painted surfaces about every six months.[1]
- Bedrooms and living rooms: standard emulsion; matt or low sheen hides small flaws.
- Kitchens: a washable emulsion with some sheen, easier to wipe clean.
- Bathrooms and their ceilings: a mould-resistant emulsion.[4]
Ventilation, VOCs and ladder safety
Paints release volatile organic compounds (VOCs), solvents that evaporate as paint dries. EPA says indoor levels can be very high during use and can linger afterwards, causing eye, nose and throat irritation, headaches or nausea. It advises plenty of fresh air, following label precautions, buying only what you need and using methylene chloride paint strippers only outdoors or with good ventilation.[10] Keep children and people with asthma out of freshly painted rooms.
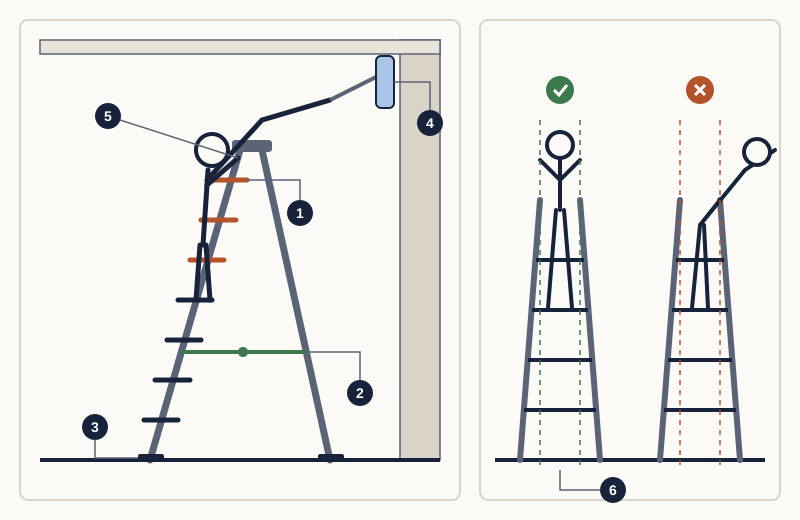
- Do not stand on the top three steps unless there is a proper handhold
- Locking bar or spreader fully open and engaged
- All four feet on firm, level floor
- Face the work and keep the roller within easy reach
- Hold the ladder with one hand: two feet and one hand make three points of contact
- Keep your body between the stiles; move the ladder rather than leaning out
Common mistakes and troubleshooting
- Painting over a stain before the leak is fixed.[7]
- Painting over mould instead of removing it.[9]
- Applying putty over old emulsion without checking the data sheet; some cement-based putties are not recommended there.[2]
- Touching up part of a ceiling, or letting the edge dry between sections.[5]
- Shutting the room to keep dust out, so solvent vapours build up.[10]
If new paint blisters within weeks, scrape a small area. Damp plaster or salt crystals behind it point to moisture; dust or grease points to poor preparation. Either way, remove the failed paint, cure the cause and start again.[7]
Do it yourself or call a professional?
| Job | DIY? | Call a professional when |
|---|---|---|
| Repainting sound, dry walls | Yes | You want a flawless finish on a large area |
| Small mould patch in a bathroom | Yes, after fixing ventilation | It covers more than about 1 m² or keeps returning[9] |
| Ceiling stain from the flat above | Only after the leak is fixed | The source is unclear or in a shared pipe |
| Sanding old paint of unknown age | Not recommended | Children live there or lead is possible[11] |
| High ceilings, stairwells, outside walls | No | Always; this needs a platform, scaffold or contractor |
What drives the cost of repainting
We could not find reliable published repainting prices for Bangladesh, so we give no figures. The cost depends on area and height (ceilings and stairwells take longer), the condition of the walls (scraping and putty can take longer than painting), damp repairs that must come first, the number of primer, putty and finish coats, the grade of paint, and how much furniture must be protected. Get written quotes from at least two painters listing the preparation, products and coats; see getting and comparing repair quotes.
Prevention: keeping new paint in good condition
- After heavy rain: look for new stains or bubbling on ceilings and outer walls.
- Monthly: run bathroom and kitchen exhaust fans during and after use.
- Monthly: wipe grease and splashes off kitchen walls.
- Every six months: wash mould or algae off painted surfaces in damp rooms.[1]
- Before the monsoon: ask the flat above about leaks and the committee about roof repairs.
- Keep a small, labelled, tightly closed tin of each colour out of children's reach.[10]
- Fix new leaks at once and dry wet areas within 24–48 hours.[9]
Next steps
- Walk round each room with a torch and note stains, peeling, mould and cracks.
- Fix leaks and damp first, and wait until the surfaces are dry.
- Decide what you will do yourself, and get written quotes for the rest.
- Buy the right primer, putty and paint for each room, plus a sound stepladder.
- Prepare thoroughly, then paint ceiling first and walls second, with windows open.
Common questions
- How long should I wait before painting new plaster?
- Follow the data sheet: Asian Paints recommends 28 days of curing,[1] and Berger at least two months of drying for best results, 15 days at the very least.[2] Allow longer in the monsoon.
- Can I paint straight over a water stain on the ceiling?
- Not until the leak is fixed and the ceiling is dry. Seal the stain with a stain-blocking primer first,[5] because paint on damp plaster peels.[7]
- Do I need primer if the wall is already painted?
- Not usually, if the old paint is sound and clean; wash and lightly sand it. Prime bare patches, and use an undercoat over a dark colour or a surface that has never been primed.[6]
- What is the best paint for a bathroom?
- A mould-resistant emulsion on a properly prepared, primed wall, with a working exhaust fan.[4] Without ventilation, any paint will grow mould.
Sources
The facts in this guide were checked against these sources.
- Decoprime Advanced Cement Primer - Water thinnable (product data sheet) — Asian Paints (published Version VN16/10/2015). accessed 18 October 2026.
- Berger All Purpose Putty White (product data sheet) — Berger Paints Bangladesh. accessed 18 October 2026.
- Best Interior & Masonry Primers for a Durable Finish in Bangladesh — Asian Paints Bangladesh. accessed 18 October 2026.
- Fenomastic Hygiene — Jotun Bangladesh. accessed 18 October 2026.
- How to paint ceilings — Dulux Australia. accessed 18 October 2026.
- Prepare interior surfaces — Dulux Australia. accessed 18 October 2026.
- Paint peeling — Dulux Australia. accessed 18 October 2026.
- Treat and prevent mould from walls, ceilings and windows — Dulux Australia. accessed 18 October 2026.
- A Brief Guide to Mold, Moisture and Your Home — US Environmental Protection Agency (published Last updated 18 February 2026). accessed 18 October 2026.
- Volatile Organic Compounds' Impact on Indoor Air Quality — US Environmental Protection Agency (published Last updated 23 June 2026). accessed 18 October 2026.
- Reduce the Risk of Lead Exposure at Home — US Environmental Protection Agency (published Last updated 5 October 2026). accessed 18 October 2026.
- Lead poisoning — World Health Organization (published 10 June 2026). accessed 18 October 2026.
- Assessing Lead in Paints in Bangladesh: Evidence for Policy Action and Market Transformation — Environment and Social Development Organization (ESDO) (published 28 March 2026). accessed 18 October 2026.
- Safe use of ladders and stepladders: Types of ladder and using them safely — UK Health and Safety Executive (published Updated 5 June 2024). accessed 18 October 2026.
This guide is general information. Have gas, structural and live electrical work done by a qualified, licensed professional. Your building’s rules and committee decisions take precedence over anything written here.
Written from the cited sources by the RUAP.NET editorial team. It has not been reviewed by a licensed engineer, plumber or electrician; for work on gas, structure or live electrics, use a qualified professional.
Spotted a mistake? Tell us — we check it, correct the guide and record the date of the correction. Report an error →